- REVIEWS
Camera Reviews 
More Reviews Mobile Reviews Photography Reviews - GALLERIES
- VIDEOS
- BUYER'S GUIDES
ACDSee Pro 3; Managing Your Workflow
 For the pro photographer, there are two possible scenarios in managing a photographic workflow. One is the scattershot method—snapping photos in hurried succession, dumping them off to a network drive, hoping you manage just enough metadata—such as ISO and shutter speed—to keep your sanity, and jumping right back into the next photo session or photo travel trip. The second approach features a clear organizational method; you know exactly where every photo is located, can track metatags right down to the GPS coordinates, and live a happy and fulfilled life.
Of course, most of us are somewhere between these two worlds. With ACDSee Pro 3 ($170), the new photo workflow tool for Windows with a Mac version in the works, it’s possible to move a bit closer to a better organizational structure, or at least know the picture you took last week in Yosemite has an ISO 3200 rating and the best lighting for that one fussy client. ACDSee Pro 3 adds some brand-new nondestructive editing features designed for improving, but not radically altering, photos. There’s also an Online mode where, instead of just uploading images to a third-party service, the company provides the ACDSee Online (www.acdseeonline.com) portal for storing and managing photos on the web.
Workflow Paradise?
ACDSee Pro 3 divides the photo workflow into four distinct sections, making the software unique in how clearly you can organize your business or keep track of your hobby.
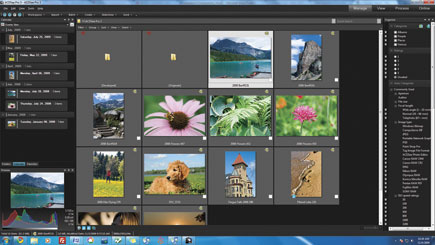
The Manage mode is where you can add keyword data to images, browse by keywords, and delete unwanted shots.
The View mode is for examining images up close and—for those who like to add tags up close for images—adding keyword data.
The Process mode is split into two sections. The nondestructive Develop mode is where you apply lens adjustments, change color and brightness attributes, and fix minor anomalies in a photo to create a new version automatically. There is also an editor for applying watermarks, adding borders, and making other corrections beyond the basic lens, exposure, and color settings.
The new Online mode is where you can upload images to the ACDSee Online site.
Because these sections are so clearly labeled, and follow such a well-established process of managing, viewing, processing, and uploading to the Online site, ACDSee Pro 3 is one of the better photo workflow apps we have tested.
Manage Mode
Managing photos in ACDSee Pro 3 is a breeze, and this is really the company’s claim to fame. ACDSee was one of the first photo management tools, long before Lightroom and Aperture.
 |
|
|
The main tweaks they have added to the new version are in the interface: there are new radio buttons for rating your photos, for example, and the keyword listings are more extensive. You can quickly filter by keyword by clicking any of them on the right pane, such as file size and focal length. This kind of photo exploration, especially with a very large volume of photos, provides some great benefits: you can see which images are horrendously large, or view only images with a 67mm focal length or more.
There’s also a handy calendar view. ACDSee Pro 3 quickly groups images by date for you and you can cycle back to previous months and specific shooting dates to see all images for that date.
 |
|
|
ACDSee provides a handy workspace manager. Here, you can tweak all of the palettes on screen, adjust the width of panes, and organize all of the management tools just the way you want. Then, by clicking the Workspaces drop-down menu, create a new workspace. That way, even if you continue to adjust the view for managing images, you can go back to that workspace at any time.
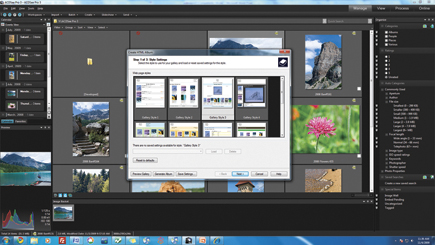
The Manage mode has a few choice extras that make ACDSee Pro 3 more powerful. For example, you can import images from a secondary storage location—such as an SD card or a USB thumb drive—and add keyword data on the fly to all imported images. This speeds up workflow when you really just need to get images off the camera and onto your PC. There are extensive batch processing tools for converting images, rotating them, adjusting exposure, and even converting ICC profiles (say, from an sRGB default color space to an Adobe RGB color space before you load images into Photoshop). Beyond these features, ACDSee Pro 3 goes several steps further with tools for creating a PDF contact sheet or a PowerPoint slide show of selected images, burning shots to a CD or DVD, and creating a complete HTML web page with images arranged exactly how you want them using a pro design.
 |
|
|
Because management and file uploads are so tightly linked, you can skip ahead in the workflow, bypassing the Viewing and Editing modes, and upload images. ACDSee Pro 3 adds an FTP upload feature with several tweaks. As with most of the ACDSee Pro 3 features for management, FTP uploading is not just a process of selecting images, configuring your FTP, and uploading; you can choose which destination folder to use and even re-size to a maximum horizontal or vertical pixel length. Another new feature is an upload wizard that supports Zenfolio.com, which is quickly becoming one of the most useful photo display, management, and POS photo sites on the web.
|
| |||||||||


![]()
Get the Latest Photo Tips, News & Reviews from Shutterbug!
| Camera Reviews Other Reviews | Mobile Reviews Photography Reviews Columns | News | Features | How-To | Resources |
 © 2026 Shutterbug
AVTech Media Americas Inc., USA
All rights reserved