- REVIEWS
Camera Reviews 
More Reviews Mobile Reviews Photography Reviews - GALLERIES
- VIDEOS
- BUYER'S GUIDES
Alien Skin Exposure X2 Software Review: Raw Processing, Image Organizing & Creative Effects
I’ve worked with all the popular film emulators and black-and-white conversion plug-ins, looking for the one that met my workflow and esthetic requirements. After countless hours, I’m still not fully convinced of their efficacy as such. Still, they are fun to use and do fill a niche. So far, I’ve found Alien Skin’s Exposure X2 does the most convincing job so that I feel comfortable enough within my own alien skin—see what I did there?—that I’ll continue to use it, so to speak.
Available for Mac or Windows, Exposure X2 comes to you as both standalone and plug-in. I first used it primarily with Adobe Lightroom CC, and briefly Photoshop, as a plug-in. However, for reasons outlined below, I found myself increasingly using Exposure X2 as a standalone app. I opted to work with processed TIFF files, taking advantage of Lightroom/ACR’s extensive Raw image processing.
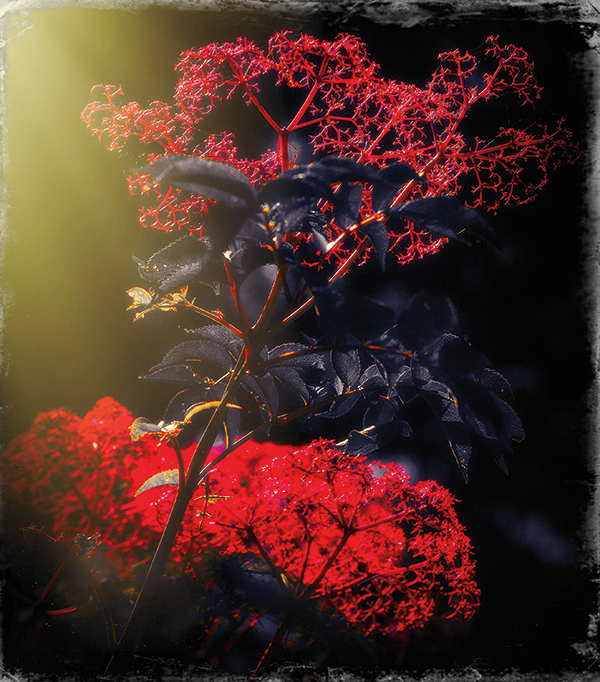
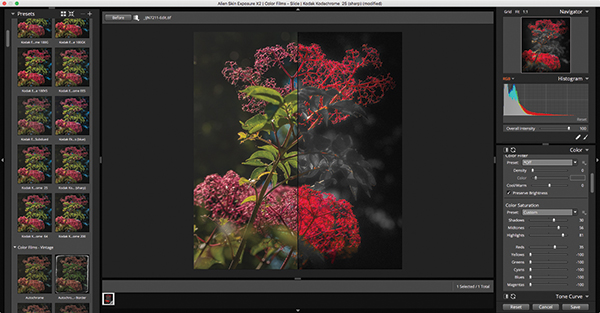
I selected the Kodak Kodachrome 25 color film emulation for its fine grain and good color saturation. But at the same time, I wanted to pump up the reds while downplaying all the other colors, so I desaturated all the others. I made further tonal adjustments before adding two overlays: a vintage border and a light effect (in tune with the rim lighting), both of which I modified.
Film Emulations
While starting this review, I approached Alien Skin with a basic question: What are your film emulations based on? Are they extrapolations or based on actual film tests? And, if actual tests, did you factor in such variables as alternate chemistries? The company provided the following response, which, on the face of it, appears adequate enough, if perhaps not with the depth I’d been looking for.
Alien Skin Software: “We created our film emulations in several different ways. If a film was available and we could find a lab to process it, we shot some rolls and used them to guide the preset design. We examined grain for some films under an electron microscope to make sure we got the structure and distribution right.
“With films that weren’t available for whatever reason, we found prints and used those to create the emulation. Also, for most films we consulted with photographers that had previously shot them. For alternate processes such as cross-processing we relied on prints and consultation with photographers.”
Just as I was about to finish writing this review, I posed one last question to Alien Skin, about film expiration dates. Their response: “Films that we shot and analyzed were all within their expiration dates.” That makes a huge difference, and is a step in the right direction.
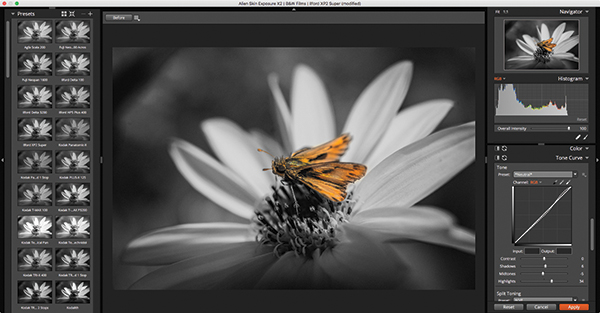
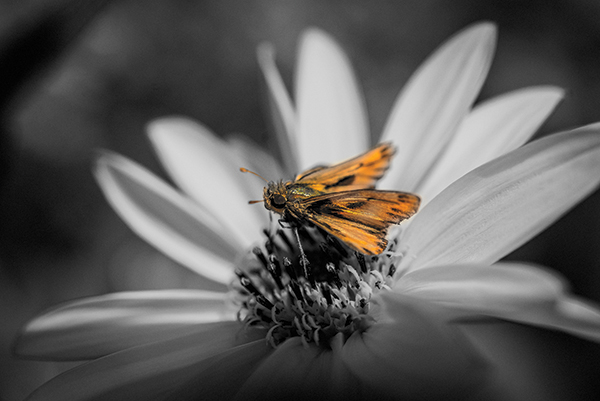
I chose this chromogenic black-and-white film more because it appeared to fit the tonal qualities of the image than for the film itself. I selectively brushed in the color on the skipper (butterfly). My technique is simple: use a heavy flow for large areas and a light flow (50 or less) for delicate areas, with feathering at between 50 and 100. The eraser brush restores color, while the regular brush cleans up around the edges, preventing color from bleeding into adjacent areas. Note that I even restored color to the antennae, which I felt was integral to the shot.
Plug-in or Standalone
You can use the standalone version of Exposure X2 for your Raw processing workflow from top to bottom, with some caveats. It offers a file ranking system, but lacks keywording, titling, and captioning. And you can’t watermark images. The export process is fairly comprehensive, so no worries there. One advantage to using the standalone version is that editing is nondestructive, so you can always return to the image from within the standalone app and continue to edit.
This version offers enhanced support for lens correction in Raw files. This feature is transparent to the end user, which means you don’t really know if the correct profile is applied. What’s more, after checking the list of supported lenses, I found that many of my lenses across Canon, Nikon, and Tamron product lines were not supported, and support for Tokina and Samyang, among others, is entirely absent. Also, lens correction extends only to distortion, not vignetting or chromatic aberration (the last of which is often critical toward achieving sharp images edge to edge). A simple workaround is this: generate a TIFF from your Raw file (using Lightroom or Photoshop) and work with that file in the standalone, or use the plug-in.
Without belaboring the point, as either standalone or plug-in, Exposure X2 offers a full range of editing controls, with pretty much the standard fare in its range of settings. It adds some effects you may find intriguing, such as bokeh, overlays, and infrared. I found the overlays a bit stylized, specifically borders and textures, and would have preferred more variety so you don’t find that you’re repeating yourself. Using simple variations on the same effect can get tired awfully fast.
That aside, I found myself getting very creative with Exposure X2. And I continually find I’m trying to step outside the box when using this software.
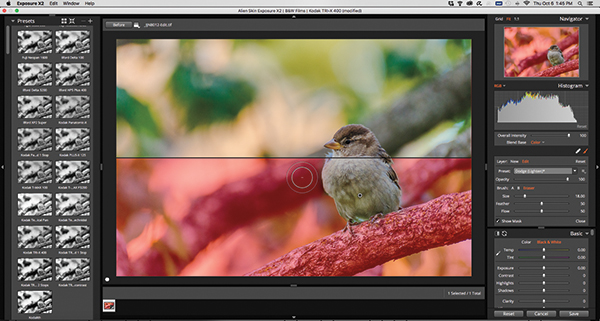
This split view shows the brush layer mask below in red. I used the eraser brush to restore color in the sparrow, carefully working around the protruding feathers. Note that when you restore color against a black-and-white backdrop (film emulation), you should set the Blend Base to “color,” with the brush in eraser mode.


For this noise-free ISO 100 capture, I wanted a film stock equally grain-free. After making tonal adjustments, notably to emphasize the structure and tall ship, while toning down a couple of the marker buoys, I added a vignette. One of the interesting things about the vignette effect is that it is not limited to familiar shapes: it can be more or less irregular, which here added a nice touch, giving the scene more depth. Location: Chicago.
Worth the Upgrade?
I’d say, yes, it’s definitely worth the upgrade. You can download a trial version and see for yourself on Alien Skin’s website, alienskin.com/exposure.
There are subtle improvements and very noticeable enhancements in this version. Aside from the already mentioned widened (but still limited) lens support when used as a Raw processor, you’ll find these new and expanded features:
Histogram. This was a major omission from previous versions, and I’m glad they finally added it. It features highlight, shadow, and mid-tone (brightness) regions that are user-controlled (slide them left or right with your mouse). That said, the histogram lacks separate white and black regions. It does, however, include highlight and shadow clipping indicators, which are reflected in the image. This made a big difference to my workflow.


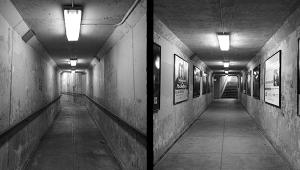
I wanted a bit of a grainier feel to this shot, so I chose a grainier film. I made some tonal adjustments to further emphasize the M.C. Escher-esque nature of these stairs at the Chicago Cultural Center. (Note the grain structure in the cropped detail.)
Enhanced Selection and Search. Under Edit, we now find a Select Matching option, to find images that match a specific parameter or attribute, such as ISO, rating, or lens, from inside a folder. The search engine has also been enhanced, giving you a broader range of search criteria. The difference is that the Matching option highlights applicable files, so you have to scroll through them—while continuing to display other files within that folder. The search calls up only matching files in that folder, which essentially makes for a speedier process, and you can enter specific search criteria, such as the numerical f/stop. A nice touch.
Faded Presets. Frankly, in my book, this new category is much ado about nothing. Still, you may find it useful. As a result of this addition, another category underwent a name change, namely the Color Fading category changed to Color Films – Aged.
Spot Healing Tool. This retouching tool is a welcome addition. It appears to work in a similar fashion to the Spot Removal tool in Lightroom, but not quite as well. Specifically, instead of borrowing from adjacent pixels, it seeks out similar pixels elsewhere in the frame and blends them, covering up any blemishes in the process. I found myself constantly having to move the target point to perfect the blend and protect the integrity of the image (for example, with the veins on a plant).
History Panel. This is another very welcome addition and is self-explanatory. All I want to add about this is, I use it regularly.
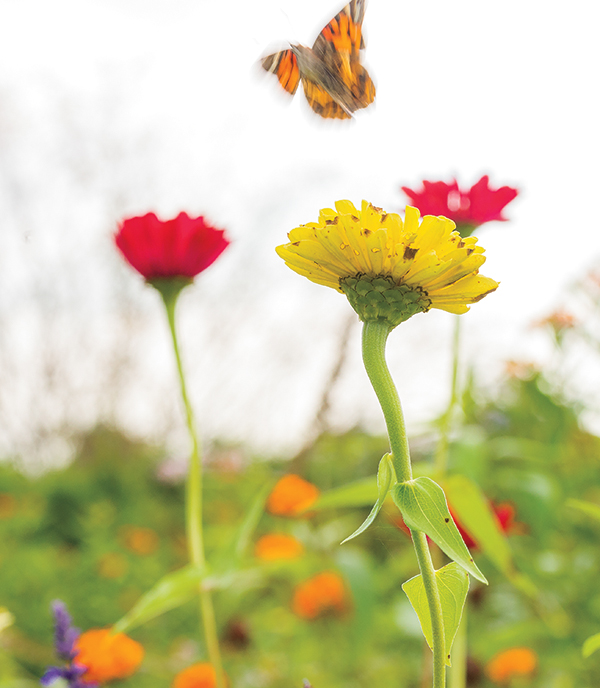
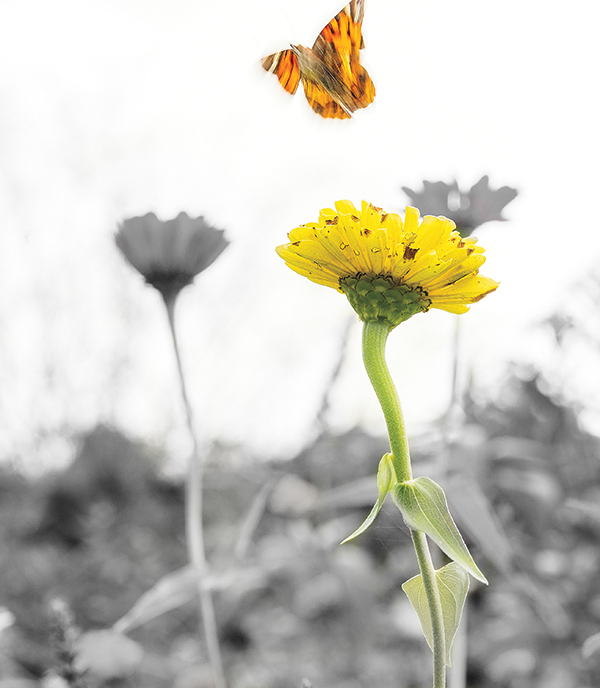
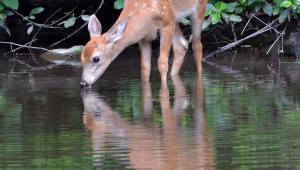
My usual approach is to convert to black and white, then selectively restore color. This time I chose to come at this the other way around, so I selected a color film, and desaturated the elements surrounding my key subjects. To do this, I had to create a Desaturate brush preset. Once I did that, I chose to use the existing Saturate brush preset as an additional layer to intensify the flower and butterfly (modifying the brush on the fly with added clarity and sharpness). I also used the healing and cloning tools to retouch out some spots on the green leaves. I should also note that I chose this Fuji film, recalling how Fuji was well known for its greens. Well, here they were simply too intense, so I had to tone them down considerably before using the Desaturate brush. (Note: You’re seeing the original Lightroom rendition in full color, not the Fuji film emulation.)
What’s Missing?
For starters, I’d like to see a comprehensive user manual for Exposure X2. Alien Skin continues to insist that video tutorials suffice. A well-indexed manual will relieve the frustrations I encountered. Pop-up wizards would also help, to explain various functions. There are pop-ups for the film emulation panel, but they appear slapdash, with some barely going beyond the title of the effect/emulation.
Beyond that, an app that focuses on film emulations should also emulate different papers. Some of these may not carry through when actually printing the images, but we often don’t go beyond the screen when sampling the results. So this would be a welcome addition.
Finally, Exposure X2 addresses push processing, but it overlooks pull processing. Whereas push processing adds contrast and grain, pull processing has the opposite effect, reducing both. We may not use it that often, but it would be nice to have the option.
Conclusion
Alien Skin’s Exposure X2 hasn’t quite become my go-to Raw processor just yet. On the other hand, its true strengths lie in its core functionalities as a film emulator and black-and-white converter. And even here, I use it more for the look and feel of film rather than trying to imitate a certain film from my analog days.
More to the point, I use Exposure X2 to give my images a definable quality and texture that will help them stand out. And especially when it comes to black-and-white conversions, I like the control Exposure X2 affords me. In fact, black and white was practically my entire focus when reviewing the software. Well, that and selectively restoring color in black-and-white images. And given the resurgence of black and white as a popular medium, this was definitely time well spent. However you look at it, there’s reason enough for anyone to choose and use Alien Skin’s Exposure X2 as part of their photography workflow.


![]()
Get the Latest Photo Tips, News & Reviews from Shutterbug!
| Camera Reviews Other Reviews | Mobile Reviews Photography Reviews Columns | News | Features | How-To | Resources |
 © 2025 Shutterbug
AVTech Media Americas Inc., USA
All rights reserved