- REVIEWS
Camera Reviews 
More Reviews Mobile Reviews Photography Reviews - GALLERIES
- VIDEOS
- BUYER'S GUIDES
Scanning For A Gallery Exhibition
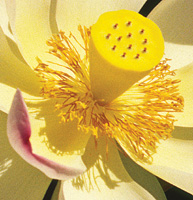
| The fast, streamlined Minolta DiMAGE Scan Elite 5400 scans 35mm film at a whopping 5400dpi with a 4.8 dynamic range, allowing you to make rich, finely detailed prints as large as 24x36" at 200dpi. Holders accommodate four mounted slides or film in strips of up to 6 frames. |
Scanning For A Gallery Exhibition
We Test The Minolta
DiMAGE Scan Elite 5400
by Howard Millard
Getting quality scans to make big enlargements from 35mm slides or negatives has always been a challenge. After trying a number of scanners currently on the market, I've found one that offers an exceptional array of features at a competitive price. The fact is, the Minolta DiMAGE Scan Elite 5400--which started shipping last fall--has set a new standard for 35mm desktop film scanners. First of all is its extreme optical resolution, 5400dpi. At the time of this writing, no other scanner in this class has surpassed 4300dpi, therefore it is clearly the best choice for high quality large prints. Next come the important considerations of scan speed, color reproduction, bit depth, shadow and highlight detail, and sharpness. The DiMAGE Scan Elite 5400 takes top marks in all of these areas. I'll show you how I've used it to make archival ink jet prints up to 24x36" for gallery exhibition and sale. Finally, not only does it deliver scans with full professional controls, it also includes software that makes it easy for beginners to achieve great scans.

|
|
|
Features And Functions
In its sleek, streamlined case, the 5400 takes up minimal space--2.6"
wide, 6.5" high, and 14.2" long--and weighs 5.5 lbs.
A textured silver front panel presents four control knobs and a self-closing
compartment for film holders, a great feature to keep dust and contaminants
out of the scanner's interior.
Furnished with the scanner are two film holders with hinged covers: one
handles film strips of up to six frames, while the second accommodates
up to four mounted slides, with the option of removing and inserting single
mounted slides when the holder is fully inserted, without having to eject
the holder from the scanner. The holders are designed so that 100 percent
of the film frame can be captured. For maximum throughput and connectivity
for both Windows and Mac platforms, the 5400 comes with both FireWire
(IEEE1394) and USB 2.0 interfaces and cables. It is also USB 1.1 compatible.
Furthermore, the 5400 ships with comprehensive software and excellent
printed manuals. If you are already knowledgeable about scanning, you
can use the option to scan from within Adobe Photoshop, Elements, or other
compatible programs. If you're new to scanning, Minolta's
"Easy Scan Utility" stand-alone software really simplifies
things. Launch the utility, and the Easy Scan Wizard guides you through
all the steps of scanning with diagrams showing how to load the film holders,
select film type from four buttons: color negative, black and white negative,
color positive (slide), black and white positive (such as Agfa Scala);
make an index scan of thumbnails to choose from, select the frame(s) to
scan, adjust and enhance the image(s), and finally select the type of
use--such as to print at various sizes, attach to an e-mail, display
on a large or small monitor, paste on a web page, and more. Once you've
saved the scan to your hard drive, you can then open it with any
image-editing program.
 |
|
|
Quick Cleanup And Setup
To help get the best quality, even from damaged or poorly exposed film,
bundled software includes Digital ICE for the removal of dust, scratches,
fingerprints, and other imperfections. Pixel Polish works to restore rich
color to faded images, enhance low contrast pictures and improve other
problem photos. To control and minimize grain, Grain Dissolver is included.
The Quick Scan function initializes the scanner and software at the press
of a button. You can select from the standard DiMAGE Scan Utility, the
Easy Scan Utility, or the Batch Scan Utility as well as set up a shortcut
to a specific application. Batch scanning allows you to scan two or more
frames when you are not changing the individual settings for each image.
(For example, for a group of pictures all taken in the same lighting).
By simply pressing the Scan button on the 5400's front panel, you
can activate the utility for each batch of film, to scan up to six frames
of a strip of film or four mounted slides.
RAM Needed
If you are scanning at high resolution, though, be sure that you have
enough RAM and/or hard drive space to accommodate the large file sizes.
For my largest gallery prints, I scan at the maximum 5400dpi with a resulting
file size of about 100MB per image. (If you are an advanced scanner and
work in the 16-bit mode, this size is doubled.) From the 100MB 8-bit files,
I can make a 16x24" print at 300dpi, or a dramatic 24x36"
print at 200dpi. Remember, as the print size gets larger, the normal viewing
distance is larger, too. Most people would be hard pressed to see much
difference between a 300dpi and a 200dpi print from a quality ink jet
printer. I print with archival inks on Epson Ultrasmooth Fine Art Paper
on the Epson 2200 and 7600 ink jet printers.
|
|
|
Lots Of Depth
Minolta states that the dynamic range of the 5400--the scale of light
to dark tones which it can capture--is a dramatic 4.8. To best reproduce
the rich variations in tone and color of a film original, the 5400 utilizes
16-bit A/D (Analog to Digital) conversion. With this high bit depth, the
scanner is able to distinguish 65,536 tonal gradations for each red, green,
and blue color channel--capturing subtle highlight and shadow detail
as recorded on the film. Additionally, to retrieve the maximum detail,
even from dark and underexposed slides, the 5400 offers multi-sample scanning
options. With this feature, you can select to sample your film 2, 4, 8,
or 16 times to bring out information and minimize noise in dark areas.
Multi-sampling, though, does increase total scan time significantly. For
normal, well-exposed photos, the default single sample works extremely
well.
Speedy Work
On the subject of speed, this is definitely the fastest scanner in its
class that I have tested, especially considering that the 5400 is delivering
larger files than the competition. In tests conducted by Minolta on both
platforms, the index (thumbnail) scans take 16 seconds or less, a pre-scan
takes 10 to 12 seconds, and a full 117MB final scan takes 69 seconds or
less. These times are similar to those I get on my Mac G4 dual processor
450. Test times are for full frame slides (negatives take a bit longer),
scanned at 5400dpi, 8-bit, with image compensation functions turned off--in
other words, for a normal, well-exposed slide. Other scanners I've
tested took four to even seven minutes to perform similar functions at
4000-4300dpi. The 5400 is a great time saver and productivity booster
for me and anyone who does a lot of scanning, or who just doesn't
want to wait five minutes for each scan.
Focus Controls
For critical control over image sharpness, the 5400 can be manually focused.
A large manual focus dial on the front panel allows fine adjustments to
be made. In scanning scores of slides, though, I found that the automated
software focus worked perfectly. However, if you are scanning slides in
unusual mounts or with curved film, it's good to know that you have
this option. Furthermore, by selecting Point AF, you can use your mouse
to choose the location point in your image where the software autofocuses.
While the autofocus default is at the center of the image, for some subjects
another area of the film may have better contrast.
Scanning For BIG Prints
Here's a quick overview of how I scan color slides to make large
format ink jet prints. First, be sure your film is clean--use compressed
air and/or film cleaner. This can save lots of time and trouble later.
Next, load the slides (or filmstrip) into the spring-tensioned holder.
I then open Adobe Photoshop 7 (you can also work with Elements 2) and
choose File>Import>DiMAGE Scan Plug-in. This initializes the scanner
(with a soft whirring noise) and opens the scanning software. Once the
green lamp on the scanner stops blinking, all is ready and you can insert
the film holder.
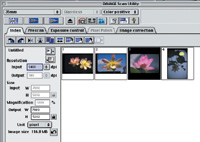
Onscreen, you see the DiMAGE Scan Utility. At the top right of the screen,
you select the film type, in this case "color positive." Now
look at the second row in this dialog box. From the left, click the arrow
in front of a grid to do an index scan of all the frames in the holder--here
you see four lotus flower photos. From these, you then choose which to
work with by clicking on its thumbnail, which highlights it in black,
(see thumbnail 3).
Next, click on the striped arrow to do a pre-scan, which opens in the
large window where the thumbnails were. Use this preview to crop and decide
if other adjustments are necessary. Once you've cropped the pre-scan,
set the input resolution on the left. I set it to the max, 5400dpi, in
order to make the largest possible print. If you know you'll only
be printing a snapshot for example, or an 8x10, it's a good idea
to set a lower resolution to save time and hard disk space. In the dialog
box, note that on the bottom left, you'll see the final scan file
size for the resolution you've selected, "Image size 116.8MB."
|
|
|
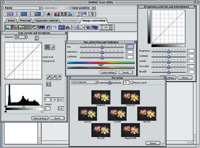
Advanced Options
For advanced users, the tabs in the Scan Utility software offer "Exposure
control" histograms with sliders for each of the RGB channels, and
under Image correction a multitude of controls including curves and histograms
for each of the RGB channels, Hue, Saturation, and Lightness sliders,
a color Variations option, Brightness, contrast, and color balance sliders
and more. For normal, well-exposed film, you'll rarely need any
of these, but it's good to have them when you need them.
After making any adjustments, click on the third and last solid arrow
to make the final scan. This takes about a minute or so, then the scanned
photo opens in Photoshop, 16x24" at an impressive 300dpi. If you
have a scratched or other problem original, the buttons on the right half
of the second row of the dialog box offer Digital ICE, Grain Dissolver,
and Pixel Polish.
Archive Those Images
Because of the large file sizes, I archive the final corrected scans on
CD or DVD to keep plenty of space free on my hard drives. For archiving,
I use Roxio Toast 5 and 6 software, burning onto Verbatim Data Life Plus
media with a La Cie d2 4x DVD/CD writer.
The scans I got using the default settings were outstanding. In scanning
over 20 images at 5400dpi, I rarely had to make even minor level adjustments.
The only frame I had to sharpen was one that had been shot in low light
and had motion blur on the film. For this, I use Filter>Sharpen>Unsharp
mask. In general, I prefer to adjust only exposure and contrast (via curves)
in the scanning software. Any further correction or manipulation is done
in Photoshop.
The DiMAGE 5400 is a professional quality scanner that can save you lots
of time yet is easy to use for photographers new to scanning, while offering
sophisticated controls for experienced users. At press time, the street
price was under $900.
Contact
Minolta Corporation
201-825-4000
www.dimage.minolta.com


![]()
Get the Latest Photo Tips, News & Reviews from Shutterbug!
| Camera Reviews Other Reviews | Mobile Reviews Photography Reviews Columns | News | Features | How-To | Resources |
 © 2025 Shutterbug
AVTech Media Americas Inc., USA
All rights reserved