- REVIEWS
Camera Reviews 
More Reviews Mobile Reviews Photography Reviews - GALLERIES
- VIDEOS
- BUYER'S GUIDES
Window Light: Classic Illumination, Proper Exposure
On the other hand, direct sunlight that enters through a window is usually just as uncomplimentary and unflattering as direct sunlight is when it is used in the middle of the day outdoors. It is harsh, contrasty, and usually unflattering to the subject.
Diffused Light
One of the main underlying precepts in photography that governs how we take pictures is the ability—or lack of ability—of film or digital sensors to record detail in the highlights and shadows. Our eye-brain combination can see incredible subtlety in those areas, but the technology we use to record images is limited. Darkroom techniques that Ansel Adams developed and his innovative Zone System expanded the ability of a photographer to reveal detail in black and white imagery, but when people started shooting color slides we were limited to approximately a five f/stop range. Color slide photographers knew that we had to expose for the highlights and accept the shadows going dark because the alternative—exposing correctly for the shadows and allowing the highlights to become overexposed—would destroy the image. This is particularly true for high contrast situations like landscapes taken at noon on a sunny day or a person standing in front of a bright window.
As the contrast of a scene is lowered (such as when the sky is overcast or multiple softboxes are used in the studio to even out the light and to fill in all the shadows), it becomes easier for digital technology to expose correctly for both shadows and highlights in a single image. The resulting photographs actually look more like what we see with our eyes.
Diffused window light gives us this type of illumination where contrast is held to a minimum. Photo (#1) was taken next to a large French door, and you can see how low in contrast the lighting is. There are no harsh shadows on the face or highlights bordering on overexpose that detract from the portrait. Many tools of the trade that studio photographers use to control light simulate window lighting simply because it’s so flattering to the subjects. I could have used a reflector to even out the light, but I wanted this portrait to have some dimension. Shadows are fine as long as they don’t detract from the subject.

All Photos © 2010, Jim Zuckerman, All Rights Reserved
Exposure Issues
Assuming you are shooting with diffused light coming through the window, the exposure considerations are challenging and you have to make some hard choices. The light level is less than when shooting in sunlight, and as the light enters the window and floods the room, it is reduced even more. The further the subject is from the window, the Inverse Square Law kicks in and the light level falls off four times as it travels twice the distance. Photo (#2) was taken in a very dark room in India. The only illumination came from a window and the fire, and getting a proper exposure while still using a fast enough shutter speed was a problem.

In order to get sharp pictures you have to:
• Increase the ISO and/or
• Open the lens aperture and/or
• Use a tripod.
Increasing the ISO is fine up to a point but you don’t want excessive digital noise and a degradation of the image. Some of the high-end cameras like the Nikon D3, D3x and the Canon 5D Mark II enable photographers to use high ISO settings without significantly degrading the images. Most cameras at this time, however, produce images with too much noise when you shoot above ISO 400. Therefore, while increasing the ISO can solve the problem of low light, it is not an ideal solution.
If you open the lens aperture to gather more light, you lose depth of field. This may be fine is some situations, but if you are shooting two people, for example, who happen to be on slightly different planes of focus, a large aperture will mean that only one of the subjects will be sharp. This isn’t a good idea. If you are shooting only one subject and you don’t have a tripod, then a large lens aperture is your best option. In this case you may not have as much depth of field as you want, but the picture will be sharp. Photo (#3) shows what I’m talking about. The face of this artist I photographed in Turkey is sharp but his arm is out of focus. I had raised the ISO to 500 and the shutter speed was as low as I dared – 1⁄80th with a medium telephoto lens. The aperture was wide open at f/2.8.
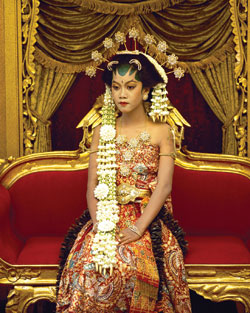
Raising the ISO and opening up the lens to let in more light are both designed to prevent the shutter speed from becoming too slow. Even if you are using a tripod, a long exposure can be problematic simply because a person can’t remain perfectly still. During a 1⁄8th sec exposure, for example, there could be just enough movement to make the image less than perfectly sharp. The only time I will risk this is if the subject is either seated or leaning against something solid. The Javanese Bride in photo (#4) was taken with a shutter speed of 1⁄15th of a second, and I asked her to hold her breath as I used a cable release to take the shot. The lighting was coming from a skylight in the ceiling.
Using a tripod is the best approach to doing portraiture by window light. If your shutter speeds must be slow, it will give you the best chance for sharp pictures. If you have sufficient light, a tripod enables you to use small lens apertures for increased depth of field and at the same time you can hold the ISO down to a reasonable number.
The Background
Window light photography doesn’t imply that the window itself is included in the picture. It can be included, but usually it isn’t part of the composition. I only consider including a window if it adds to the artistry of the image. For example, in photo (#5) I included the window because it was from a 16th century palace and it worked beautifully with the period costume of the model. Backgrounds that are lighter than the subject are often distracting because they compete for attention (our eye is naturally drawn to the lightest areas of picture first and it returns again and again instead of completely focusing on the subject), but in this context the medieval design is part of the subject so, at least to me, it makes sense. If this had been a simple modern window, I never would have shown it in the composition. In a similar fashion, I made the distant window part of the composition in photo (#6). The model is illuminated by the light from a window out of sight on the left, and I thought the lacy curtains and the medieval ambiance added to the intrigue of the portrait.


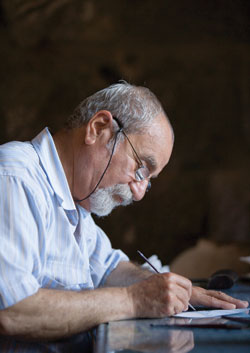
An example of light areas behind a subject that are distracting can be seen in photo (#7). The daylight entering the old shed in the background draws the eye away from the subject. In this case, there was nothing I could do but rely on Photoshop in post-processing to clone those areas out. Notice the lighting on the man’s face, though. The diffused side light is complementary and flattering.

When photographing people, you can never go wrong with using black as a background. The little girl dressed for Halloween (#8), was photographed next to a sliding glass door leading to a patio outside. I hung a piece of black velvet behind her, and the only light source was the diffused daylight. I use velvet because the fabric absorbs light better than other material. Black paper made to be used in photo studios isn’t good because it will reflect a certain amount of light, and instead of getting a nice, rich black the background will be dark gray.

Backgrounds are virtually as important as subjects in making a picture work. If they are messy and there is a lot going on, the elements behind the subject pull at our attention and cause a distraction. That’s why I like black backgrounds. However, other muted and monochromatic colors can work as well. For example, the woman in photo (#9) was photographed in a breezeway in India. Notice the complementary background color; the earth tones are unobtrusive and give us nothing else to look at but the subject. The soft and flattering lighting on her face was coming from an opening to the outside on her right. This picture was taken at midday and the sky was clear. The lighting outside was hopelessly contrasty and harsh, but shaded by the architecture the woman’s face was lit by subtle side lighting. The effect was just like window lighting because, in essence, the large opening to the outside was an archway.


![]()
Get the Latest Photo Tips, News & Reviews from Shutterbug!
| Camera Reviews Other Reviews | Mobile Reviews Photography Reviews Columns | News | Features | How-To | Resources |
 © 2025 Shutterbug
AVTech Media Americas Inc., USA
All rights reserved