Wedding & Portraiture
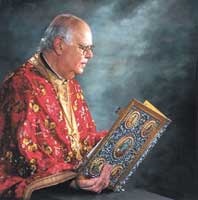
I Wish I'd Known More About Lenses Years Ago

Photo 1.
Photos © 1999, Monte Zucker, All Rights Reserved

I used a fixed-lens camera for many, many years--even after I'd become a professional photographer. Then, someone told me that I could never be a professional until I had a camera on which you could change lenses. I remember being glad that my clients didn't know that. But the conversation did intrigue me, so I looked into it.

I still have lots to learn about the technical side of the many lenses that exist, but I figured out something a while back that I'd like to share with you. Wide angle lenses aren't just for when you can't squeeze everything into your picture. Telephoto lenses aren't just for when you need to get closer to your subject. There's another characteristic of lenses that I consider one of the most important aspects of them, and a great reason to have a camera on which you can change the lenses.

Photo 2.

In the simplest of terms, I use varying focal lengths on my Hasselblad camera to help me include what I want behind my subjects. Telephoto lenses help me contain the backgrounds to what's just behind my subjects. Wide angle lenses allow me to show lots of background behind them. Let's look at some of my recent images and see how that works.

The portrait of Rev. Fr. F. Kirlangitis, for instance, (Photo 1) was made during a recent class at the St. Barbara Church, Sarasota, Florida. When I work in front of a painted background I have to contain the angle of view to just the 6' wide surface behind the subject. A 150mm lens is most appropriate for almost all of the portraits that I make like this.

Photo 3.

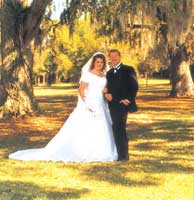
Occasionally, however, I'm working in a more cramped area than usual. In cases such as these I switch to a 120mm lens. I can create portraits without distortion--even groups of up to five or six people against a background like this.

Outside the church (Photo 2) I wanted to show its beautiful, sprawling architecture. At the same time, I wanted to feature the bride and groom in front it. Rather than pose them close to the church and have them "lost" in the background, I put a 40mm wide angle lens on my camera and brought them up close to the lens. They're standing a mere 6' away from me. The church, on the other hand, was as far back from them as I could get without posing them on the driveway and including it in the foreground.

Photo 4.

The exposure was based on the brightly lit gold dome far behind them. I kept the bride and groom in the same strong sunlight, split-lighting their faces. I used two Quantum flashes to light them. One was my main light close to the right side of my camera. It wrapped the light around from the left side of their faces onto the shadowed side. A second flash was behind the bride, backlighting her veil. Both of them were at full power, matching the brightness of the sun.

For Photo 3 I came underneath the covered area of the front of the church and used the depth of the repeating arches for the background. My 150mm lens seemed to bring the space between the arches closer together, while at the same time it confined the field of view to just within the arches.

Photo 5.

The light in this area was diffused by the covered area all around them. There was enough light there to take the picture without any additional lighting from me, but in cases like this I like to expose for the ambient light and come in with a bare-bulb flash close to the camera. The flash is two f/stops less than the ambient light and completely ignored when figuring the exposure. My flashes are always triggered by Quantum Radio Control Slave units.

Inside the sanctuary of the church (Photo 4) there is bright, diffused light coming in on both sides from large windows. There is an overhead skylight that brings in a lot of light, too. The church is so intricately and ornately decorated that to place the bride and groom close to the background would be a disaster. It would be hard to find them among such beautiful and meaningful religious artifacts.

Photo 6.

As I did outside, I used a 40mm lens to include as much of the background that I could from the rear of the church, keeping the bride and groom only a few feet from the camera. I exposed for the background and matched a bare-bulb flash, camera right, to the f/stop of the light in the background. Of course, there was another flash behind the couple lighting her veil. Finally, I positioned the camera so that the bright area of sunlight on the wall far in the background would be between the two faces.

Backgrounds are everywhere. You just need to look for them--and know what you're looking for. Outside, I first look for a light background with a lot of depth. Photo 5 is a great example of a perfect background for me. It has tremendous depth and has sunlight falling onto it. I don't want my backgrounds to go dark.

Photo 7.

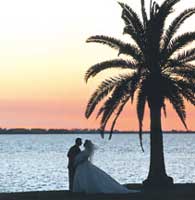
To take advantage of this outdoor setting I narrowed the field of vision down with my 150mm lens again and positioned the couple against a bright, contrasting part of the background. I exposed for the lightly shaded area in which they were standing and once more used a bare bulb two f/stops under the ambient light. Yes, there's another flash behind them to backlight her veil.

The large f/stop of the lens kept the focus to just the bride and groom--exactly as I had intended. By changing the f/stop of each lens you can keep the focus to just the people or to the entire scene.

Photo 6, for instance, needed to have a stopped-down lens for the bright sun on the background and for my desire to have the scene behind them a sharp, intricate part of the portrait. Choosing the building behind them for the background, I first tried my 40mm lens. It showed the whole parking lot to my right. A 60mm lens was perfect for me here. It included just as much of the scene as I wanted. Again, I was close to my subjects, so that they would dominate the scene. I was careful to pose them against a simple part of the background, of course.

Photo 8.

Notice that when there is bright sunlight in the scene and I want to keep detail throughout the picture, I make certain that my subjects, too, are in bright sunshine. The exposure, then will be in good balance. Split-lighting the faces with direct sunshine is such an easy way to accomplish this type of lighting. Then, add a strong flash from the same side as the sunlight, but closer to the front of the faces. Always backlight, matching the f/stop coming through the veil.

Once in a while, I use an 80mm lens. I know that this is supposed to be the "normal" lens for a 21/4 camera, but I use this lens less frequently than any of my others. Here, for Photo 7, the lens seemed to include exactly what I wanted around and behind the bride. Lighting was just as in the previous pictures. That is, split-lighting from the ambient light, a bare-bulb flash two f/stops less coming from camera left--and a flash in the room behind her to add depth and backlight her veil.

Photo 9.

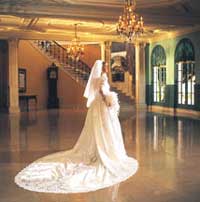
Now, study Photo 8. Why did I use a 40mm lens? To include as much of the room behind her as I could get into my viewfinder, of course. I exposed for the ambient light in the background and matched the other areas with three flashes. One was coming down the staircase all the way far behind her to show detail there. The second flash lit her profile and the third was where? Backlighting her veil, of course.

When I find a lens and a lighting technique that works for me, I use it whenever I come across a similar situation. Why not? It's the only thing that makes sense. Why bother with experimenting all the time? Profit from past experience. Hopefully, you can profit from mine, too.

The last two photographs of this series, Photos 9 and 10 were made with all natural light. Can you pick the lenses without my telling you? Maybe.

Photo 10.

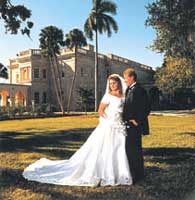
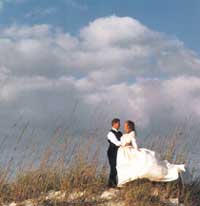
The couple on the top of the mountain (actually only 3' above sea level) were photographed with my 150mm lens. I wanted to place them against the open sky. I didn't want a lot of distraction around them, behind them, or anywhere. The lens was perfect for this moment.

The silhouette of the couple in Photo 10 was made with--I'll surprise you here--my 350mm lens. I was almost a block away from them. He had a walkie-talkie on his belt, so that I could give them directions from that far away. Not a bad idea, huh?

But just look at the way that telephoto lens zoomed right in on them and how it brought all those layers of depth together. It just wouldn't have worked nearly as effectively with a shorter lens.

Of course, your choice of lenses depends on what your pocketbook can afford. Just thought I'd give you, perhaps, a different point of view. Select the amount of background that you want to show and use the lens that will accomplish that for you. Couldn't be simpler, could it?

Now, all you have to do is to be able to afford the lenses. Hey, there are bargains to be had out there. I do have my favorite sources for equipment, new and used. You can find out more about them by checking out my web site, www.montezucker.com. Hope you'll visit me there and learn more about lenses, lighting, and loving (at least in pictures, that is).

X