- REVIEWS
Camera Reviews 
More Reviews Mobile Reviews Photography Reviews - GALLERIES
- VIDEOS
- BUYER'S GUIDES
The Tip Off
Patience Has Its Rewards
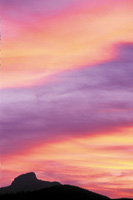
This scene was the last of a very long and exciting photography workshop that I conducted in North Carolina. We were all pretty tired and a bit anxious to get home. We found the sky interesting at Table Rock and decided to work this as our final scene. Image #1 was made as the sun was setting, but not below the horizon. I added a 10cc magenta filter to pump up the blue sky and add some color to the clouds. I figured that was about the best we would get. After sundown, things looked pretty much gone and it began to get dark. As a few others and I began to pack up, one of the students (John) remained set up and was patiently waiting. I felt he was being optimistic, but didn't say anything. As darkness moved in, John said, "Here it comes!" I turned and saw the afterglow beginning. Needless to say, those of us who packed up made a mad dash to reset up tripods and cameras. These afterglows only last a few minutes at best. On #2, the scene began to become reddish, so I added a Tiffen 812 filter, which is a slight red intensifier. On #3, with the color at its most intense, right before it started to fade, the red became vibrant, accentuating the purple color band in the middle. At this time, I switched to a Singh Ray red intensifier, which rendered the final image in the set as the most dramatic. The scene went dark in just a minute or less. |
|||
With the above in mind, here
are some basic guidelines for sunrise/sunset situations: |
|||
Sunrise #1: The first is at dawn, before the fireball, when the horizon can become blood red and then begins to brighten, illuminating clouds. Sunrise #2: The second sunrise is the fireball. Depending on how fast the sun begins to flare your lens, you can photograph the fireball as it comes up over water or behind a silhouetted subject, then turn around to see how the sun is lighting things. It should be a warm, golden tone for a minute or two, although the absolute best quality of light will occur in the first 30 sec or less. Sunset #1: As the sun sets, it will get more diffused as it enters into the horizon. This is also when flare will begin to disappear. At this time, one can safely place a subject in front of the fireball. Sunset #2: An example is #3. The sun sets behind the mountain and things go dark for a few minutes; then, if there are clouds they pick up the color of the afterglow and color changes like on a bell curve, from nothing to blazing red to nothing. All images shot with the Nikon F4 and 80-200mm f/2.8 lens and scanned for submission using the Nikon Super CoolScan 4000 ED. |


![]()
Get the Latest Photo Tips, News & Reviews from Shutterbug!
| Camera Reviews Other Reviews | Mobile Reviews Photography Reviews Columns | News | Features | How-To | Resources |
 © 2026 Shutterbug
AVTech Media Americas Inc., USA
All rights reserved