- REVIEWS
Camera Reviews 
More Reviews Mobile Reviews Photography Reviews - GALLERIES
- VIDEOS
- BUYER'S GUIDES
Sunbounce Sun-Swatter Pro: Harsh Light, Be Gone!
I am a dyed-in-the-wool natural light shooter. Outdoor portraits are my specialty and 95 percent of my outdoor portraits are taken with nothing but daylight. Yet, unlike other photographers I know, I actually prefer shooting on sunny days, and my studio schedules all day, so there is no waiting for the “golden hour” to get soft, directional light.
All Photos © Steve Bedell
After many years of doing this, I prefer the color and energy of sunlight and being able to use natural reflectors such as buildings and sidewalks to shape light. And, since I like sunny day shooting and prefer the look of natural light, my options are usually limited to either finding the light, blocking the light (subtractive lighting), or adding light using reflectors (additive lighting). But there’s also an alternative. For years, Hollywood has been using huge translucent fabrics to not block light but to diffuse and soften it. Known as scrims, they work with the same principle as using a softbox on your flash, yet their purpose here is to soften direct sunlight and yield all its wonderful qualities without its occasional harshness.
To check it out I recently worked with a product known as the Sun-Swatter Pro made by Sunbounce. The folks at Sunbounce seem to have a particular fondness for sunlight, like me, and they make a wide variety of products to deal with just about any lighting situation that may arise.
Kit And Setup
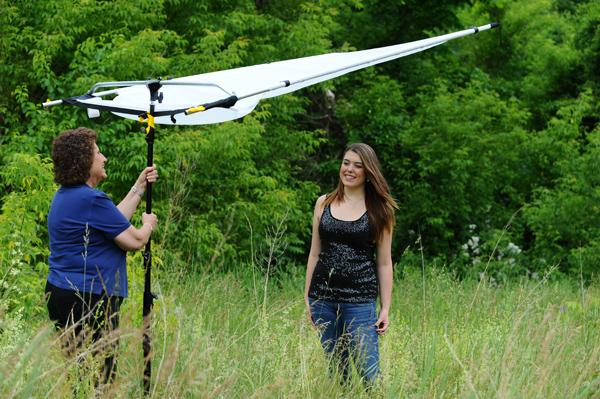
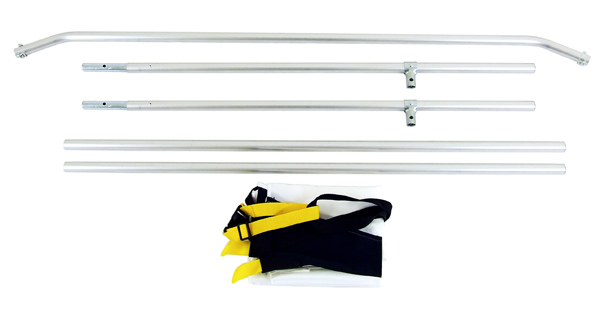
My Sun-Swatter arrived in a sturdy nylon case. Once I opened it, I found a smaller nylon soft case inside with the Sun-Swatter and a heavy-duty “boom stick” on which to mount it. The kit itself consists of a 4x6-foot frame, the translucent screen, and clips and hardware to hold things together. The frame is made from aluminum and has a crossbar that allows you to mount the Sun-Swatter to a tripod or the boom stick. It can also be held by hand.
When you place your order you can specify just how translucent the material should be, from 1/3 to 2/3 to a full stop. Although their literature states that you can assemble this in seconds, maybe I’m not so fast; once I got the hang of it, however, set up and break down was easy. As far as attaching it to the boom stick, that’s a different story.

Here’s what happened: I received the package just before one of my outdoor lighting workshops. Perfect! I hadn’t even opened the bag yet, but since I had about 20 photographers there, including an engineer, I figured I’d just have them put the thing together and we’d get shooting with it. It wasn’t intuitive, and the whole thing might be thought of as one of those “how many photographers does it take to attach a boom stick” jokes.
Well, they could put the Sun-Swatter together and put it on the stick OK, but there was no way for us to control it—it just kind of flopped around. So we packed it back up and when I got back home I found the video explaining how to assemble the scrim and put it on the stick. It seems you mount it on the stick and then wrap the enclosed strap around it to keep it in one place. So, the answer to the joke is “one—the one who watched the instructional video.”
In terms of design, the combination of aluminum poles and a sturdy crossbar means just three pieces to put together, so it really made for fast set up and break down. And once you’ve got everything put together, what you really have is a 4x6-foot sail. I know about suncatchers—this is a windcatcher.

Handling In The Field
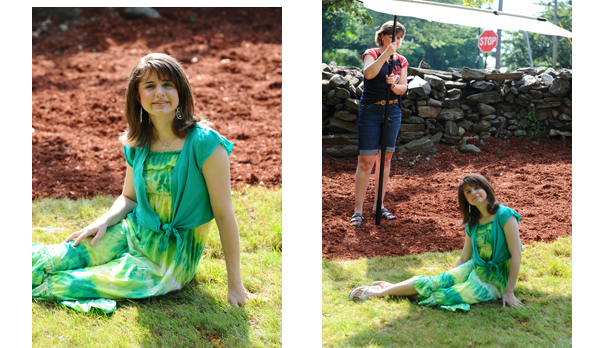
In order to use this with a tripod or any other type of stand outdoors, you need some pretty significant weight to keep it settled in the wind. For that reason, every time I used it I had an assistant hold it for me. This is a matter of physics, so I’d really suggest you get the boom stick as well. If you have someone just trying to hold the scrim itself and there’s any wind it can be quite difficult to hold, so mounting it on the stick and lashing it makes it much easier to raise and lower while keeping the butt on the ground. Either way, an assistant, maybe two, is required.
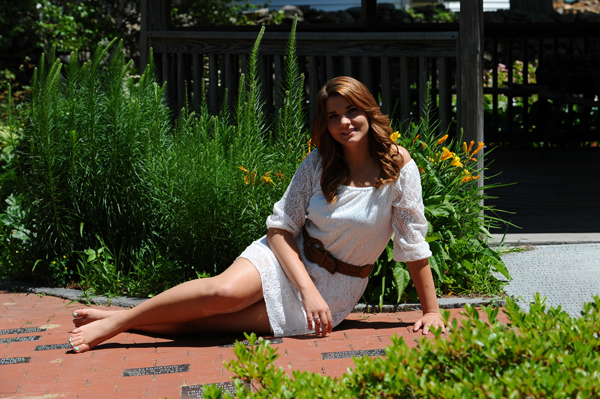
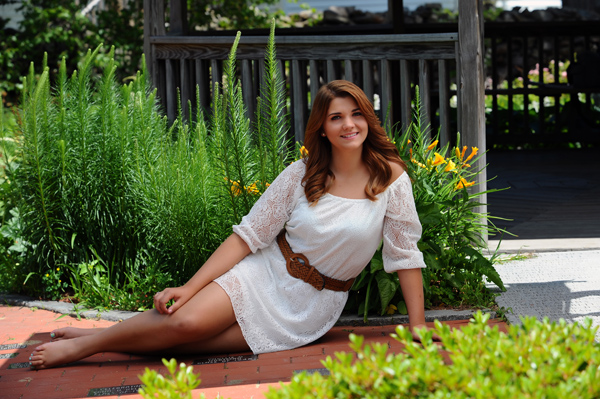
If you’re used to using reflectors but not scrims, you need to recalibrate your brain a bit. Many times you’ll want to use the Sun-Swatter to knock down the light so it becomes your main light, but that’s not the case when blocking light. I had to watch myself at first because I’d use it as a blocker and not turn my subject’s face into it. The result was deeper shadows under the eyes than I’d like, but after the first few shots I adjusted my technique.
There are also times when you may want to use this to filter light or just knock it down a little, such as a strong backlight from behind that may be hotter than you’d like on your subject’s hair or clothing. In all, it’s great for turning hard sunlight into a wonderful, strong backlight glow.
The sample I had was the 2/3 version, which stands for 2/3 of a stop of light, and indeed, when I measured the light and then took the measurement again about a foot behind the Sun-Swatter, I found the light to be 2/3 of a stop less.
Courtesy of Sunbounce
While this product is advertised as ideal for location and wedding photography, I think the only weddings I’d be using it for would be those that have a special outdoor location chosen by the bride and groom, one where I knew that I could not control the light like a beach or an open field. Having said that, the Sun-Swatter is great in many locations where the light is just too bright and harsh, such as at the beach or in an open field. If you’re looking for some new ways to use and control outdoor lighting, this could be just the ticket for you.
The street price of the Sun-Swatter Pro with a boom stick is approximately $650. For more information, visit www.sunbounceus.com.
Steve Bedell has been a portrait photographer for over 25 years. To subscribe to EPhoto, a free e-mail newsletter with tips for photographers, contact Bedell via e-mail at: sb@stevebedell.com. Also ask about his lighting DVDs.


![]()
Get the Latest Photo Tips, News & Reviews from Shutterbug!
| Camera Reviews Other Reviews | Mobile Reviews Photography Reviews Columns | News | Features | How-To | Resources |
 © 2026 Shutterbug
AVTech Media Americas Inc., USA
All rights reserved