- REVIEWS
Camera Reviews 
More Reviews Mobile Reviews Photography Reviews - GALLERIES
- VIDEOS
- BUYER'S GUIDES
Profoto B2 Lighting Review: This Small Light Really Packs A Punch

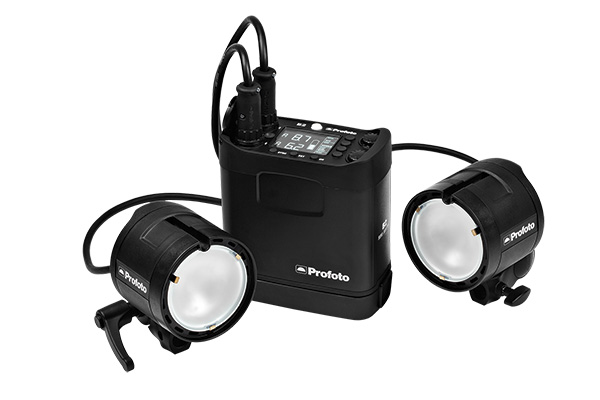
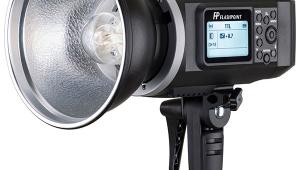
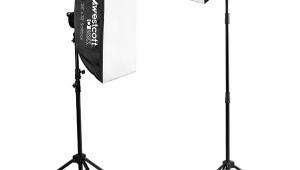
I had the opportunity to spend a couple of weeks with the Profoto B2 Location Kit. Said kit contains one power supply with two batteries, two flash heads, a carrying bag, and more. Profoto also sent me a bunch of light-shaping tools to experiment with.
To be truthful, the B2 was not what I expected. Since I have previously tested the Profoto B1, I thought the B2 would be some type of evolutionary update. Guess I should have looked at the specs first because it is not. Not to worry, the B2 is a totally different animal that looks to carve out a unique niche. So let’s take a look at what it is, what it can do for you, and if it’s something you may want to add to your equipment list.

What It Is
In Profoto’s own words, the B2 is not a speedlight or a monolight. It’s a new kind of light “combining the best of both worlds.” So my job is to figure out if this is true or if it is just the marketing department trying to hype their latest product, because in my experience, products that try to succeed in two different areas usually end up being a compromise in each.
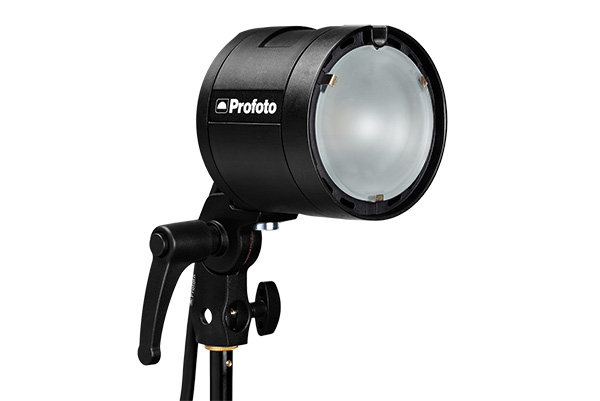
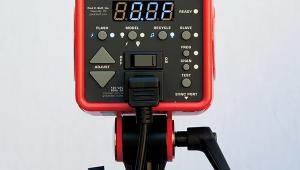
So I charged up the B2’s batteries, started fiddling with the power pack and the supplied Air Remote TTL-N for Nikon and went to work. Like everything from Profoto, the build quality and finish is excellent. High-quality plastic is used throughout, along with some glass and metal. The flash heads themselves are very small and lightweight and the supplied light shapers were very easy to mount and use. One very unique feature is the bright LED modeling light. Most battery-powered flash units won’t work with modeling lights since they deplete the battery too quickly but the new age of LEDs draw much less power. It should be noted that the modeling lights are tungsten-balanced, not daylight.
Who’s It For?
The B2 lights are aimed at the wedding and event photographer who can throw the battery pack on their shoulder, mount the light head over their flash using a bracket and at 250Ws have three to four times the power that most speedlights can muster.
Exposure is manual or TTL, recycle time is a fast 1.3 seconds at full power, and you have the option of throwing up an umbrella or octabox quickly for some portrait work. You even have the option of using two lights, although the power is cut in half for each light. You even have the option of using High Speed Sync (HSS).
Specs are great but let’s see how things work in the field.
Model Shoot
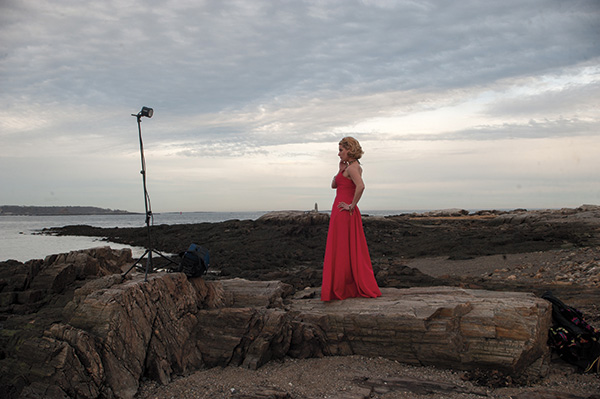
I met my model Raeme Jean at a location on the seacoast in New Hampshire. It was quite cold at the time and snow still covered most of the ground, so it was nice to not have to lug around lots of big and heavy lighting gear. Once I scouted out the location and found the spot I wanted to use, I set up one light head on a stand with an octabox. I like umbrellas on location simply because they are so quick and easy to use. Boxes are sometimes a huge pain to put together and I don’t like to be fumbling around with gear while my model waits, especially in the cold. But the Profoto octabox was pretty simple to assemble with its color-coded holes, so I snapped everything up and went to work.
My first step was to meter the ambient light. I had decided I wanted to have the flash overpower the daylight by about one stop. This is a great way to use flash to get great color and control your light direction but not really scream off-camera flash like when you really overpower the daylight. In effect, you are using the daylight as fill and the flash as your main light.
I used the B2 in TTL mode, took a test shot and pretty much had the effect I was looking for with no adjustments to the flash via the Air Remote. If I wanted more power from the B2, I’d just add power by using the Plus buttons on the controller. Less, I’d just subtract. I had plenty of power to shoot, especially since I used a moderate f/stop, 5.6, at ISO 400. Ambient exposure was 1/125 second at a little over f/4; I took the image at 1/125 second at f/5.6. This darkens the background slightly when exposed correctly for the flash. A Nikon D3 with a Tamron 28-75mm lens was used at 28mm.
Then I wanted to use the power of the B2 lights to create a little drama. I took Raeme to a rock where I could get below her and shoot up. I made sure there was another rock to place the light on where the light would be higher than her, as I don’t like the light to come from underneath. I used no light-shaping tools, just the bare flash head. I set to ISO 400 to get a proper exposure on her face, which was 1/200 second at f/5.6. With this setting I’d have a nice exposure on her but the clouds would be barely visible because of overexposure. Still on TTL mode, I dialed in a plus 1 and took the shot at more than two stops less, 1/250 second at f/11, using my Nikon D3 with a Sigma 17-35mm lens at 25mm. I laid on the ground to get the angle I wanted. By then she was frozen so we got out of there!


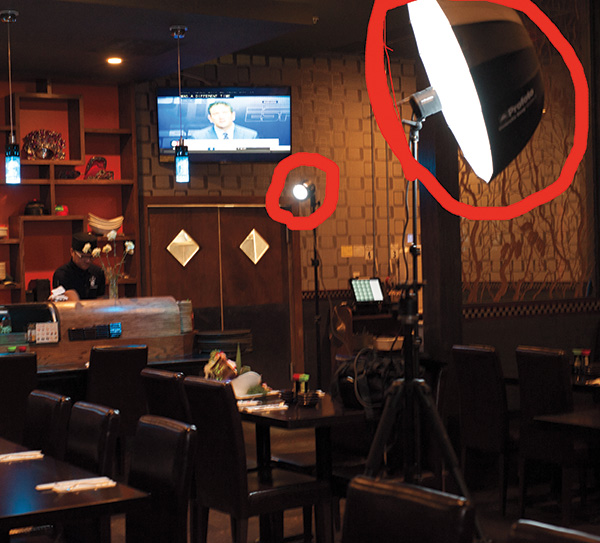
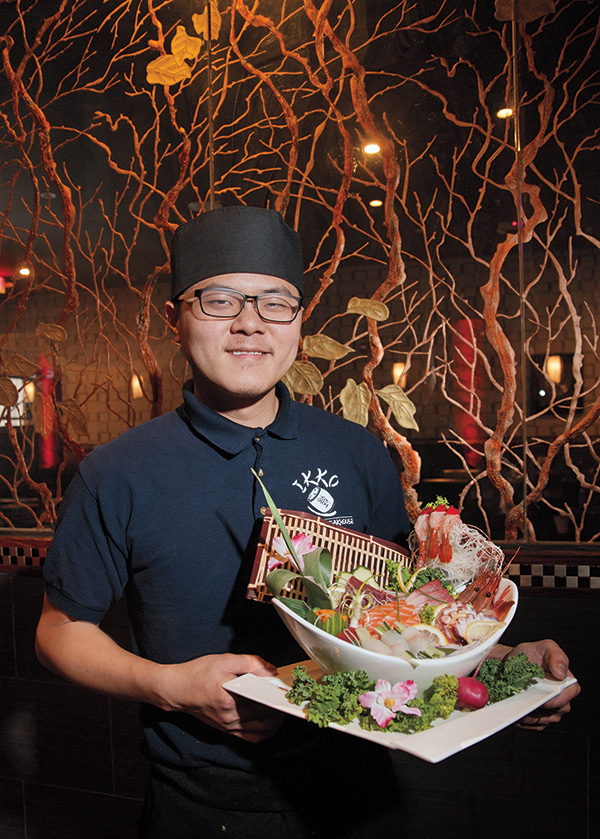
Restaurant Shoot
This time I chose to use the B2 at a location job at a new restaurant that just opened in my town. I thought the sushi chef showing off some of his wares would make an interesting photo. For my first image, I set him up in the restaurant with his workstation behind him. It was pretty dim in there so I wanted to dial the light down from the B2 so I’d still be able to show the environment. If I shot at 1/200 second at f/11 or so, the background would go black. So I chose ISO 400 and set the exposure to 1/15 second at f/4. This kept the exposure in the background, so I set my main B2 with a Profoto White Umbrella Deep and manually adjusted the exposure from the Air Remote controller. After I was satisfied with that I added a second light with a 20-degree grid as an accent light. I powered that way down to just create a little depth and dimension and separate him from the background. I used a Nikon D3 and a 50mm Nikkor lens.
For the second shot I used this interesting wall. Keeping the light source out was a major issue so this time I used one B2 head with the 20-degree grid. It did show in the image but it matched some of the other lights so I could leave it or remove it. I took it out. It was darker in this area so I bumped up my ISO to 800 and shot at 1/15 second at f/5 using the Tamron 28-75mm lens at 28mm. I wanted to get in close with the short lens to emphasize the food. I manually dialed the flash power down.


The Verdict
You can test specs in a controlled environment all you like but getting out there and using gear is the best way to evaluate if it makes sense for you. In my short time with the Profoto B2 kit I found many things to like and of course there were also a few things that I’d change.
On the plus side, it’s very lightweight and compact, especially the light heads themselves. It has plenty of power for most situations, although it may come up a little short in some HSS situations in bright light that demand even more power. But for most situations, you’ve got the power.
The Air Remote works flawlessly. It really combines with Profoto B1 and B2 light systems to give complete control over your power settings from the camera. Change groups and adjust settings just by pushing a few buttons. It’s addictive.
The battery lasts quite a long time with over 200 full-power flashes and quick recycling to boot. The modeling light is a big plus, especially in areas like the dark restaurant I was in. No more focus hunting. And, of course, the fact that we now have TTL available off-camera is quite an asset. This just may be the ideal rig for a wedding photographer where you can easily switch from on-camera flash to off-camera and even have two lights available if needed.
One other big plus to this system is the availability of many unique Profoto light shapers, from many types of umbrellas and boxes to grids and hard reflectors. Many new tools were created specifically for the B2.
Of course, there are a few areas I’d like to see some changes. I was sent a Boomerang bracket with the kit but the Nikon D3 was too tall to swing the arm to vertical. Horizontal shots, no problem, but check out your brackets carefully for your camera. This is not a Profoto issue but one I thought I’d bring to your attention.
Perhaps my biggest issue is with the cable length. It’s only about six feet. With a tall light stand you can’t even keep the power pack on the ground, as it will be hanging. And that’s with one light. That means the second light has to be within a few feet. For the restaurant shot I did with two lights, I put the power pack on a table about three feet off the floor halfway between the lights. It really limits the usefulness of the light, especially using two. Profoto does sell a three-meter extension cable; I think the original cable should be longer or at least include the extension with the kit.
Of course, there is one thing that always comes up with Profoto gear: price. This great engineering and build quality comes with a substantial price tag. The B2 Location Kit with two heads comes in at $2,995, as of this writing. A single light kit is $2,195. The Air Remote is about $400.
If you’re already invested in Profoto lights, you may already have the Air Remote and some accessories. If not, you’re looking at a sizable sum to get started.
The bottom line is that Profoto seems to have created a unique product that will be used for many years by the professional wedding and location photographer. This setup will allow him or her to easily create beautiful lighting quickly. I’d call it a wedding photographer’s dream!


![]()
Get the Latest Photo Tips, News & Reviews from Shutterbug!
| Camera Reviews Other Reviews | Mobile Reviews Photography Reviews Columns | News | Features | How-To | Resources |
 © 2026 Shutterbug
AVTech Media Americas Inc., USA
All rights reserved