- REVIEWS
Camera Reviews 
More Reviews Mobile Reviews Photography Reviews - GALLERIES
- VIDEOS
- BUYER'S GUIDES
Studio Photography: A Basic Setup Might Be All You Need
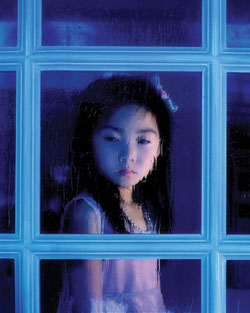
For example, photo (#1) was taken in my garage. I didn’t even set up a backdrop. The dark background is just the unlighted portion that leads into the house. The young girl was seated by the open garage door so some of the diffused ambient daylight lit her face, and my artificial light source on the side was a $10 reflector and light bulb I bought at Home Depot. The light was clamped to a handy chair—I didn’t even go to the trouble of setting up a light stand. The “window” is something I made. I wanted the look of a classic wooden window, but these are hard to find in an age of modern architecture. I bought a piece of glass and cut pieces of molding to simulate a window. As a final touch, I sprayed the glass with water to imply a rainy day. The reason most of the picture is bluish is because I used a tungsten white balance. This gave me a correct color balance on the girl (because the light bulb was tungsten) while the subtle ambient daylight on the window frame turned blue.
All Photos © 2010, Jim Zuckerman, All Rights Reserved
Using a photoflood as a light source has two major advantages: It’s cheap, and unlike flash photography, you can see exactly how the shadows and highlights fall on a face. Photofloods also have two disadvantages, however. First, they give off a lot of heat (especially if you use 250 or 500 watt bulbs), and while this may feel good to a model if you are shooting in a cold studio, usually the heat from the bulbs will make people perspire. Second, they don’t give off as much light as you normally need for significant depth of field. If you want increased depth of field, your only two options are to raise the ISO (which adds digital noise) or move the light closer to the model (which makes them too warm and uncomfortable).
Different Kinds Of Lights
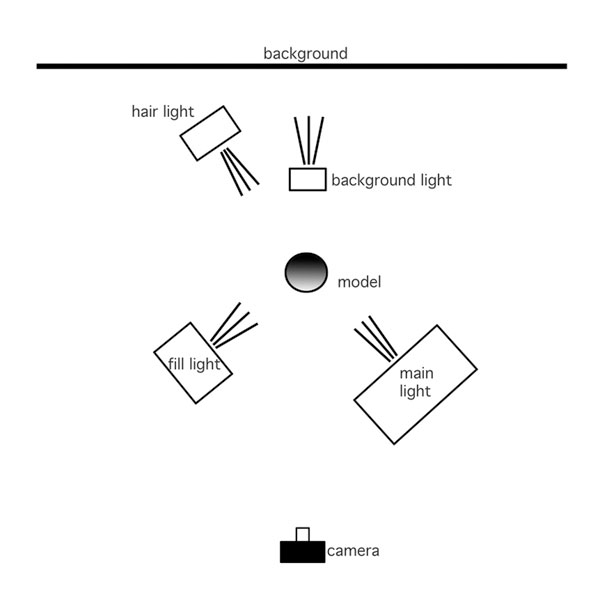
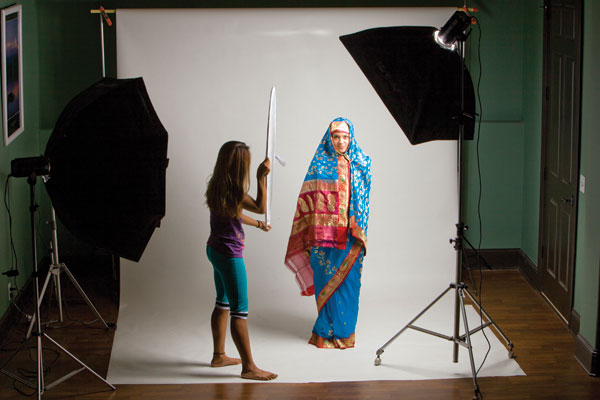
Depending on what a particular light does, it is given a name that describes that function. For example, the main light is the brightest light on the set. It can be used alone or in conjunction with several other lights. The fill light is usually placed on the opposite side of the subject from where the main is set up and it fills in shadows created by the main light, figure (#1). Instead of a fill light, you can also use a reflector. This isn’t nearly as strong as a fill light, and it therefore adds a soft and subtle light in the shadow areas. Image (#2) shows my wife positioning a reflector to fill in the shadows of the main light. The fill light on the far left was turned off.
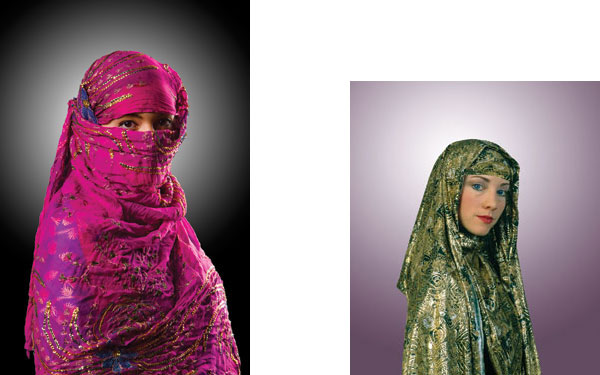
The background light is often placed right behind the model from the camera’s point of view so it is hidden by the person’s body, but its light shines on the background. Instead of a single background light, sometimes two lights are used that are placed on either side of the set to evenly illuminate the background. If only a central spot light is needed behind a model, as in photo (#3), then a single flash unit is used. In this case, it was placed close to the background so it didn’t have much distance to spread out. In photo (#4), the background was several feet behind the model and this gave the light a chance to spread out more. One way you can control the light on either the model or the background is by varying the distance of the light.
A hair light is usually positioned off-center and 2-3 ft above the model’s head. The light is angled downward to illuminate the hair, and that provides separation between the model and the background. For dramatic effect, a hair light can be placed right behind the model to make the hair glow with very strong backlighting, as in photo (#5).

Classic Lighting For Portraits
There are four basic types of lighting arrangements for illuminating a face. These are not the only options, but they are used over and over again because they are generally accepted to be flattering to a face.
1. Beauty lighting. This fills a face with light from the front leaving no shadows. There may be a background light and a hair light, or not. Photo (#6) is an example of beauty lighting without any additional lights on the background or the model’s hair.

2. Butterfly lighting. A main light is placed directly in front and above a person, creating a shadow under the nose like a butterfly with outstretched wings. Photo (#7) is an example. I used a softbox with little diffusion, thus the shadow is clearly defined. Softboxes have places to attach translucent pieces of white fabric to soften the light as much as you want. In this case I wanted the light to be a little harsher.

3. Rembrandt light. This is a classic lighting technique made famous by the Renaissance painter Rembrandt. The main light—whether it be a strobe or window light like Rembrandt would have used—is placed at a 45˚ angle to the lens axis (the lens axis being the imaginary line that runs lengthwise through the camera lens) and 2-3 ft above the model. The shadow of the nose falls down across the corner of the mouth, and at the same time there is an inverted triangle of light on the cheek opposite the light source. You can see this clearly in photo (#8). I think this is one of the most attractive ways to light a face.
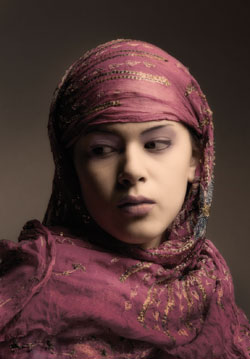
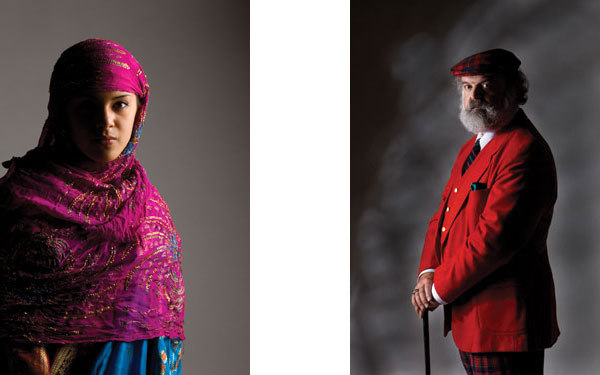
4. Sidelighting. As the name implies, the light is placed about 90˚ to the lens axis and illuminates a face from the side. If no fill light is used and there isn’t any ambient light, the side of the face opposite the light source will be in complete shadow with no detail, such as photo (#9). If you have the model angle his or her head such that it is turned slightly toward the light, the eye on the shadowed side of the face can catch the light. This is very dramatic, as you can see in photo (#10).
Light Ratios
The comparison of exposure on either side of the face is called the light ratio. This is a term often used by portrait photographers to describe how much or how little contrast the lighting is providing on a face. This usually refers to the ratio of the exposure between the main light and the fill light.
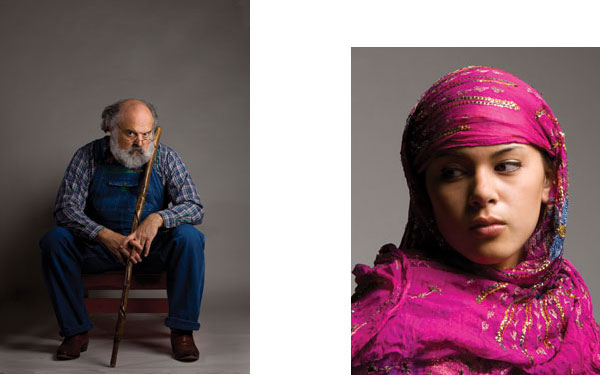
For example, if you take a light reading with a flash meter for the fill light only, and the exposure is 1/250 at f/16, and then you take a light reading using the fill light only and the result is 1/250 at f/11—a one stop difference—the light ratio is 2:1. If the light from the fill light produces an exposure that is 1/250 at f/8—two f/stops different than the fill light—the ratio is now 4:1. An example of a 2:1 ratio can be seen in photo (#11). Note how the fill light provides detail in the shadowed side of the model’s face, and you can also see that the exposure discrepancy between the main and fill lights isn’t extreme. In other words, the contrast on the face has been reduced. The light ratio in photo (#12) is 4:1. You can see that I used Rembrandt lighting, and the shadowed side of the face is quite dark because it’s two f/stops less than the side of the face illuminated by the main light.
Thinking Outside The Box
Studio lighting is not limited to photographing portraits. Pictures of people can take many forms, and I encourage you to be creative and to think expansively. For example, photo (#13) is a picture of a model taken from a ladder. I had purchased a vinyl backdrop for the floor, 6 ft square, and I conceived of a completely black and white image punctuated by a splash of color. The lighting here was simple. I used two flash heads with white umbrellas to diffuse the light, one placed on either side of the model. This is a simple idea, but it shows you another approach to working in the studio.
Strong color and design are always appealing to the eye, and that’s what I wanted to capture in photo (#14). This isn’t a portrait really; instead it is a graphic design using the human body as the subject. I was going for visual shock value in terms of the colors, and the model’s form provided the attractive lines that made up the design.

Strobes And Light Modifiers
Studio flash equipment can cost thousands of dollars—or not. What you get for a huge expenditure is a great deal of power. Commercial photography involving cars and large sets require multiple large power packs. Large format cameras that typically use lens apertures like f/64 and f/90 also require a huge amount of power—obviously. But for the rest of us, smaller and much less expensive units can be used. For shooting portraits of individuals or families, I am very happy with the White Lightning (www.paulcbuff.com) line of flash heads, softboxes, and wireless flash triggers. Instead of a single power pack where you plug in various flash heads, the White Lightning units are self-contained single flash AC units. This makes them a lot lighter for transport and very easy to use. They have built-in modeling lights, and as you vary the power of the flash you can similarly vary the power of the modeling light. This makes it easy to establish a specific light ratio without the need of a flash meter.
I have White Lightning units that are 1600 and 800 ws. For shooting people in a studio with one or more flash units, this gives me all the power I need as well as all the creative control to do anything I can envision. All the images in this section were taken with these units.
In addition to the strobe units themselves, studio photographers use various devices to soften and direct the light onto the subject. Umbrellas, reflectors, and softboxes are the most common. You can get them in white, silver, or gold, depending on the color tone needed for a shot. I use primarily softboxes because I like the quality of the light they offer. Paul C. Buff, Inc. has a unique octagonal softbox with a touch fastener-attachable grid that helps direct the light onto the model while keeping it away from the background. This is particularly useful if your shooting space is limited. I found it to be extremely helpful in controlling the light and getting exactly what I wanted. The softboxes and umbrellas fit onto the flash heads, and unlike other systems I’ve used in the past, they are very easy to put on and take off.
Continuous Daylight Units
In lieu of the inexpensive photoflood, you can use continuous light sources that look like banks of florescent lights. They are daylight-balanced lights that are made to simulate the sun’s light (and flash, too), but instead of giving you an instantaneous burst of light they are on all the time. This gives you the ability to study the lighting on a face and adjust the position of the light(s) accordingly. They are more expensive than the cheap photoflood I used in photo (#1), but they are also much brighter as well as daylight balanced. These don’t give you as much light as strobes do, but they are nevertheless a creative way to light people in the studio.
Strobes And Light Modifiers
Studio flash equipment can cost thousands of dollars—or not. What you get for a huge expenditure is a great deal of power. Commercial photography involving cars and large sets require multiple large power packs. Large format cameras that typically use lens apertures like f/64 and f/90 also require a huge amount of power—obviously. But for the rest of us, smaller and much less expensive units can be used. For shooting portraits of individuals or families, I am very happy with the White Lightning (www.paulcbuff.com) line of flash heads, softboxes, and wireless flash triggers. Instead of a single power pack where you plug in various flash heads, the White Lightning units are self-contained single flash AC units. This makes them a lot lighter for transport and very easy to use. They have built-in modeling lights, and as you vary the power of the flash you can similarly vary the power of the modeling light. This makes it easy to establish a specific light ratio without the need of a flash meter.
I have White Lightning units that are 1600 and 800 ws. For shooting people in a studio with one or more flash units, this gives me all the power I need as well as all the creative control to do anything I can envision. All the images in this section were taken with these units.
In addition to the strobe units themselves, studio photographers use various devices to soften and direct the light onto the subject. Umbrellas, reflectors, and softboxes are the most common. You can get them in white, silver, or gold, depending on the color tone needed for a shot. I use primarily softboxes because I like the quality of the light they offer. Paul C. Buff, Inc. has a unique octagonal softbox with a touch fastener-attachable grid that helps direct the light onto the model while keeping it away from the background. This is particularly useful if your shooting space is limited. I found it to be extremely helpful in controlling the light and getting exactly what I wanted. The softboxes and umbrellas fit onto the flash heads, and unlike other systems I’ve used in the past, they are very easy to put on and take off.
Hand-Held Light Meters
The most accurate way to set your lights such that a specific light ratio is achieved is to use a hand-held light meter. I prefer the Sekonic L-758 (figure #2) because of its superior accuracy and its photographer friendly functions. In addition to being able to read ambient light in tenths of an f/stop, it also functions as a flash meter. When you choose the flash function and point the white dome at the camera (the meter is not pointed at the light source when determining an exposure), you can press the test button on the strobe and instantly the correct f/stop appears in the display.

To determine a light ratio, you can take a light reading on one light source at a time. In other words, turn the fill light off and then when the main light is fired, note the f/stop. Next, turn the main light off and turn the fill light on and trigger the flash. You can now compare the readings, and if adjustments need to be made to create a specific light ratio you can increase or decrease the light output for either the main or the fill by doing one or more of the following:
1. Move the light closer or farther from the subject.
2. Add more diffusion material over the lights.
3. Reduce or increase the power output of the lights.
By studying the LCD monitor on the back of your camera, you can see the way the light is falling on the model. Based on that, if you want to change the light ratio by adding or subtracting light, it’s easy to do.


![]()
Get the Latest Photo Tips, News & Reviews from Shutterbug!
| Camera Reviews Other Reviews | Mobile Reviews Photography Reviews Columns | News | Features | How-To | Resources |
 © 2026 Shutterbug
AVTech Media Americas Inc., USA
All rights reserved