- REVIEWS
Camera Reviews 
More Reviews Mobile Reviews Photography Reviews - GALLERIES
- VIDEOS
- BUYER'S GUIDES
Software Tips; The Enhanced Portrait; Skill Sets For Studio Photographers
Retouching a portrait using film used to be a pretty simple task. Send the negative to your lab, check the “retouch” box, pay $5 or so, and the job was done. For your $5 you’d get eye lines softened and blemishes removed. If you wanted anything else, like stray hair or braces removed, the work had to be done by artists on each print. As you might expect, the cost for this artwork was substantial, so in most cases you’d stick with the basics.
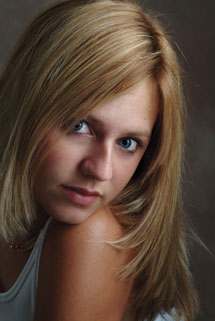
Untouched Original |
Standard (Basic) |
|
 |
 |
|
|
||
Fast forward to today. What used to be done by the lab is now being done by photographers in Photoshop. Instead of paying a lab, photographers and their staff are now using Photoshop to soften eye lines and remove blemishes. No problem, story over. Right? Well, not so fast.
Being incessant fiddlers, photographers often keep playing with the file. Once the eye lines and zits are blasted, they keep looking at the image. They (and me!) say something like, “Hmm, maybe I could soften the skin. And those red lines in the eyes are distracting, I’ll erase them. Maybe I’ll add some color to the eyes, lighten the hair and slim this person down a bit—they’d like that. And while I’m at it, maybe I’ll adjust levels, darken the corners down a bit and lighten the teeth some, too. Man, this is going to be great!”
Enhanced Retouching |
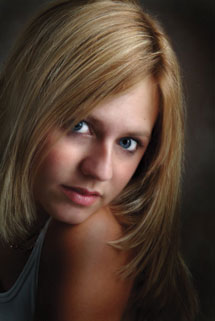 |
And while the image looks great and the client will be happy, something drastically wrong has occurred here. Our photographer has gone from being an artist to being a production worker; consequently, his or her hourly wage has been drastically reduced. And instead of spending five minutes doing simple retouching, it’s 20 minutes or more enhancing the image!
So what do we do about it, especially knowing that the client thinks we can push one button and do this retouching in about eight seconds?
We can charge for it, that’s what! And by showing clients the difference between a normally retouched image and an enhanced one, they can decide if it’s worth the difference. Either way, you win. You either don’t do anything beyond basic retouching or you get paid to do more. Make sense?
It’s up to you to decide what’s normal and what should be enhanced. How much you charge should enter the equation also. I charge extra to enhance high school senior portraits or wedding images. I don’t for regular portraits, because I charge quite a bit more for them. Even then, enhancement is kept to a minimum, like fixing some wrinkles or burning in corners.
 |
 |
I’ll be the first to tell you that I’m not a Photoshop expert and there may be better ways to accomplish what I’ve done here.
Remember—time is money! If you’re going to spend time in front of the computer, make sure you’re getting paid for it!
Now that we have some idea of the difference between an “untouched,” “retouched,” or “enhanced image,” let’s see what it takes to get to each level.
To get to this level, we made a duplicate of the original then used the Healing Brush and Patch tools to make minor corrections. I did adjust the levels so it would look better, but I would have let my lab do that if I had sent it out for printing. (Model: Natalie Dubois)
Most of the tools and steps I use will be familiar to those who have spent any time using Photoshop, so I’ll just describe the easy stuff. (See the sidebar for some advanced tips.) For starters, I printed down the corners. I then used the Dodge (O) tool set to lighten with a big soft brush and dodged her forehead, cheeks and lips. Each time I move on to a new tool, I usually make a new duplicate layer and create a new snapshot. That makes it easy to either return to a previous point if I’ve gone overboard with an effect like softening, I can also adjust the opacity of the new layer to get it right.
 |
 |
I spent some time on her eyes. I held down the Shift key and outlined the whites of both eyes with the Lasso (L) tool Then I went to Image>Adjustments>Brightness/Contrast and lightened the whites slightly. Then I used a trick I picked up from Eddie Tapp to add more color to the eyes if the irises are dark due to a dark shooting room. (See sidebar). I next softened her skin using layers and Gaussian Blur (see sidebar). Finally, using the Dodge tool with a soft brush at 10 percent set to shadows, I dodged her eyes opposite the catchlight, a common technique for adding color and life to the eyes.
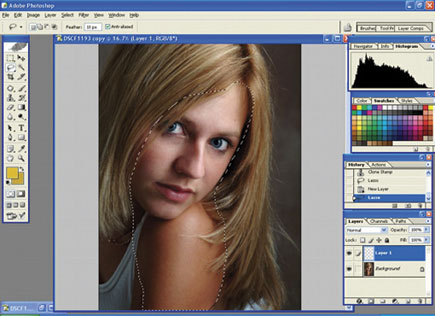
Portrait Softening
This is not a new one and many of you may be familiar with it. Make a duplicate layer (Layer>Duplicate Layer) or drag layer to the “Create Layer” symbol. Use the Lasso tool (L) and select the face and shoulder. Go to Filter>Blur>Gaussian Blur. Don’t be shy with the blur, go 4-5 pixels so it’s really soft. Now click the eye on the background layer and erase through the eyes, eyebrows and lips with a soft brush. Then go to the Opacity setting in the layers palette to adjust softening. I find I get better results by dragging the slider to zero and going forward to adjust to taste. If I start from 100 percent opacity and work my way down, I usually go too soft. Turn the lower layer back on so the sharp eyes show through. Flatten now or later.
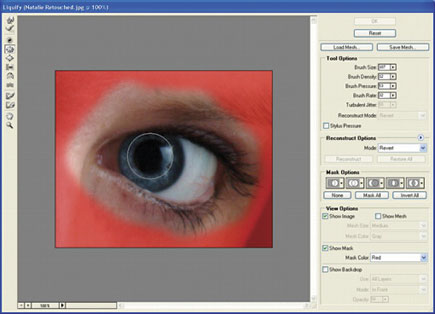
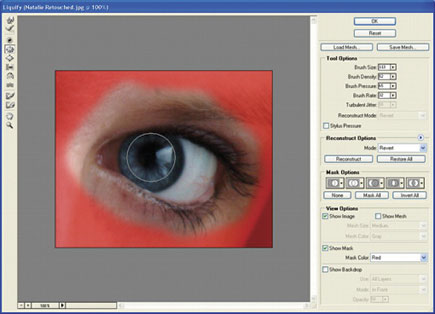
What Big Eyes You Have!
If you shoot in a dark studio the dark pupils become larger, leaving less room for the beautiful eye color in the iris. It’s an easy fix! Use the Lasso tool to circle the eye. Then go to Filter>Liquify and select the Pucker tool, the fourth one down. As the name implies, it will squish down, or “pucker,” the area you’ve selected. Make sure you include a little of the eye color on the outside edge and click the left mouse button. Geezam! The dark area shrinks and the colored area fills in! (Eye 1 is before, eye 2 is after) Try it, it’s quite amazing!


![]()
Get the Latest Photo Tips, News & Reviews from Shutterbug!
| Camera Reviews Other Reviews | Mobile Reviews Photography Reviews Columns | News | Features | How-To | Resources |
 © 2026 Shutterbug
AVTech Media Americas Inc., USA
All rights reserved