- REVIEWS
Camera Reviews 
More Reviews Mobile Reviews Photography Reviews - GALLERIES
- VIDEOS
- BUYER'S GUIDES
Picture Taking; How To Shoot And Assemble Panoramas; A Set By Set Tutorial
Have you always been intrigued by panoramic photography but couldn’t bring yourself to pony up for a dedicated panorama camera? Well, today you don’t have to. You can create panos in your computer.
My software of choice is Panorama Maker 4 from ArcSoft but there are others available, or you can use Photoshop. All the software works in similar fashion, albeit with some tweaks here and there. Let’s shoot some images and composite them to create a panorama.
 |
|
 |
|
|
Keep It Level
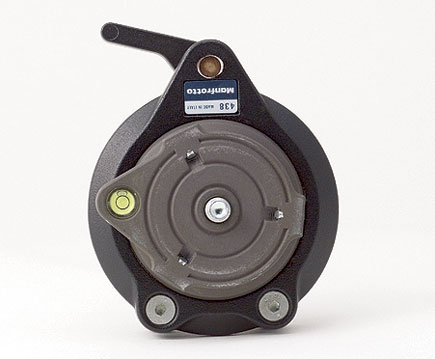
Successful images require attention to a few simple rules. The first is leveling the tripod and tripod head so your camera doesn’t yaw, or creep up or down as you pan. A bubble level on the tripod legs or a leveling stage will facilitate this. I also use a bubble level mounted on the camera. Here, the Manfrotto 438 leveling stage provides several degrees of leveling without having to adjust the tripod legs. It mounts between the tripod legs and the tripod head. My HAMA double bubble level makes leveling the camera very easy. You can level on both the X and Y axis at the same time. I use mine even when I’m not shooting panos.
 |
 |
The Nodal Point
Practice your panning to confirm leveling and image overlap. With normal
or telephoto lenses overlap should be around 20 percent, but with wide angle lenses you’ll need to overlap by as much as 50 percent.
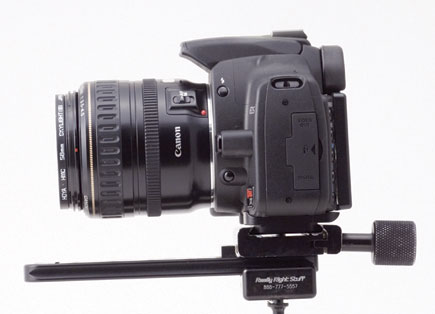
Another concern when using wide angle lenses is the panning axis. It’s important to rotate the lens around its nodal point or distortions at the frame edges will make matching difficult or even impossible. There’s a simple trick to finding the lens nodal point. Aim the camera at two vertical lines, fence posts or even a couple of light stands will do, a short distance in front of the camera with 8-10 ft between them. Line them up and pan the camera slightly to the left or right. If one seems to move in relation to the other you’re not panning around the lens nodal point.
 |
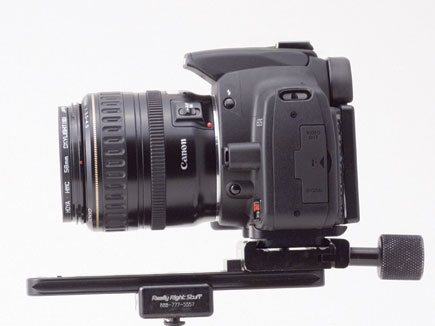
To adjust for this you will need to move the camera back and forth; don’t move the whole tripod. I use a macro slider to facilitate this and repeat the first step. Here’s the Really Right Stuff macro slider with the camera body centered over the rotational axis. This is the camera positioned to place the rotational axis under the approximate nodal point of the lens.
It may take a few attempts but eventually the alignment won’t change as you pan. This indicates you’re panning around the nodal point. Remember, if you’re using a zoom lens the nodal point changes as you zoom. Using longer lenses eliminates this problem.
 |
Exposure
Be sure to set the exposure manually. Automatic metering can cause serious mismatches from image to image. You’ll also want to leave the polarizing filter in the bag; use of it will cause skies to be uneven. If possible, I shoot the sequence a couple of times and change exposure up or down.
Stitching Time
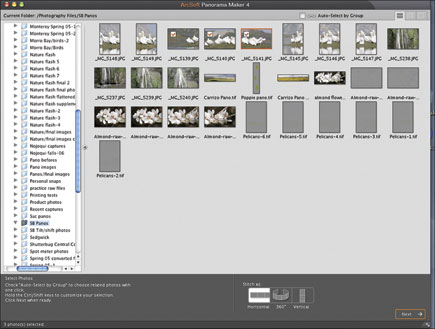
After you’ve captured the sequence it is time to bring your images into the computer and let the software do its magic. Panorama Maker 4 has its own browser so finding and selecting the files is simple. Here, three images are chosen for stitching as indicated by the red check marks.
 |
Select your images, choose the desired format and click “Next.” The “Confirm Sequence” dialog box will now show the images and the placement; you can drag and drop the thumbnails if editing is necessary. When you’re ready, click “Stitch.”
 |
The software will then process all the information and then open the “Fine Tune and Save” window. Here you will typically have several options; Preview, Crop, Straighten, Print or Start Over. If you want to save the image you can choose the file type and location. I choose TIFF and save to the desktop, then, using Photoshop, I tweak the color and contrast to my satisfaction.
Panoramas Made Easy
Here’s our finished panoramic image, after color and contrast adjustments in Photoshop. The whole stitching process takes less time than reading about it.
 |
Here is an easy problem to avoid. By standing too close to the center of the storefronts I got distortion. Stand a little past one end of architectural subjects and you can avoid this effect.
Don’t forget that your panos can be vertical, too. This study in chipping, peeling paint is a composite of three images.
 |
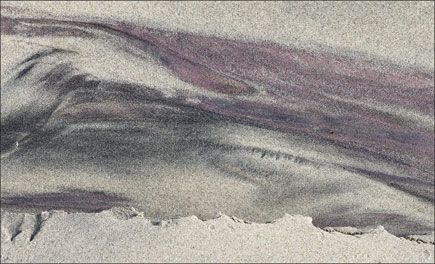
Textures, patterns and other abstractions can be great fun for panostitching. I’d love to see this Big Sur sand pattern as a jigsaw puzzle.
 |
Contacts
Adobe Systems Inc.
345 Park Ave.
San Jose, CA 95110
(408) 536-6000
www.adobe.com
ArcSoft, Inc.
46601 Fremont Blvd.
Fremont, CA 94538
(510) 440-9901
www.arcsoft.com
Bogen Imaging Inc.
(Manfrotto)
565 E Crescent Ave.
Ramsey, NJ 07446
(201) 818-9500
www.bogenphoto.com
Really Right Stuff
(HAMA)
205 Higuera St.
San Luis Obispo, CA 93401
(805) 528-6321
www.reallyrightstuff.com


![]()
Get the Latest Photo Tips, News & Reviews from Shutterbug!
| Camera Reviews Other Reviews | Mobile Reviews Photography Reviews Columns | News | Features | How-To | Resources |
 © 2026 Shutterbug
AVTech Media Americas Inc., USA
All rights reserved