- REVIEWS
Camera Reviews 
More Reviews Mobile Reviews Photography Reviews - GALLERIES
- VIDEOS
- BUYER'S GUIDES
Picture Taking; Get Perfect Exposures Every Time; Get It Right Out Of The Camera And You'll Need Less Fix Time Later In The Computer
In digital photography, exposure control is sometimes considered irrelevant. “You can easily fix any problems in your computer,” some friends will suggest. While there’s a kernel of truth in that comment, it’s a serious oversimplification. With sloppy exposure control, you may lose detail in the bright areas, the dark areas, or both. While you can improve such images with versatile software, the results may appear unnatural or over processed. So, it’s important to get the exposure right, using in camera overrides when necessary.
 |
|
|
Digital capture has less latitude (exposure correctability) than color negative film so this medium requires more thoughtful exposure control. On the other hand, digital SLR cameras—and high-end digicams—provide some valuable tools for exposure evaluation not available in film photography. These include an LCD screen for checking your pictures immediately plus at least one other feature for more precise feedback about exposure.
What Is “Ideal” Exposure?
This is a simple question without a straightforward answer. As well, it depends on whether you’re shooting JPEGs or using Raw Capture. In general however, an ideal image exhibits pleasing overall brightness with full detail in important shadow areas and/or important highlight areas. There may be some ultra-bright spots (such as reflections off water) or very dark areas (shadows under a bush, for example) but that’s not a problem. As long as the primary subject areas exhibit full or adequate detail, the exposure should be fine overall.
 |
|
|
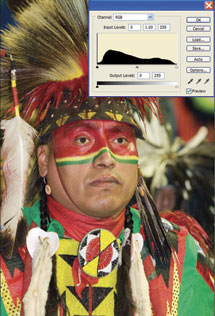
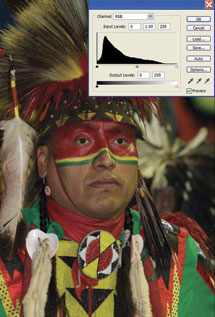
Exposure Evaluation Tools
Many digital cameras allow you to activate a “histogram” in Playback. This is a graph that displays the distribution of brightness values. If the peaks on the graph are mostly on the left side, the image may be underexposed; in that case, set plus exposure compensation and re-shoot. If they’re mostly on the right side, it may be overexposed; set minus compensation and re-shoot. (Manual exposure control can also be used of course, in the camera’s Manual mode.)
An increasing number of cameras also offer another option: a blinking colored overlay that warns about loss of detail in highlight and/or shadow areas. This is a very valuable tool and much easier to interpret than a histogram. (Check your owner’s manual as to available features and how to access them.) Should you get a warning, re-shoot after setting some plus or minus exposure compensation to achieve a brighter or a darker image.
 |
 |
|
 |
||
|
||
JPEG Exposure Techniques
Because JPEG photos are fully processed in the camera, exposure and all other aspects are all finalized and locked-in. If a major exposure correction is required in image-editing software, you’ll face a serious challenge. A JPEG file contains only 256 levels of tonal information. Consequently, any significant adjustment of exposure (“tonal value”) will produce some damage or an artificial-looking effect.
The key to success in JPEG capture is to make images that will require little manipulation. As a starting point, take advantage of light metering techniques that you employed when shooting film, particularly slide film. Meter off a suitable midtone, such as grass or foliage, and use Auto Exposure Lock while recomposing. Examine the first photo in Playback mode. If it’s too dark or too light—or if there is a loss of important highlight or shadow detail—re-shoot after setting plus or minus exposure compensation. To increase the odds of getting at least one highly acceptable image, also set exposure bracketing, in 1⁄3 or 1⁄2 step increments. Then shoot three frames, each with a slightly different exposure.
 |
|
|
|
| |||||||||


![]()
Get the Latest Photo Tips, News & Reviews from Shutterbug!
| Camera Reviews Other Reviews | Mobile Reviews Photography Reviews Columns | News | Features | How-To | Resources |
 © 2026 Shutterbug
AVTech Media Americas Inc., USA
All rights reserved