- REVIEWS
Camera Reviews 
More Reviews Mobile Reviews Photography Reviews - GALLERIES
- VIDEOS
- BUYER'S GUIDES
Photo Filters Page 4
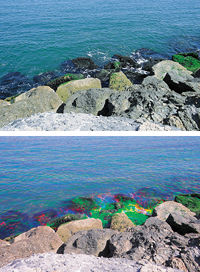
| Polarizing Filters While a red filter works great in black-and-white photography when you want to darken a blue sky, you can't use it for that purpose in color work, or your photograph will take on a red cast. But there is a filter that will do the trick: the polarizer. "Normal" nonpolarized light waves vibrate in all directions perpendicular to their line of travel. If a light ray hits a nonmetallic surface, the vibrations in only one plane are reflected completely—the reflected light is polarized. A polarizing filter polarizes light—it permits the vibrations in only one plane to pass, blocking the vibrations in all other directions. If a polarized light ray strikes a polarizing filter, three things can happen. If the polarized light is vibrating in the plane that the filter lets pass, it will pass through the filter. If the polarized light is vibrating perpendicular to the plane the filter lets pass, the polarized light ray will be blocked by the filter. If the polarized light ray is vibrating at an angle to the plane the filter lets pass, a portion of the ray will pass through the filter. A lot of light from the sky is polarized when it is reflected by dust and water particles in the air, so you can use a polarizing filter on the camera lens to block some of the polarized light, thus darkening the sky in the resulting photograph. You'll get the maximum darkening effect when shooting with the sun to one side; you won't get any darkening when shooting directly toward or away from the sun. Just rotate the polarizer in its mount until you see the desired effect, then shoot. Polarized light from the sky and reflections from water reduce contrast and give a scene an overall hazy appearance. By blocking some of this polarized light, a polarizer can cut through some of this haze and improve scenic contrast. The polarizer is also handy for eliminating unwanted reflections from nonmetallic surfaces (a polarizer can't eliminate reflections from metallic surfaces because these reflections are not polarized). If you see a reflection and want to get rid of it, just put the polarizer on the lens and rotate it until the reflection is gone. (If you aren't using a single-lens reflex camera, which permits you to view through the lens, examine the scene through the polarizer from camera position, rotate the filter until you see the effect you want, then attach the filter to the camera lens in the same relative orientation.) Most polarizers have a filter factor of 2.5 (increase exposure by 11/3 stops when using the filter), and this applies no matter how the filter is oriented (i.e., whether or not it is eliminating reflections). With some 35mm SLR cameras, the built-in through-the-lens metering system will automatically compensate for the polarizer, but most of today's SLRs use metering (and autofocusing) systems that polarize light, and thus won't work properly with standard linear polarizing filters. With these cameras, you must use a special (and more costly) circular polarizer. Check in your camera's instruction manual for details, and if in doubt, meter without the polarizing filter and then use the filter-factor method to calculate the exposure. Regardless of how you determine exposure, it's a good idea to bracket polarized shots to make sure you get one with an effect you like Neutral-Density Filters Kodak Wratten gelatin neutral-density filters come in densities from 0.10 to 4.00, in 0.10 increments at the lower densities, each .10 reducing the light by 1/3 stop (so an ND 0.60 filter reduces the light by two stops, for example). Some manufacturers designate their neutral-density filters by filter factor: 2X, 4X, etc. Table C correlates the two designation systems for you. Graduated Filters The most accurate way to determine exposure when using a graduated ND filter is to meter the foreground in manual mode, lock in that exposure, then position the filter over the lens and shoot. Some multi-segment meters in newer AF 35mm SLR cameras can produce good exposures with the filter in place, but it's best to use the manual method. And, of course, bracket exposures any time you're in doubt. Many filter makers offer colored graduated filters, which serve two functions: they reduce the contrast difference between one half of the image and the other, and they add either subtle or startling coloration to one half. The word half is used approximately here, and not mathematically, if you are using a modular system, as opposed to a screw-in filter. This is because with a rectangular graduated filter, you can place the gradation high or low on the lens to match the horizon, to alter (for example) one-third and two-thirds of the image, rather than half-and-half. With a screw-in filter, you're stuck with the half-and-half coverage. Like their neutral-density counterparts, color grads come in several densities (usually one- and two-stop densities). Colors vary from realistic tones (sunset, blues and pinks) to special-effect colors. The tobacco (brown) color grad is popular with landscape photographers, adding a warm look to the sky. Most photographers use graduated filters to darken the bright sky in relation to a dark landscape, making it possible for the film to handle the contrast between the two. However, two filters, one "upside down," can be used successfully in some cases. The classic example of this is a sunset scene over the ocean, when a graduated tobacco filter (color on top) adds color to the sky, and a graduated blue (color on bottom) adds vibrancy to the blue water. |


|
| |||||||||
- Log in or register to post comments


![]()
Get the Latest Photo Tips, News & Reviews from Shutterbug!
| Camera Reviews Other Reviews | Mobile Reviews Photography Reviews Columns | News | Features | How-To | Resources |
 © 2025 Shutterbug
AVTech Media Americas Inc., USA
All rights reserved