- REVIEWS
Camera Reviews 
More Reviews Mobile Reviews Photography Reviews - GALLERIES
- VIDEOS
- BUYER'S GUIDES
Output Options; The DPI Myth; Optimal Settings For Printing Page 2
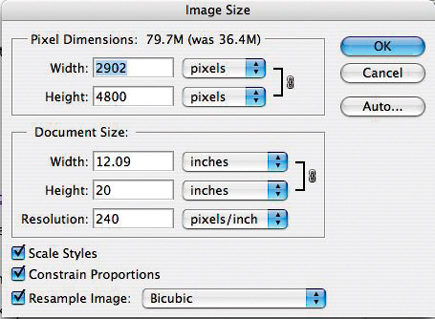
The key to re-sizing is to uncheck the "Resample Image" checkbox. For enlarging a print beyond what would be acceptable with a simple ppi change, Resample Image is the way to go. For really big enlargements use a program like Alien Skin Software's Blow Up (my current favorite for quality enlargements) or Genuine Fractals. In this case, I'm going to set a print size of 12x20 (#3). As you can see, with Resample Image checked, my pixel dimensions have changed from 1961x3244 to 2902x4800.
 |
|
|
Printer Resolutions
The final point of confusion for many is the quality options available in the
printer driver. You'll usually find two or three quality settings which
affect the density of ink placed on the page. This is one of those cases where
more must be better right? Not always for you, but certainly for the printer
manufacturer, since you'll be using more ink! And, you'll wait longer
for your prints, too--as much as twice as long, all for minimal improvement
in most cases.
I typically print at the normal setting, which if you use Epson is called "Best
Photo," and on HP it's "Best." Canon is the exception
here, and I always choose "1" as the quality setting. In almost
every case, the print quality at these settings will be indistinguishable from
the high quality setting. Again, with Canon I do see a visible difference between
the "1" and "2" settings, and with a minimal difference
in speed, so everything gets printed at the higher setting.
For final prints on gloss or luster media I will sometimes use the highest quality
setting ("Photo RPM" for Epson, "Maximum DPI" for HP)--I
don't find any benefit to these settings with most fine art papers though.
These settings will trigger the higher density prints that generated those big
numbers seen earlier, like 2400dpi.
A DPI/PPI Cheat Sheet
To help condense all of this down a bit, and hopefully give you a handy quick
reference for printer settings, here's a list of commonly used settings.
For images with finer details, and prints done on gloss or luster media, a higher
setting will work best. And, the larger your source file, the better your results
will be since there's less image resampling to be done to get a larger
print.
| Print Size |
PPI In Image Size Dialog |
| 8x10 and smaller | 360 ppi (Epson) or 300 ppi (Canon & HP) |
| 11x14 | 300 ppi |
| 13x19 | 240 ppi (300 acceptable for larger images) |
| 16x20 | 240 ppi |
| 24x36 | 180 ppi |
Quality Settings |
|
| Epson | Best Photo |
| Canon | Quality1 |
| HP | Best |
Jon Canfield is a popular instructor and author of several books on digital imaging, including "Print Like a Pro" and "RAW 101." You can visit Canfield on the web at: www.joncanfield.com.
|
| |||||||||
- Log in or register to post comments


![]()
Get the Latest Photo Tips, News & Reviews from Shutterbug!
| Camera Reviews Other Reviews | Mobile Reviews Photography Reviews Columns | News | Features | How-To | Resources |
 © 2025 Shutterbug
AVTech Media Americas Inc., USA
All rights reserved