- REVIEWS
Camera Reviews 
More Reviews Mobile Reviews Photography Reviews - GALLERIES
- VIDEOS
- BUYER'S GUIDES
Nikon Capture “UPoint” Control Points
All Photos © 2007, George Schaub, All Rights Reserved |
Here's a close-up made with a Nikon D40x, recorded as a NEF (Nikon's Raw file.) I chose this to display the Control Points because it has complementary colors and a range of highlight and shadow.
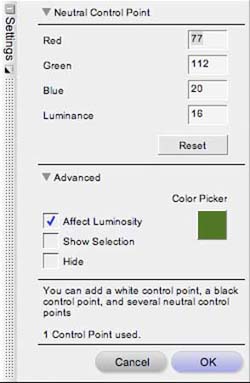 |
The Control Point selections are located atop the menu. You have a choice of Color, Black, White and Neutral points. (You also have a Red Eye Point, which we won't cover here.) This selection was the Neutral Point (a middle value). Note the various dialog and informational items in the box.
 |
Here I have selected the Black Point. I inserted it into a dark part of the image by clicking on that area after selecting the Point. An "L" (for luminance) comes up with a line and end point on it. All I needed to do was grab the dot at the end of the line and slide it in and out to make the area darker or lighter. The change is in real time as I move the point.
 |
Here's the Color Point inserted on the darker green area of the leaf. The sliders represent the channels of the image, and the point at which you place it is what will be affected. You can also affect the range from the targeted color in which the change will take place. Keep in mind that the green here is a mix of color and tone, and that when you slide any of the sliders you change that mix.
 |
In this frame I have altered the color by moving the sliders around. As I said you can get quite subtle or very radical with the changes, and a part of working with Control Points is learning when to stop, and when to add more change as you move the sliders around.
 |
Again, this change in tone, almost like shifting white balance, is from a slight change in the relationship of the sliders.
 |
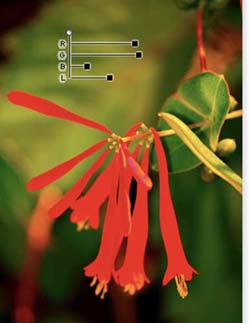
As mentioned you can work with all of the Points simultaneously, and even move them around the image. This detail shows the placement of three of the Control Points at various places in the frame. As you add Points things can get a bit complex, but you can also mix the color and tones to your heart's content in various places in the image. Once you get a handle on it the complexity leads to almost complete control of shading, color value and tone.
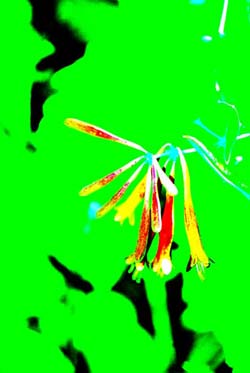 |
To finish up and to show some of the more abstract options you can choose, here's a White Control point placed in a middle value of the image. I could move this to the highlight, but here it alters the entire relationship of colors and tones to create a near posterized effect.
To learn more, visit: http://www.nikondigital.com/main.html


![]()
Get the Latest Photo Tips, News & Reviews from Shutterbug!
| Camera Reviews Other Reviews | Mobile Reviews Photography Reviews Columns | News | Features | How-To | Resources |
 © 2026 Shutterbug
AVTech Media Americas Inc., USA
All rights reserved