- REVIEWS
Camera Reviews 
More Reviews Mobile Reviews Photography Reviews - GALLERIES
- VIDEOS
- BUYER'S GUIDES
Light Moves: Walkabout: Dave Black's Lightpainting Methods
The intriguing thing about lightpainting is you never know exactly what you’re going to get. And whatever you get, you won’t get it again. That’s part of the technique’s appeal: you’re creating a one-of-a-kind photograph.
Simply, a lightpainting photo is an image made with a handheld, constant light source in a dark room or environment. The camera’s sensor captures only what you choose to illuminate. Lightpainting images can range from relatively simple to fairly complicated. Striking photos can be created indoors with nothing more than a still life subject, a tabletop to put it on, and a small LED penlight to light it. Or you can think big: how about a mega-powerful spotlight illuminating prairie land in the Grand Tetons or a mesa in Monument Valley?
For Dave Black, lightpainting fits well with his desire to create unique, imaginative images that grab, direct, and hold viewers’ attention.
No matter the scope of the lightpainting image, Dave’s technique and his choice of gear don’t vary all that much. As a general guideline, he suggests a 30-second exposure at f/8 and ISO 400 as a good starting point. For exposures longer than 30 seconds, he’ll often use a wireless remote release to open and close the shutter. He’ll use autofocus to render his subject sharp as he’s setting up the shot, then he’ll turn it off; obviously, he doesn’t want the AF system hunting for focus as he’s walking around in the scene. But he always turns on the long exposure noise-reduction feature of his Nikon D-SLRs.
He generally advises against metering a lightpainting image, though he will meter if there’s ambient light in the scene and then use the reading as a starting point for his exposure.
Most of his lightpainting is done with short to medium zooms; his 24-70mm is a favorite. Of course, a tripod is essential; Dave’s Gitzo carbon-fiber model is “substantial,” but still lightweight.
And then there are the flashlights. In their order of increasing size and power, the three lights Dave uses are a Stylus Penlight (from Streamlight), a Bolt (from Inova), and a two-million candlepower Max Million II (from Brinkmann).
The look of a lightpainting will be determined by how close he brings the light to the subject, how he moves the light, how long he keeps it on, and how quickly or slowly he walks. Lightpainting means lots of trial and error, especially at first; and there are lots of images shot for each setup and situation. At workshops Dave tells his students that a dozen or more tries for one shot isn’t unusual. He also suggests they start with a tabletop setup to try out the technique.
Dave also points out that it’s called lightpainting for a reason, so a gentle circular or brushing motion is often ideal when applying the light. He likes to wrap the light around his subjects, in effect softening the edges. Most important is to keep the light moving rather than holding it steadily on the subject in order to achieve a soft, transitional edge. And it’s much more flattering to the subject to have the light coming in at an angle from an off-camera position.
So how did Dave use these guidelines and techniques to make the photos you see here? I thought you’d never ask.

All Photos © Dave Black
Fly Hooks. Dave used a 36mm extension tube on his 28-300mm zoom to get in close for this one-minute exposure. The Stylus Penlight provided the light, and helping out was a bit of homemade light control in the form of two pieces of cardboard, taped together to form a sandwich-like snoot. He inserted the Stylus into one end and pinched the other end to a 1⁄16-inch opening. The result was a thin shaft of light that went exactly where he wanted it.
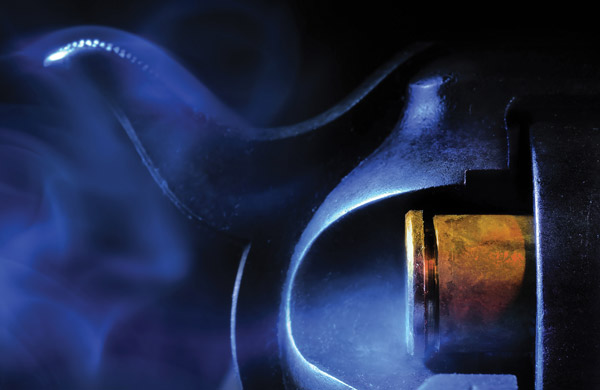
Colt 45 Cartridge. The 1896 Peacemaker was clamped to a workbench so the smoke would rise naturally around it. To produce and capture the smoke, Dave struck a wooden match, then blew it out and turned on the Stylus. The entire exposure took 30 seconds. Dave had set his camera for a cool white balance (3030 Kelvin) and used a warming gel over the flashlight’s bulb. He painted the cartridge for about five seconds, then removed the gel and applied seven seconds of light to each of two other portions of the revolver.
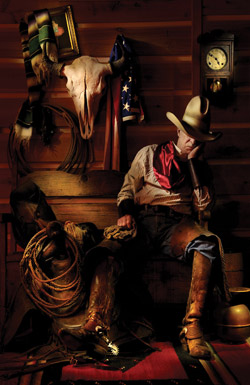
Quit’n Time. If you work with people for lightpainting images, be sure they’re in comfortable positions and know ahead of time how long they’ll have to remain still (in this case the cowboy had to hold his pose for one minute). And since the face is the most likely part of the body to move, paint it first. If there’s a blink or twitch after that, you and your light will be elsewhere in the scene. “There are lots of parts to the lightpainting puzzle in this image,” Dave says. “The clock, his face, boots, spurs, the skull, the flag—I applied a few seconds of light with the Bolt to all of them. I call them the supporting characters.” Dave tells students in his classes not to forget the supporting characters in any picture, but to draw attention to them especially in a lightpainting scene.
Cruisers. They were comfortable enough to hold the pose for the 30-second exposure, but Dave did encourage some movement: while he used the Bolt to featherdust some light onto objects away from the cruisers, the front rider was able to touch the brake and click the headlight to add those lights to the image. The dark glasses make the couple look extra cool, but they also hide blinking.

Starlight Serenade. No, Dave didn’t light the Grand Tetons. “The light you see at the tops of the mountains comes from the moon, which was still below the horizon,” he says. “The light on the prairie and the house—that was me.” Dave made an eight-minute exposure, lightpainting with a Max Million II. “I needed eight minutes to get the star trails, but only about 45 seconds of lightpainting on the house; then I walked, illuminating little bits of the prairie. The idea was to get just a touch of moonlight to the top of the Tetons and lightpaint the rest.”

West Mitten After Midnight. “A lot of lighting schemes are essentially a triangle configuration, with the camera, the subject, and the light source forming the points,” Dave says. “The camera was a little over a mile and a quarter from West Mitten Butte [in Monument Valley]. I was about a mile and a quarter to the right of the camera, parallel to the rock, with two Max Million lights.” An assistant triggered the camera and, via walkie-talkie, helped guide Dave’s positioning of the light. “The wind was blowing about 40 miles an hour, kicking up dust everywhere. We used our vehicles as a windbreak for the camera, but as soon as I turned on the Max Millions, the dust lit up. As I was sweeping the light up and down, over the walkie-talkie my assistant was telling me, ‘It looks good, keep it there.’” You might be able to see two stars in the night sky—one directly above the butte, the other to the right and a bit lower than the first. “They appear to be motionless,” Dave says, “and people wonder how that could be during a 20-minute exposure. Well, the cloud cover obscured the stars for most of the exposure, but it broke for about 30 seconds—just long enough for the stars to register fairly sharply in the photo.”

Finally, an important point about images like the last two: even though they employ the same basic principles as the pictures of the fly hooks and the Colt, they require a lot more care and preparation. Before you set off into the night on a lightpainting adventure, do a thorough daylight recon of the territory to familiarize yourself with gullies, ravines, rocks, washes, and other possible hazards. Only the final image should be a surprise.
Dave Black’s website, www.daveblackphotography.com, offers a gallery of lightpainting images. The Workshop at the Ranch section provides information on a number of photo techniques, including lightpainting.


![]()
Get the Latest Photo Tips, News & Reviews from Shutterbug!
| Camera Reviews Other Reviews | Mobile Reviews Photography Reviews Columns | News | Features | How-To | Resources |
 © 2025 Shutterbug
AVTech Media Americas Inc., USA
All rights reserved