- REVIEWS
Camera Reviews 
More Reviews Mobile Reviews Photography Reviews - GALLERIES
- VIDEOS
- BUYER'S GUIDES
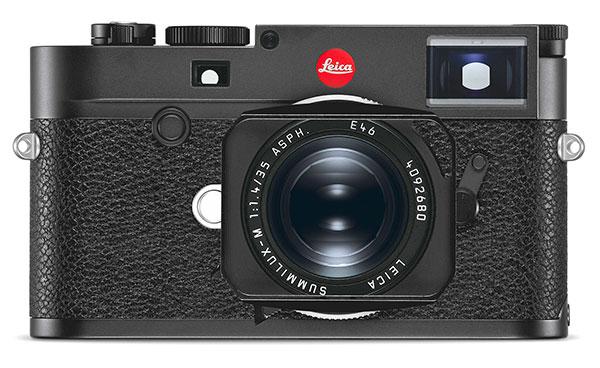
Leica M10 Review: Shooting with Leica’s New 24MP Rangefinder Digital Camera in Berlin
(Editor’s Note: You can see full-resolution test images we shot with the new Leica M10 here.)
In this day and age of cross-type AF sensors and AF tracking in high-speed shooting modes, a rangefinder-focusing camera might well seem an anomaly, if not a downright anachronism. Indeed, manual focusing has in large part become vestigial among photographers and their ability to focus without AF has atrophied.
Yet, venerable and famed practitioners of the art and craft of photography used rangefinder cameras for a good part of the 20th century. Street, documentary, photojournalistic, candid, and even nature and landscape photographers somehow got along without the need for focus lock, AF zones, and the modern view provided by EVFs and LCD finders.
My field test of the Leica M10, which follows, allowed me to revisit my earlier work with a rangefinder camera, a Leica M3 that I photographed with for almost 20 years. I was curious about this melding of manual focus with digital functions; I also wanted to see if the M10 provided the same visual experience and engagement I experienced with rangefinder shooting in the past.
Rangefinder Focusing
First, though, a quick primer on rangefinder focusing. When viewing through the optical finder, a rangefinder gathers and displays two images of the same object via a transparent overlay: with the Leica M10, a “split-image” rangefinder, moving the focusing ring on the lens via a small handle makes the object “whole,” with one image sitting atop the other. It is judged as one of the most accurate ways to get precise focus because of the eye’s innate ability to recognize an offset and then reform straight lines.
Why is this more accurate than focusing manually or focus tweaking AF with a DSLR or mirrorless? In essence, the ability of the eye to resolve small details using an EVF, optical finder on a DSLR, and especially on an LCD is inherently poorer than that provided by a rangefinder system: so-called electronic “focus peaking” is a nod to this and emulates a rangefinder view, yet can often block full consideration of the image.

Practically speaking, even recognizing the amazing speed and accuracy of advanced AF today, the “travel” (lens rotation to attain coupled focusing) in the Leica M10 is short, smooth, and rapid, albeit with some requisite practice. And, for me, rangefinder focusing is tangible and provides a visceral engagement with making an image, which is always a good thing.
M10 Body and Specs
Speaking of engagement, the Leica M10 is sparse in terms of body buttons and dials. There’s a manual ISO setup dial on the top left and a shutter speed setting on the right (1/4000 second to 8 seconds, flash sync—1/180 second and slower—and Bulb, use of which is aided by a threaded shutter button that can take a cable release). It also has the Auto ISO feature, which I used regularly.
For most of the shots in this test I set the max ISO to 1600 and worked in aperture or shutter priority. Aperture is set right on the lens and shutter on the right-side dial. If the two red “A” markings on the dials are set, you are shooting in aperture priority.
The Leica M10’s back controls include buttons on the left for switching to live view (LCD: three inches, 1.036 million pixels, 100 percent view), playback, and a Menu button for setting parameters using the LCD, with a four-way control field on the right for making selections within the menu.
The menu on the Leica M10 is standard and fairly spare (thankfully); it lets you format a card, choose Auto or set ISO, white balance, advance modes, recording formats (DNG and/or JPEG), exposure compensation, metering pattern (three: multi, CWA, or spot), sensor cleaning, and a few more, including using focus peaking when working in live view, an in-screen histogram and clipping warning, and superimposition of grids for composition.
Inside the Leica M10’s weather-resistant, sveltely finished, all-metal die-cast magnesium body with brass top panel and base sits a 24MP CMOS full-frame (24x36mm) sensor. Leica’s latest Maestro-II image processor handles full JPEG or DNG (raw/lossless compressed)/JPEG format.
The Leica M10 takes all lenses in the M-Mount series as well as R-Mounts with an optional (Visoflex) adapter. There is no video recording capability, thus recording can be made on standard SD cards, though faster ones should be used to take full advantage of the 2GB buffer that allows for up to 5 frames per second (fps) shooting at full resolution.
Power, Charging & Wi-Fi
The Leica M10 is powered by a lithium-ion rechargeable battery that frankly does not have a large-shot capacity (about 250 shots); a Leica spokesman candidly told me, on the record, that photographers expecting to shoot more before recharging should carry a charged spare. I did, but found that a day’s shooting without having to use the spare was more than enough power, although I might not shoot as much as others. One note of caution: using Wi-Fi with the Leica M-App (more on that below) can drain batteries faster.
So if you plan on extensive use of remote control (you can control many parameters from the phone display as well as release the shutter) and to share pictures to the phone and take lots of pictures in a typical day, bring two extra batteries for the Leica M10. (Long trail hikers and campers, take note.)

I found it easy to connect the Leica M10 to my iPhone. First, I downloaded the Leica M-App (as of this writing, it’s only available in Apple iOS). I then tested it in my studio using my local area network. The camera detected the network and then all I had to do was input my network password and I was connected.
ISO & EVF
The ISO range on the Leica M10 is 100 to 6400, with “push” ISO up to 50,000. As mentioned, I set Auto ISO to 1600 (max) and was quite pleased with the results.
For this test of the Leica M10 I also shot ISO 25,000 and while “grainy,” it could do in a pinch, but only when necessary. There is a hot shoe for an auxiliary flash and it’s where you’d mount the optional Visoflex EVF that also offers GPS functionality.
I did find that the Visoflex has a less-than-instant refresh rate and if I moved quickly the image had a bit of a smear. But using the EVF with an R-Adapter allows you to use it as a finder with nearly all Leica R-Lenses, although in general practice and with M-Lenses, why you’d shoot with EVF with this camera is beyond me. I’ll go over other features of the Leica M10 as I go through the field test shots and comments, but of course must mention the cost: $6,595 (body only).
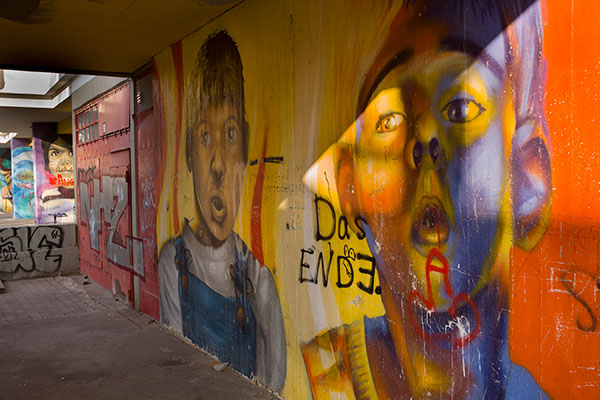
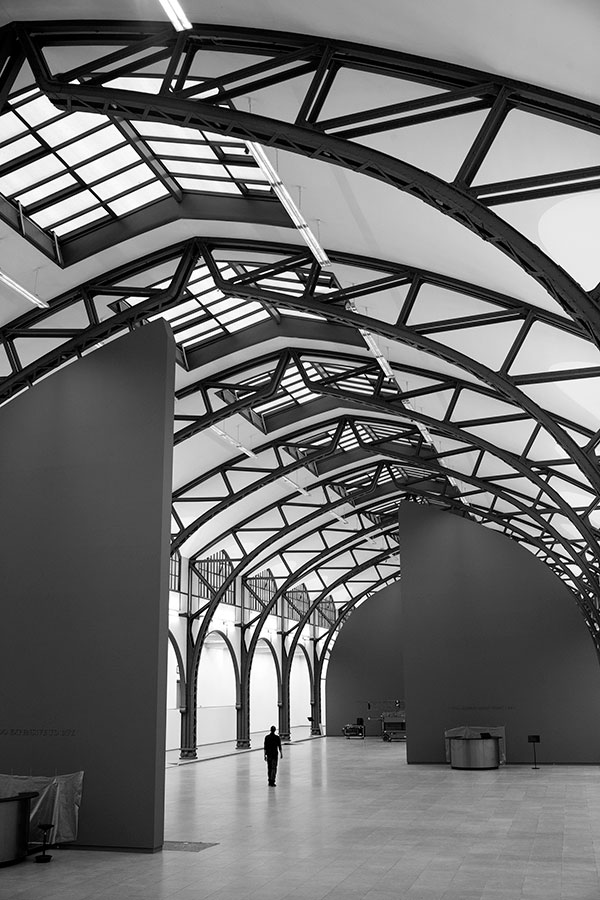
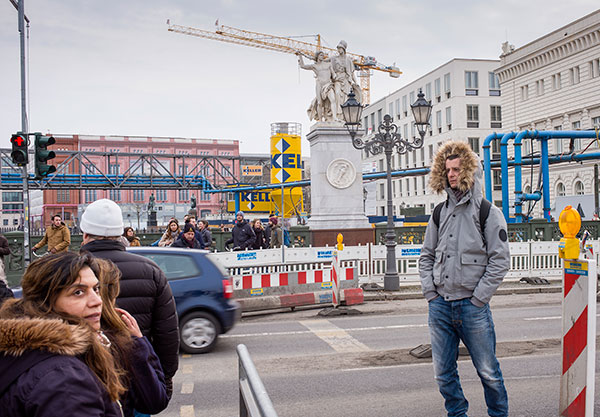
Field Test
I spent a week with the Leica M10 on a trip to Berlin, Germany, while attending TIPA meetings. I photographed in all manner of light during the day and the evening. Bright sunlight in Berlin is a rare treat, at least during the time of year I visited: light mist and overcast was more the norm.
At first, getting back into the rangefinder saddle with the Leica M10 proved a bit challenging, but I quickly got the gist and enjoyed working with the smooth travel and feel of the focusing ring. I also got back into hyperfocal distance settings, as the depth-of-field scale on the lens barrel is well marked for all apertures. Thus, I could focus with the split-image rangefinder and/or set up hyperfocal distance shooting, which I did many times when I set the aperture at f/8 and above. Low-light shooting was a pleasure due to the f/1.4 max aperture on the Summilux-M 35mm f/1.4 ASPH lens I had for the test. Minimum aperture is f/16, with half clicks between stops.
The Leica M10’s menu was quick and easy to navigate, and the only time I really used it aside from formatting my memory card was to change white balance when I went into a museum or to switch from Auto to Manual ISO when I tried out the higher-speed realms. I focused primarily through the optical finder, although the LCD can help for overhead shots: unfortunately, the finder does not articulate so those shots tended to be a bit of a Hail Mary. As mentioned, I did not find the Visoflex finder helpful and after trying it out on the street the first day I subsequently kept it snugly in the hotel safe thereafter.
Metering and Exposure
I had a choice of three metering patterns with the Leica M10 but worked mainly in center-weighted and spot. There is an exposure compensation control in the menu, but I found it easier to just bias toward the highlight and lock exposure with slight pressure on the shutter release. I guess if you were photographing snow in bright sun the exposure compensation would come in handy.
The shutter speed readout is very evident and bright in the optical finder, unlike some cameras I’ve tested where you need a magnifier to read it. That turned out to be a very helpful feature.

Unfortunately, I discovered that images made slower than 1/30 second with the Leica M10 were not particularly sharp. I generally do my best to squeeze the shutter rather than poke it, and while I cannot rule out my contribution to the shake, I did have a notion that a rangefinder allowed for slower handheld shooting than a DSLR—at least that had been my experience.
That caused me to be mindful of the Leica M10’s shutter speed on later takes and when the light got low to open up the aperture to ensure that I was shooting at faster speeds. With all the other features of the M10, I wished that some form of integral image stabilization could have been included.
Conclusion
The Leica M10 is a mix of manual and electronic, analog and digital. On the digital camera side it has live view, various settings, readouts and processing tricks on offer, an LCD zoom, a fast 5 fps continuous shooting mode, sophisticated image processing, and more. Yet, working with it is a decidedly analog experience.
Overall, the handling and feel of the camera are delightful: I had a distinct sense of pleasure when making images. I felt engaged in the experience and enjoyed the sense of control and decision making that went into each shot with the Leica M10: it certainly got me out of the “auto everything” trip many cameras pose today.
The Leica M10 presented no hindrance to taking the pictures I wanted when I wanted. Somehow, a rangefinder, and particularly a Leica, feels less intrusive and, while this may all be in my head, seems to give one a certain feeling that the people you are photographing feel less put upon than when you point a big ole DSLR at them. It’s quiet, quick, and handy. The price, unfortunately, puts it well out of my budget range, but it sure was fun while it lasted.


![]()
Get the Latest Photo Tips, News & Reviews from Shutterbug!
| Camera Reviews Other Reviews | Mobile Reviews Photography Reviews Columns | News | Features | How-To | Resources |
 © 2025 Shutterbug
AVTech Media Americas Inc., USA
All rights reserved