Infinite Backgrounds
Select, Cut And Paste It is All In The Digital Darkroom

Infinite Backgrounds

Where do you get backgrounds? This was a mural on the wall of a men's room in the Dominican Republic! (Model: Abby Chase.)

About 15 years ago I bought a front projection system for my studio. The way it works is something like this: You pop a slide into the projector and it shows up on the background screen. Put your subject in front of the screen and when you look at the final image, there's your model and London Bridge is in the background.

Cool!

The only problem was that I had one of the early systems from a company that doesn't even exist now. There were several things I didn't like about it. First, there was a "black line" around the subject, so they looked like they were pasted on the background. Second, I had to keep my lights from striking the screen and overexposing it, so I had to make sacrifices in where I placed them. And third, the system itself was pretty big and heavy, locking me to the tripod. (Please note, today's systems are far superior.)

This shows the two photos opened, my "green screen" shot on the left and a sunset sky photo on the right for my new background. I like to approximate the sizes and do all my cropping ahead.

Even with those problems, I always thought the basic concept was pretty cool. When you're a small studio like I am, you don't have a huge shooting room and every photographer knows you can never have enough backgrounds. Not only that, but you can have backgrounds that don't exist, like huge flowers, or colorful little designs that you can make wall sized, or just beautiful textures and colors.

Enter the year 2003. We've got tools that didn't exist 15 years ago, like scanners, digital cameras, and Adobe Photoshop. Even a technical dope like me can figure how to cut someone off of one background and paste them onto another. (Note: I did have to call one of my "techie friends" for the best way.) Now, I can put my lights where I want, not worry about a "black line," and create unlimited backgrounds for my subject. Here's how.

Choosing the Select>Color Range and picking out the green selects all the green color.

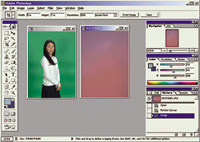
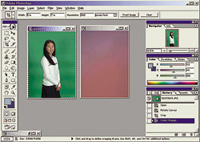
Choose The Background
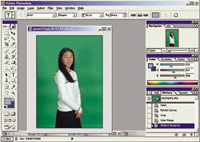
The first step is picking the right background. As you probably know if you've read my articles for any length of time, I go for the path of least resistance. Call me lazy, brilliant, or stupid, I don't care; I just need to always know the easiest way to get the job done. That means I need to choose a background that has color in it that my subject does not. Since most of my subjects don't wear nasty green clothes and their skin isn't that color (except my clients from Roswell, New Mexico), I use a green "chroma key" colored paper background from Superior Specialties. This means I can shoot the photos and then easily delete that background color in Photoshop. Here's the procedure I use.

By choosing Inverse, we select the subject instead of the background.

Select The Background
I open the file in Photoshop and go to Select>Color Range. Then I use the (+) eyedropper and use it to pick out and add all the colors I want to remove. If it's all a solid color that isn't anywhere else, it's pretty simple, hence the green background. Then I adjust the "Fuzziness" to usually about 90, hit OK, and my subject is pretty well outlined.

At this point I've got the "dancing ants" moving around my subject. I go to Select>Inverse, 
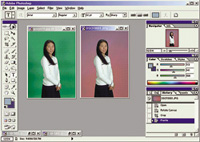
and my subject is cut out from the background. Then I simply copy my subject and paste them into the previously chosen background file. I can adjust sizes by using the Transform tool but I usually try to get the sizes the way I want by cropping them first. The whole process takes only a couple of minutes.
Here's another hint for creating a natural look. When I first tried doing this, there was something I just didn't like about it. Then it hit me. I usually put backgrounds out of focus, and I was leaving them sharp. Try running your background file through the Gaussian Blur filter and adjust to taste.

The last step is to copy your subject and paste her into the new background. Notice I smoothed out her sweater some while I was at it. (Model: Katie Theriault.)


The only drawback I've seen so far is that the green color sometimes shows in the hair or the edge. I've been running a soft clone brush at 100 percent to take care of this. Of course, if your subject doesn't have black or white clothing on, you could use one of those colors and not get a shift.

Infinite backgrounds are just one more example of how digital imaging is transforming our photographic world. I can't wait to see what other goodies lie ahead. Don't forget to sign up for my newsletter at ephoto@stevebedell.com to keep abreast of all the latest developments.

X