Globetrotter
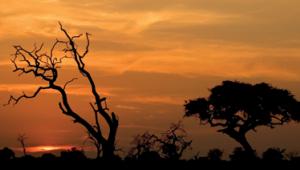
What To Do When The Weather Turns Bad

Globetrotter

Photos © 2002, Rick Sammon, All Rights Reserved

Look at any post card rack, and you'll see pictures taken on bright, sunny days. The pictures were often taken late in the day or early in the morning, when the scenes are bursting with warm colors, contrast, and detail. Those are the kinds of pictures that "sell" a destination, pictures that make us want to "be there." Pictures that we all want to take.
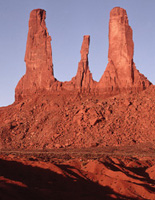
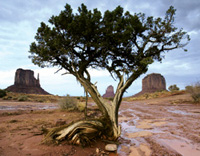
 And that includes me!

The fact is that we can't always get sunny-day shots. Sometimes, Mother Nature has other plans for us. That's what happened to me on my second trip to Monument Valley, Arizona.

On my first trip in 1995, I had spectacular weather, as you can see by this picture I took of the Three Sisters near John Ford point. I took this picture just after sunrise, when there was not a cloud in the sky.
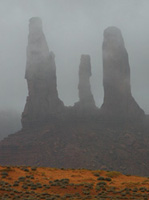
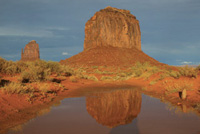
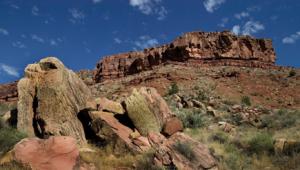
On my 2002 trip it rained about 80 percent of the time. So my shooting time was severely reduced.

Did it get me down? You bet. Still, I wanted to get images. So, I stayed out all day looking for locations...and breaks in the weather. I made the best of it. I took pictures, and actually enjoyed the challenge of trying to get good pictures, even if they were pictures that illustrated bad weather.

So my suggestion is this: If it "rains on your parade," go out there and shoot. Challenge yourself. The soft light may actually enhance some scenes. You may get lucky and get a bit of sunshine. What's more, you may actually have fun and come back with some "keepers."

This picture, taken during a break in the pouring rain, is not the most exciting picture I've ever taken. I took it as part of a pair that illustrates one of the big benefits of rain: puddles.

Look how beautiful the butte looks, from a different angle, when it is reflected in a huge puddle (which covered and eventually washed out the road in a flash flood, by the way).

When you want reflections to appear in a picture, don't use a polarizing filter. In fact, on cloudy and rainy days, don't use a polarizing filter at all. It will have no effect on the sky and clouds, but will reduce the amount of light entering your lens. That reduction in light will cause you to lose a stop of exposure, which could come in handy if you want more depth of field or a faster shutter speed for a handheld shot.

(Above, Right) Close-ups are a nice option on overcast days. The soft light provided by cloud cover eliminates harsh shadows. So go for some close-ups.

(Below) Moody scenes, created by overcast skies, make for moody pictures. I actually like this picture of several buttes and an old tree. (My guide pointed out this vista. It illustrates the importance of having a good guide when traveling.) For me, the picture captures the feeling of what the Navajos believe is a sacred place.

Sure, the sky may be dull and the foreground may not have much detail, but that's no reason not to take a picture. Try taking one in which you plan to use only a portion of the frame and turn it into a panoramic picture. That's what I did to get this silhouette of several of the buttes. I used my 16-35mm lens set at the 35mm focal length, took a picture, and then cropped out the top and bottom of the frame.

After some work in the digital darkroom (specifically using Photoshop 7), I was able to change the "weather conditions" in my moody picture. The scene is now brighter, warmer, and has more contrast.

As you can see from these screen shots, I boosted the Contrast using the Image>Adjustments>Brightness/
Contrast control, boosted the Red and Yellow in the Image>Adjustments>Color Balance control, and lightened the overall scene by pulling down Curves in Image>Adjustments>Curves (pulling up Curves in RGB mode does the same thing as pulling down Curves in the CMYK mode, the mode in which I was working).

So keep in mind that wherever you go, despite the weather, good shots, and fun shots, can still be taken.

Gear You'll Need For Wet Weather Shooting
If you plan on taking advantage of the wonderful light that rainy days offer and look forward to the challenge of shooting in adverse conditions, you may want to consider bringing along the following accessories and gear.

Fast film/ISO setting. Pack ISO 400 or 800 film or make sure that your digital camera has a fast ISO equivalent.

Camera protector. I use a plastic sandwich bag and a shower cap to protect my camera. More serious camera covers, and flexible and watertight plastic models, are available from Ewa-Marine (www.rtsphoto.com).

Waterproof camera bag. I use a Lowepro backpack with a built-in "raincoat" that folds into a pocket and unfolds to cover the entire bag. Lowepro (www.lowepro.com) also makes shoulder bags with built-in "raincoats."

Plastic bags for accessories. Keep memory cards and film in bags for extra protection.

Camera cleaning kit. You'll need one in case your camera gets wet. On that note, if a raindrop gets on the front element of your lens or filter, wipe it off with a lint-free cloth. If you don't, a single raindrop can look like a big blob in a picture. The wider the angle of the lens, the larger the blob will appear. Also, a lens hood will help keep the front element of your lens dry.

Rain gear. You want to be comfortable and dry in the field. EXOFFICIO (www.exofficio.com) and Orvis (www.orvis.com) make rain wear that will keep you dry. Waterproof hiking boots are a good idea, too.

X