- REVIEWS
Camera Reviews 
More Reviews Mobile Reviews Photography Reviews - GALLERIES
- VIDEOS
- BUYER'S GUIDES
Fine Art Effects: Using Software To Transform Your Images
In this article I’ll encourage you to put on your artist’s smock and dig in to your vault of photos to create new versions of them with options that look like hand made watercolor, oil, pen and ink, woodcut, serigraph (silkscreen) and pencil sketch. No drawing is required.
We’ll start with OnOne Software’s Perfect Effects 3 (PE3) (www.ononesoftware.com), which offers more than 300 effects in 14 categories: Vintage, Darkroom, Borders, Portrait, Color and Tone, Film, Glow, Detail, Black and White, Landscape, Movie Looks, Photo Filters, Textures and Vignettes.
To give an example of what can be done with this software I worked with a shot of New York’s 1909 Manhattan Bridge framing the distant Chrysler building [1]. Using PE3 as a plug-in, I worked with Photoshop CS5 and CS6 Extended. After opening my photo, I selected File>Automate>Perfect Effects to launch the PE3 screen [2] with large before and after previews in the center. Scrolling out along the bottom are thumbnail previews, below a bar of 15 categories, of the effects that are available or have already been applied to your photo. From the Black and White category, I chose Roadie. While converting the image to black and white, this also opened up the shadows within the bridge and added a grainy texture to the sky [3].

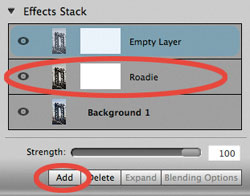
All Photos © Howard Millard


On the right in the Effects Stack, you’ll see that Roadie has been added above the background layer. Clicking the Add box below the Effects Stack adds this effect [4] and places a new empty layer at the top of the stack, ready for your next effect choice. If you don’t click the Add box, the next effect you select will replace it—this is handy for previewing many different effects before committing to one. But, you must remember to click Add once you’ve settled on your choice or you’ll have to go back and start again.
You might be tempted to click Apply now (at the lower right). However, if you want to add any additional effects (and I think you’ll want to consider some), this is not the time. Why? Because Apply is the final step since it adds all the effects in the stack to your original and returns you to Photoshop.
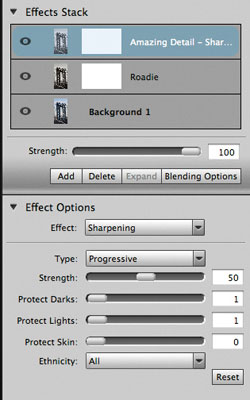
My next stop was the Detail category where I selected (what else?) Amazing Detail. Effect options for Amazing Detail, found in the Effects Stack [5], include sharpening. I chose Progressive because it was the most dramatic and offered options for strength and the ability to adjust the sliders for Protect Darks, Protect Lights and Protect Skin. The other types of sharpening available here, High Pass and Unsharp Mask, offer different controls. Adding Amazing Detail energizes and enlivens the bridge cables as well as pumping up the detail in the distant Chrysler building, which I had framed with the bridge [6].

After clicking the Add box, the next stop is the Landscape category where I tried Autumn, the Golden Hour Enhancer, Fog and Vechio before settling on Magic Sunset. This effect added a very warm sepia tone, as well as enhancing the contrast and graininess in the smooth tone areas such as the sky [7].
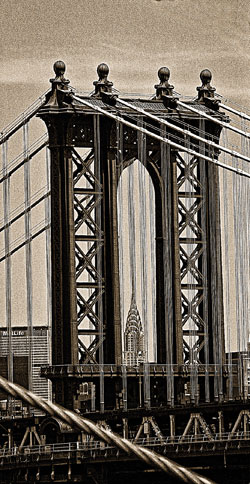
Why stop there when there are so many more categories to explore? I next used the Vintage effect and chose Mayor, which pumped up the heat with overall warming while adding deep red hues at the top and bottom [8].

Finally, to add a finishing touch, I headed to the Borders category. The style “Martha” looked good, but “Russell” won out as being easier to see in this size format. Check the Effects Options [9], which tells us this is a (vintage Polaroid) Film Type 55 border, and the Blend mode for it is Hard Light. Both these options can be changed with drop down menus, and the strength and scale can be modified for each image. Lastly, you can rotate the border and move it up or down for the best position. Adding up the Effects Stack, you’ll see all the ingredients that have brought the bridge and the building a long way [10] thanks to the multiple options of PE3.


A Painterly Effect
I recently got a new electric guitar [11] that looks quite stunning, making it a great subject for art effects. With their comprehensive arsenal of art emulations, the Topaz Labs plug-ins (www.topazlabs.com) seemed like the first place to go. Topaz offers effects in multiple categories including Black and White, Lens Effects, Adjust (Color, Detail and Exposure), Detail and Sharpening, Clean, Focus, De-Noise, Masking and Simplify, as well as a new photoFXlab, which works as a stand-alone app with layer capability. For this work I chose Topaz Labs’ Simplify 3.

Opening my photo in Photoshop CS6, I chose Filter>Topaz Labs>Topaz Simplify 3. Image [12] shows the Topaz Simplify screen; with preset art effects options on the left and multiple adjustments on the right. Hover your mouse over an effect at the top left and a small preview of it will appear above the list of presets [13]. Find one you like and click on it to see a full size preview. This can take 10 seconds or so to draw, depending on your computer.


I chose Sketch hardPencil, and the result with the default settings was quite elegant in black and white [14]. There is nice shading and detail within the guitar, good edge contrast, and fine definition in the oak background texture.

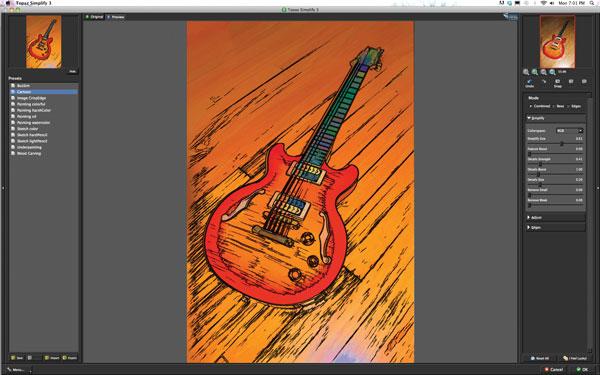
Now it was time to head into the realm of color, rich color and line were the effects I wanted. Selecting Cartoon resulted in the preview seen in [15]. Moving to the right workspace column, controls [16] include Size, Feature Boost, Detail Strength and Boost, Remove Small and Remove Weak (elements of the image). Play with these sliders to see how they affect the final look, such as removing small details.


Below Simplify in the right column are further controls [17] for Adjustments: Brightness, Contrast, Saturation and Edges. After trying many adjustments, I settled on the rendering shown in [18]. (Note: To remove the bright highlight at the bottom right of the picture I used Photoshop’s Clone Stamp tool to clone in other areas of the background to cover the distracting highlight.) Now, bright colors fill the body of the guitar, contrasting with the dark greens and blues in the neck, loosely drawn black lines define the instrument’s shape and dark lines in the wood background detail the grain in the oak.

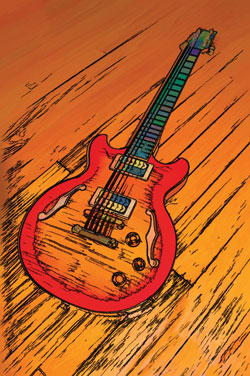
To add a finishing touch and enhance the realism of the art effect, I turned to OnOne PhotoFrame 4.6, (www.ononesoftware.com). In Photoshop CS6, I chose File>Automate> PhotoFrame 4.6 Professional Edition. From the library of frames and border treatments, I chose Woodcut_01, which adds irregular color marks outside the edges as would be created by a woodcut [19]. However, the default crop cut in too close to the left edge of the lower body of the guitar. So I used the crop adjustment to pull the effect to the left and leave some breathing room for the instrument [20].


Sources
OnOne Perfect Effects 3, $99.95, OnOne PhotoFrame 4.6, $99.95. Online or physical delivery as well as free trials, examples and videos can be found at www.ononesoftware.com.
Topaz Simplify 3, $39.99. To purchase this software and for free trial downloads, examples and tutorials please visit www.topazlabs.com.
For many of the software companies mentioned, note that you can usually buy their entire suite of products for the price of 2 or 3 individual modules.


![]()
Get the Latest Photo Tips, News & Reviews from Shutterbug!
| Camera Reviews Other Reviews | Mobile Reviews Photography Reviews Columns | News | Features | How-To | Resources |
 © 2025 Shutterbug
AVTech Media Americas Inc., USA
All rights reserved