- REVIEWS
Camera Reviews 
More Reviews Mobile Reviews Photography Reviews - GALLERIES
- VIDEOS
- BUYER'S GUIDES
What Are Lightroom's New ADAPTIVE PRESETS & How Do They Work? (VIDEO)

We've been bringing you all the capabilities of Lightroom's recent update as fast as we can, and today's tutorial describes the new Adaptive Presets, and demonstrates how to use them for a variety of image-editing tasks.
Instructor Anthony Morganti is a Photoshop and Lightroom impresario who we rely upon frequently for demystifying new editing tools. In today's eight-minute episode he explains everything you need to know for making faster and more precise edits with the new Adaptive Presets found in Lightroom.
The first step is finding these new tools, and you do that by navigating to the left-hand panel in Lightroom's Develop Module. Once you click on the Presets tab on the top you'll first see any presets you purchased in the past. The next section includes all the Presets built into Lightroom, with the new Adaptive Presets at the top of the list.
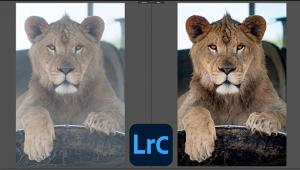
You'll then see the available options, which include Adaptive Portrait, Adaptive Sky, and Adaptive Subject—each with a subset of tools. So what exactly are these Adaptive Presets and how do they differ from a "normal, everyday, run-of-the-mill Lightroom Preset?"
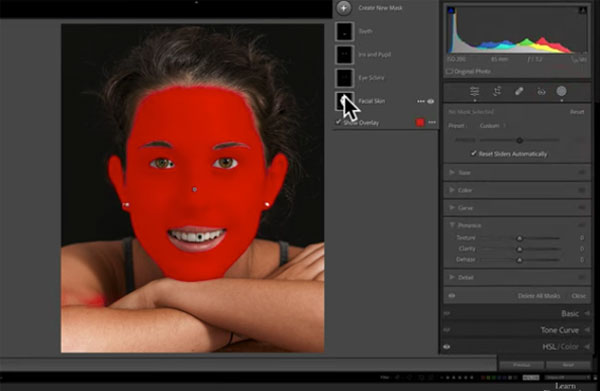
Morganti explains the difference like this: "The new Adaptive Presets work by "taking a number of AI masks and bundling them together—so with a single click you can edit a bunch of things at one time." He uses a simple portrait to demonstrate the almost instantaneous method of softening the model's skin, whitening her teeth, enhances her eyes and more.
You also have the option of choosing which of these enhancements you want, if some of the adjustments are unnecessary or unwanted. So, for example, if your only goal is to whiten a subject's teeth, or darken her eyebrows, the Adaptive Presets enables you to do just that.
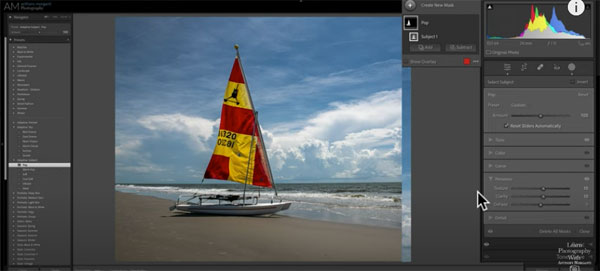
As you see, when Morganti pulls up a seaside photo, the other Adaptive Presets work in much the same way. For this shot he selects the Adaptive Sky Preset to demonstrate how this one works to selectively enhance various attributes of the sky, while leaving the rest of the photo untouched.
The lesson concludes with an explanation of the Adaptive Subject Preset which could be a person, an animal, or in this case small sailboat on the beach. By watching Morganti work some magic with these new tools, and comparing the before/after images, we think you'll agree that Lightroom's timesaving Adaptive Presets are a big deal.
After watching the video pay a visit to Morganti's YouTube channel where you'll find an abundance of image-editing tips and tricks. We also suggest checking out the tutorial we posted from another image-editing expert, explaining how to use simple Lightroom masks to create nature photos with enhanced depth and drama.


![]()
Get the Latest Photo Tips, News & Reviews from Shutterbug!
| Camera Reviews Other Reviews | Mobile Reviews Photography Reviews Columns | News | Features | How-To | Resources |
 © 2026 Shutterbug
AVTech Media Americas Inc., USA
All rights reserved