Now-a-days, you cannot even imagine to remove the word digital from photography. We are living in the age where the photographers are doing miraculous work with the help of green screen technology which is not possible without digitization.
Regards,
Enneagram workshops
- REVIEWS
Camera Reviews 
More Reviews Mobile Reviews Photography Reviews - GALLERIES
- VIDEOS
- BUYER'S GUIDES
That Extra Touch: Fill Flash, Filters & HDR

You may think that flash should be used only in low light, but it can be applied in many ways in the outdoors. Flash not only provides light to add detail in otherwise dark areas, but that light also can enhance color in your subjects. The question often becomes—when should you use fill flash outdoors, and when shouldn’t you? The best course is to ask yourself: What will my flash add light and detail to? If you have subject matter within range of the flash’s coverage that will appear darker than you wish, you might be able to fill in these areas by using your flash. To use this knowledge effectively you have to check the flash specs to see its power output (coverage), doing so at the ISO setting and aperture the specs provide.
The pop-up flash on most cameras cover only about a maximum of 10 feet, so keep that in mind in your work. If you find that you consistently need greater coverage then consider an auxiliary speedlight or flash. I wanted to document a friend of mine backpacking through Anza Borrego State Park, but the harsh desert sun created too much contrast, so as he passed me blocking the sun from my lens, I added some fill from my pop-up flash to bring back detail to an otherwise silhouetted hiker (#1).

#1
All Photos © Sean Arbabi
All Photos © Sean Arbabi
In low light, your flash may overwhelm the shot providing more exposure than the rest of the scene, but in bright sunny conditions you may barely notice it at full power. This is where experimentation and experience can help you become better friends with your flash unit. Reading the manual to learn how to control the power of the flash, while testing it in the field can give you some general starting points on ways to control your flash so that you add light in a natural, less-noticeable way.
First identify a moment where additional light is needed, then meter the overall scene, lock in the exposure and turn on the flash to pop some light into the dark areas. While photographing the Grand Tetons at sunrise (#2) I framed the scene as sunlight crested the Eastern sky, the higher peak lit up while the ground in front of me remained in shade. So, with the additional assistance of a 3-stop Graduated Neutral Density filter I added some fill flash and was able to retain the color on the Tetons while not losing the foreground detail of the colorful wildflowers.
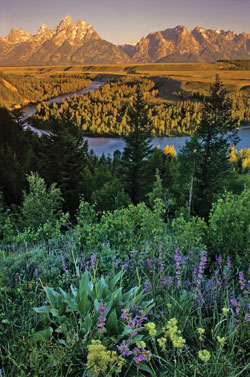
#2
I used 3 other techniques in this scene to make the light from my flash less conspicuous. The first was to dial down the output of the flash using Flash Exposure Compensation set at minus 1-2/3rd stops. The second was to feather my flash; that is to point my flash more toward the distant trees in the middle ground of the frame instead of directly at the wildflowers. By doing so, I dispersed the light from the unit more evenly over the foreground, which in turn diminished the appearance of the flash. The third was to cover my speedlight with translucent orange plastic—a “gel”—in order to mimic the light in the background.
Fixing With Filters
I use 2 filters in the field—a Polarizer and a Graduated Neutral Density filter (GND). When it comes to landscapes, a GND can be a savior, making the difference between a lost shot and a great capture. Clear on the bottom and gradually increasing in neutral (colorless) density darkness toward the top, these filters come in varying degrees or strengths of 1, 2 or 3 stops. Since most skies are much brighter than the land below them a GND can take a high contrast scene with overexposed highlights or underexposed shadows and turn it into an extraordinary landscape with detail in all the right areas.
To some extent, a GND was our first high dynamic range application. A good example of this is the sunrise scene I recorded along the shores of Jenny Lake in Grand Teton National Park (#3). Without the use of a 2-stop GND, there was no way I could expose the area as I saw it, but when added the filter cut the sky and mountain range down 2-stops (in the darker top section of the filter), while leaving the lake reflection alone (in the bottom clear section). This, in turn, diminished the contrast enough to allow my camera to see what I could see, correcting the exposure in camera without the need for heavy post-capture dodging and burning. I used a 2-stop GND along the shores of Mono Lake (#4) to retain detail in the shaded areas of the tufa towers while maintaining the pink and purple hues of the dusk sky.

#3

#4
The effect of Polarizing filters cannot be duplicated in any software application—at least not at the moment. Circular Polarizers are the ones digital photographers use and the filter can not only cut reflections of shiny surfaces to allow you to “see” beneath the sheen on lakes and streams it can also cut haze in atmospheric conditions, boosting the appearance of clouds against a deep blue sky. If you’ve never applied a Polarizer filter to your images before, hold it up to your eye and move around as you rotate the filter. Similar to polarizer sunglasses, you’ll notice skies deepening in color and reflections being cut depending on the angle and direction you look. You can see this in the comparison of the Grand Teton landscape (#5) made with no filter and (#6) with a Polarizer.

#5

#6
And because the blue sky darkens with polarization, the exposure for the sky is closer to the landscape, therefore cutting the contrast of the overall scene. This effect not only benefits color images, but black and white conversions as well. This is evident in (#7) the photo of the large cumulus cloud above Lembert Dome that seems to jump out of the frame.

#7
High Dynamic Range Imagery
In today’s world of digital photography, the doors have opened wide to new processing techniques and image manipulation. Digital has given nature photographers more control over their images than ever before and has expanded the arsenal of possibilities in the field. There was no way to create the image of Chimney Rock in Point Reyes National Seashore (#8) using film without hours of heavy darkroom manipulation and even then that amount of control was limited at best. Yet, by applying new High Dynamic Range (HDR) techniques, I could capture an extreme wide range of detail from the shaded cliffs and flowerbeds to the bright sun and sky, without losing any detail.

#8
By reinventing exposure through the process of combining bracketed photos into 1 image file, High Dynamic Range (HDR) imagery has become an essential part of landscape photography today. This amazing new extension of expression, if performed well and in the right circumstances, allows us to document scenes with a huge range of light (15-20 stops) that was impossible to capture in the past.
However, not all HDR images are created equal—many seem overdone and unrealistic, and in nature photography that can be a recipe for failure. Restraint is key and taking advantage of the technique can be revelatory, especially with the ease of practice provided by great plug-ins and stand-alone programs like Nik Software’s HDR Efex Pro (www.niksoftware.com) and Photomatix Pro (www.hdrsoft.com). In all, an appreciation of exposure skills and an understanding of realistic contrast, color and light can help you in the process. Note the use of those attributes in these photos (#9, #10, #11 and #12), all produced through the process of bracketing a series of shots and combining them in post-capture software. The aim was to recreate and retain the wide contrast ratio from the original scenes. Some only needed 3-bracketed images, while the others were created from 5-9 exposures.

#9
#10

#11

#12
The How-To Of HDR
Here’s a brief, simple step-by-step procedure for producing an HDR image. Most HDR software will walk you through the processing stages—your job is to create consistent framing and exposure brackets.
1. Search for a scene with enough contrast where you can apply the benefits of HDR. A landscape with bright highlights and deep shadows can work well.
2. Meter the scene’s brightest and darkest area to find the parameters for your bracketed exposure. Set the camera on Aperture Priority, or lock the aperture in Manual for the bracket and use shutter speed to change exposure. Make your exposures starting by exposing for the brightest highlight (use a Spot meter function for that) and going toward the deepest shadow in which you want detail.
3. As you bracket from one extreme to the other, keep in mind that you only want to change the shutter speed and not the aperture in order to remove the effect any depth-of-field change may bring. You can bracket shutter speeds in any order—my default is usually 1-stop increments.
4. Once back at your computer, choose the series of image files you wish to use (usually no less than 3 and no more than 9) and preferable Raw files, then run an HDR program like HDR Efex Pro (www.niksoftware.com) to combine these images into 1 file.
5. There is a learning curve depending on which program you may use, many offering options before saving the final file. Such as sliders to increase or decrease the HDR effect, contrast, or reduce or remove any ghost effects from the subject matter.
6. After the final file has been created, you may want to modify it further in your favorite software program.
- Log in or register to post comments

RE: Taking The Digital Out Of Digital Photography
Submitted by Martinl on September 9, 2012 - 2:11pm
Martinl's picture RE: Taking The Digital Out Of Digital Photogr
Submitted by edrugsearch on September 10, 2012 - 5:33am
Digital photography has become easier and more affordable during the last couple of years. The biggest expense will be the initial investment in your digital camera, digital media and other accessories for your camera. Whilst most entry-level digital cameras are still slightly more expensive than their film equivalents there has never been a better time to convert to digital photography.


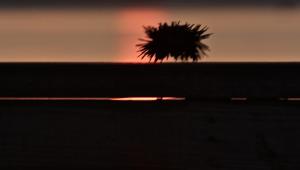


PHOTO OF THE DAY

Today’s photo is Relaxation by Linn Smith
eNEWSLETTER SIGNUP
![]()
Get the Latest Photo Tips, News & Reviews from Shutterbug!
| Camera Reviews Other Reviews | Mobile Reviews Photography Reviews Columns | News | Features | How-To | Resources |
 © 2025 Shutterbug
AVTech Media Americas Inc., USA
All rights reserved