- REVIEWS
Camera Reviews 
More Reviews Mobile Reviews Photography Reviews - GALLERIES
- VIDEOS
- BUYER'S GUIDES
Equivalent Exposure
Equivalent Exposure
by George Schaub
Now we come to how ISO, aperture, and shutter speed relate to one another. They exist to balance the amount of light in the scene with the recording made by the sensor and ultimately made into an image file on the memory card. Your goal is to record the scene with as true and balanced a color and lightness of what you saw when you snapped the shutter.
To review, the ISO setting of the camera sensor is the sensitivity to light. We raise or lower it according to the light level and how we want to utilize aperture and shutter speed settings.
 |
 |
|
|
||
The aperture and shutter speed solve the exposure problem and create balance between the brightness outside and the sensitivity of the sensor inside the camera. We control them for various image effects, weighing one against the other in every frame we take. We want to create balance, or equilibrium between all the factors.
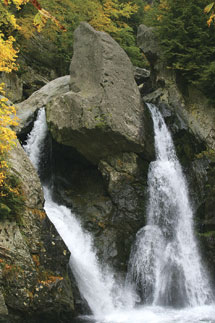
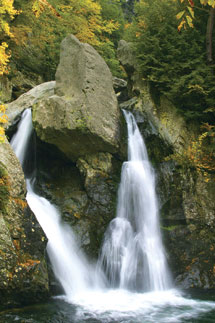
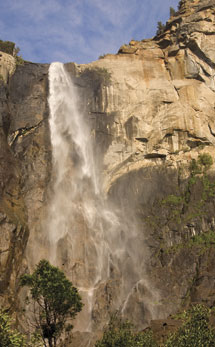
An equivalent exposure is one that relies on the same amount of light for the proper exposure but juggles the aperture and shutter speed settings to yield different image effects. This waterfall was photographed with two exposures, one at f/22 at 1⁄15 sec and one at f/8 at 1/125 sec. This is the same, or equivalent exposure, but the result is entirely different in terms of image effects. The narrower aperture resulted in a slower shutter speed to make the water appear like a ribbon, while the wider aperture caused a faster shutter speed and changed the effect.
Let’s define some terms. There’s a commonly used abbreviation for working with light and that’s EV, or Exposure Value.
 |
 |
EV is used in many ways, but just keep in mind that it always deals with working with light. It can be:
The combination of aperture and shutter speed that create a certain exposure.
It can be used as shorthand for a light level (how bright the scene is, expressed in aperture and shutter speed combinations at a certain ISO setting).
EV is also used to denote a change in that level, either through the actual amount of light in the scene getting brighter or dimmer, or in how you change the combination of aperture and shutter speed to allow a certain amount of light through the lens to make the exposure.
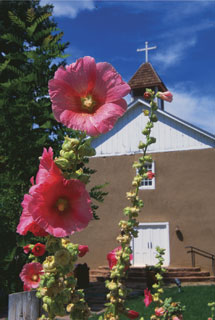
Each time you photograph you make a choice about image effects. When you work with aperture you can have a shallow or deeper depth of field, which changes the foreground/background relationship of subjects within the frame. Here the flowers and church are photographed at f/11 at 1⁄60 sec and f/4 at 1/500 sec; again, equivalent exposures yielding quite different image effects.
 |
|
|
For example, if double the shutter speed (say from 1/250 sec to 1/500 sec) you are changing that value by 1 EV. And if you halve or double the aperture setting (which you do by going from, say f/8 to f/11) you are changing the value by 1 EV. So, think of EV as shorthand for how we deal with changes in light levels or light recording in photography.
You’ll also encounter EV numbers in exposure compensation, flash output compensation, and in some instances in actual exposure settings.
The other terms used are AV (Aperture Value) and TV (Time Value) (or just S) for Shutter Speed or Value.
So now let’s join all these terms and see how they dance together.
 |
|
|
Say you are shooting on a fairly bright day and the camera is set at ISO 100. The reading is 1/125 sec at f/8, which happens to be EV 12. (This is an arbitrary number—don’t concern yourself with it.) You want to change the shutter speed or aperture to create different image effects. You do not want to change the exposure, as that is the right exposure needed to record all the brightness values correctly. Here’s how it all works:
At EV 12 you get the same amount of light coming through the lens (the exposure) with:
f/11 at 1⁄60 sec or f/16 at 1⁄30 sec or f/5.6 at 1/250 sec or f/4 at 1/500 sec.
When you make aperture decisions you are determining just how sharp, or unsharp the background will be. In some cases you’ll want to include the entire background in sharpness to give the subject context. In others you might want to isolate the subject by unsharpening the background, or at least make the background a less prominent part of the image. Here (1) the decision was made to have both the foreground tree and background sharp to give context to the main subject, thus an aperture of f/16 was used on a 28mm lens.
As you open the aperture wider you get to use a faster shutter speed to get the same exposure. Conversely, as you slow down the shutter speed you get to use a narrower aperture.
 |
|
|
Now raise the ISO to 200. We can “spend” the extra stop of sensitivity to light of the sensor in either aperture or shutter speed values—one or the other.
The exposures, within the same scene can become:
f/8 at 1/250 sec or f/11 at 1/125 sec or f/5.6 at 1/500 sec.
When you raise the sensitivity to light one EV step, thus double it, you gain an extra stop in either aperture or shutter speed.
So, when you go to ISO 400 for the same scene the exposure could become:
f/8 at 1/500 sec or f/11 at 1/250 sec or f/5.6 at 1/1000 sec.
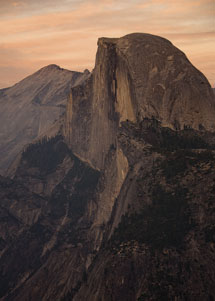
If the light is low and you are working handheld you can raise the ISO to bring more options into play. Usually that’s for getting a faster shutter speed, but at times you might raise ISO to get a narrower aperture for the shot. This sunset shot in Yosemite (2) was made at ISO 800 at an exposure of f/5.6 (the widest aperture available on the zoom lens) at 1⁄60 sec. At first reading, with the camera set at ISO 100, the shutter speed was 1⁄8 sec, way too slow for a handheld shot.
 |
|
|
The wonderful thing about modern exposure systems is that you don’t have to do the figuring yourself—the camera’s exposure and metering system does it for you. When you raise the ISO the system recalculates the values and automatically offers you another option, for a faster shutter speed or a narrower aperture. True, if you work in Manual Exposure mode you make the settings yourself, but the meter is still calibrated to the new sensitivity for you.
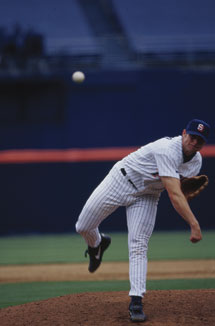
The ability to work with equivalent exposure means that you have creative control over image effects. In this shot of a pitcher delivering heat (3), the decision was made to try to catch the ball in midflight, which necessitated a very fast shutter speed (1/2000 sec) which yielded a wide aperture and shallow depth of field. In this shot of a waterfall (4) the decision was made to show a rich flow of water, with a shutter speed of 1⁄15 sec. The tripod-mounted exposure was f/29 in that bright light.
Why bother taking the time to learn this? It’s just smart to know how this works because then you can make good decisions about when to raise or lower ISO to get a faster shutter speed when needed or a narrower aperture to gain more depth of field. Even that can be simplified when working in Exposure Priority modes, which we will cover next.
The light was fairly low in the chapel interior, and I did not want to be rude by shooting flash. I was working with a fairly long telephoto, about a 200mm, to get close to this Saint without intruding on the altar area. My exposure at ISO 100 was 1⁄30 sec at f/8. What ISO would I set to get to a shutter speed of 1/250 sec or thereabouts? (See the equivalent exposure/ISO list for a hint.)
In short, equivalent exposures allow us to make creative decisions about image effects using the various combinations of aperture and shutter speed.


![]()
Get the Latest Photo Tips, News & Reviews from Shutterbug!
| Camera Reviews Other Reviews | Mobile Reviews Photography Reviews Columns | News | Features | How-To | Resources |
 © 2026 Shutterbug
AVTech Media Americas Inc., USA
All rights reserved