- REVIEWS
Camera Reviews 
More Reviews Mobile Reviews Photography Reviews - GALLERIES
- VIDEOS
- BUYER'S GUIDES
Digital Slide Shows; A Road Map For Success
As more and more images are made digitally, whether directly from a camera or via scans, photographers, educators, and lecturers of all sorts are creating and displaying digital slide shows using a host of different projectors. It's even becoming difficult to find slide projectors at some venues. Yet, many digital photographers are horrified the first time they project their images because they don't look like they did on their monitors at home. Some have even made prints they are quite proud of, having mastered a color managed workflow. But when they go to project these files, they may appear contrasty, overexposed, or display marked color shifts (#1).
 |
|
|
Selecting The Correct Color Space
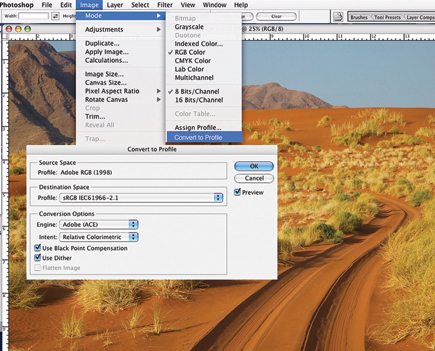
Your digital slide shows need not be a nightmare as long as you properly prepare
your images for projection. After you have selected the image files you are
going to use--we will assume these are master files you have optimized
for other usages--you will need to copy the files to a new folder. While
you have probably been using Adobe RGB 1998 (or ProPhoto) as your color space
for prints, these files will all need to be converted to sRGB. To do this in
Photoshop CS2, go to Edit>Convert to Profile and select sRGB as the destination
space. If you're using earlier versions of Photoshop, go to Image>Mode>Convert
to Profile and select sRGB. You can do this as a batch action on all the files
in this folder (#2).
 |
|
|
Re-Sizing And Sharpening Your Images
The second step is re-sizing the files. The size of the files is determined
by the resolution of the digital projector you will be using. For most projectors
available today for photographic slide shows this will be 1024x768. This means
that a file can be a maximum of 1024 pixels wide and/or 768 pixels high. You
can set this in Photoshop by going to Image>Image Size and filling in the
number of pixels. Note that you do not have to worry about the number of inches
or resolution--you are setting your file size to the resolution of the
projector. Some of the newest projectors now have resolutions of 1280x1024 or
even 1400x1050. If you have access to one of them, then you should size your
files accordingly. And if perchance you have access to a really high-end digital
projector, you will need to ask its resolution before sizing your files.
Note that most slide show software programs can re-size your files if needed,
but I wouldn't recommend relying on this for major re-sizing. Also, some
slide show programs--notably PowerPoint--perform better if you set
the resolution to 96, even though--theoretically--only the actual
number of pixels is important (#3).
 |
|
|
You will need to sharpen your files according to their final output size.
This is best done in your photo-editing software rather than in slide show software.
When you re-size your images, set Photoshop to use Bicubic interpolation. This
is done in the Image Size dialog box. If you choose to use Bicubic Sharper,
the downsizing of the file will be combined with some sharpening. If you are
in a hurry, this can be helpful, but as always, convenience comes with a price.
Sometimes the amount of sharpening is acceptable, while at other times it isn't.
If the file needs further sharpening, you're okay. But if Bicubic Sharper
applied too much sharpening for a particular image, you will have to start over.
My preference is to use Bicubic interpolation and take the time to sharpen each
picture individually whenever possible. With Photoshop CS2 I usually use Smart
Sharpen and select Amounts of 100-200 and a Radius of 0.4-0.8. In earlier versions
of Photoshop I used Unsharp Mask with settings of: Amount between 300-500, Radius
of 0.2-0.5, and Threshold of zero, but this may vary by image. Some professionals
prefer to re-size their images using Bicubic interpolation and then do a batch
action to sharpen their files. Save your re-sized images as JPEGs.
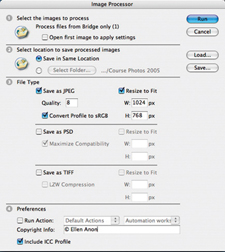
Using The Image Processor In Photoshop CS2 If you're using Photoshop CS2,
the entire process described so far can be even easier and faster! You can select
the files for your slide show in Bridge and then while still in Bridge, go to
Tools>Image Processor. Use the Image Processor to have Photoshop re-size
your image files to the dimensions you specify, convert them to sRGB, and save
them as JPEGs in a separate folder, all in one very user friendly dialog interface.
You can even have the Image Processor run an action on the files to sharpen
them (#4).
 |
|
|
|
| |||||||||


![]()
Get the Latest Photo Tips, News & Reviews from Shutterbug!
| Camera Reviews Other Reviews | Mobile Reviews Photography Reviews Columns | News | Features | How-To | Resources |
 © 2026 Shutterbug
AVTech Media Americas Inc., USA
All rights reserved