- REVIEWS
Camera Reviews 
More Reviews Mobile Reviews Photography Reviews - GALLERIES
- VIDEOS
- BUYER'S GUIDES
Deja Vu: Kodak Photo CD Revisited
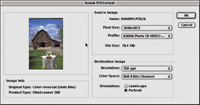
While Kodak's Photo CD process was originally announced in 1990, it wasn't until the summer of 1992 that a photo lab in my area offered the service. The original concept behind Photo CD was at once simple and complex. The digitized images stored on a CD-ROM disc were easy to have made and to use. You gave a roll of unprocessed film to your lab and they give you back a disk full of digitized images along with your prints and negatives. But this approach aimed at the consumer market, flopped. The home imaging infrastructure we assume today wasn't present and people were asked to buy a fairly expensive player to see their images on TV. It was a format and service that was way before its time. Luckily, pros caught on that this was a great way to digitize their images and get a variety of resolution scans at one time. To understand why pros took to Photo CDs--and still do--let's take a look at how they work. To produce a finished disc, an operator at a Photo CD Transfer Station converts your film images into digital form using a high-resolution film scanner, a computer, image processing software, a disc writer, and a color thermal printer. Each image is pre-scanned and displayed on a monitor, where they check the orientation (portrait or landscape) of the image. Color and density are adjusted and a final, high-resolution scan is made. On a Photo CD Master disc, each 18MB file is compressed to 4.5MB using Kodak's proprietary Photo YCC format and written to the disc. Five different files at five different resolutions are actually written of the same image using Kodak's ImagePac format, which provides images from 128x192 up to 2048x3072 resolutions. |
|||
A Photo CD Master disc accepts 35mm negative and transparency film. The Pro Photo CD Master format can be used to digitize film up to 4x5 sheet film while offering an optional sixth resolution of 6144 x4096 pixels. The dynamic range for a Photo CD scan, an important measure of image quality, is 2.8, while a Pro scan is 3.2. At a time when film scanners were much more expensive than they are now, Photo CD had immediate application for serious amateur and professional photographers. Since the dynamic range of the Photo CD Master disc closely matches that of color negative film, I started creating more images on color negative stock for projects I knew would be delivered in a digital form. Since a digitized image could be easily converted into gray scale mode, color film became more popular with photographers. Color negative film became the choice for photojournalists, even if the image would ultimately be published in black and white. Just Click Open |
|||
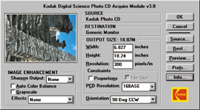
Whether you use nik Sharpener Pro or Photoshop's built-in Un-sharp Mask filter, one thing's for certain: Photo CD scans almost always need to be sharpened. When using Unsharp Mask, a good rule of thumb is that the larger the file is, the more sharpening you can apply. A 72MB Pro scan, for example, can easily handle an "amount" as high as 200 percent, while smaller images can only support a factor 30 percent before looking "oversharpened." Experiment with different images to avoid oversharpening and be careful. Use Unsharp Masking like salt--a little goes a long way. Kodak Photo CD Acquire Module |
|||
Photo CD Accessory Software Over time, digital imagers can create and save their own presets which can apply up to 50 adjustment steps at a time for specific projects or sets of images. Intellihance Pro's PowerVariations feature has a multi-pane window where a single image can be split or repeated across user-defined previews. With a maximum of five rows and columns, up to 25 variations can be simultaneously viewed. Image adjustments can be made and previewed and a test print made. The plug-in contains paper and ink settings that will automatically adjust images for output to specific devices. You can download a demo from Extensis' web site at: www.extensis.com. |
|||
Acquisition Alternatives If you're new to image acquisition, SilverFast's ScanPilot automatically guides you through the process of making individual image corrections. All operations are done in real-time allowing you to immediately see the effect of any changes you make and unwanted modifications can be undone on the fly. Photo CD novices can use the plug-in's built-in presets and auto-adjust features, while more experienced users can work with numerical input and monitor exact values with SilverFast's built-in densitometer. SilverFast Photo CD allows you to define and match input and output color spaces using ICC (International Color Consortium) profiles and is compatible with color management systems such as ColorSync for the Mac OS and ICM for Windows 98 and 2000. You can download a demo from LaserSoft's web site at: www.lasersoftint.com. Conclusion |
|||
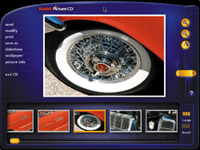
Kodak's Picture CD After inserting the CD-ROM in a Windows computer, your digitized pictures appear on the monitor displayed in a magazine-style format, using a table of contents. On a Macintosh computer, you'll need to click the "StartMac" icon to see them. The software on the Windows version of Kodak's Picture CD lets you view and tweak images; with the less comprehensive Mac OS version you can rotate your photographs as well as add text or captions. The software lets you create full-screen slide shows using transition effects between the images. You can print single or multiple pictures as well as print a single image at different sizes and quantities. If you want to send an image by e-mail you can copy one or more of your pictures onto your hard drive, then attach those images to a message. You can find more information about Picture CD at: www.kodak.com. Manufacturers/Distributors |


- Log in or register to post comments


![]()
Get the Latest Photo Tips, News & Reviews from Shutterbug!
| Camera Reviews Other Reviews | Mobile Reviews Photography Reviews Columns | News | Features | How-To | Resources |
 © 2025 Shutterbug
AVTech Media Americas Inc., USA
All rights reserved