The Creative Edge; Quick Tips For Sharp Pics

Photos © 2004, Rick Sammon, All Rights Reserved

Thanks to image-editing programs, turning soft shots into sharp shots is relatively easy. I do it all
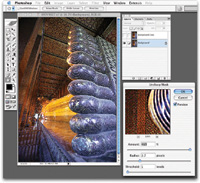
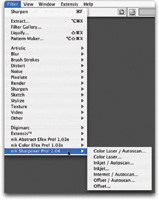
 the time!

In this article, I'd like to share with you some of my tips and tricks for sharpening pictures. I use Adobe Photoshop CS, but you can use these ideas with other image-editing programs.

Now let's take a look at a way cool plug-in that makes sharpening a picture extremely easy. It's a plug-in from nikmultimedia called nik Sharpener Pro!

(1) An easy way to sharpen a section of an image is to use the Sharpen tool, found in Photoshop's toolbar. Simply click on the tool, select your brush size and move the brush over the area you want sharpened. Be careful about the Strength setting, indicated by my red arrow. If you start sharpening at 100 percent, the effect will be applied too rapidly and you'll quickly over-sharpen an area. I usually start out at 50 percent.

(2, 3) For this picture of my friend Chandler, `I wanted to sharpen only the eyes. In photo 2, the eyes are not sharpened. In Photo 3, the eyes are sharpened. You'll need to look closely to see the difference.

(4, 5)Under Photoshop Filters you have a choice of three sharpening techniques. It's okay to use Sharpen, Sharpen Edges, Sharpen More...but you'll have much more control if you use Unsharp Mask. Keep the Radius and Threshold relatively low, and use the Amount slider to achieve the desired degree of sharpness. For accurate control, view the image on your monitor at 100 percent.

(6, 7) When using the Unsharp Mask, be careful not to over-sharpen an image. If you do, you'll get a very noisy (grainy) image, as illustrated in these examples.

Let's take a look at 
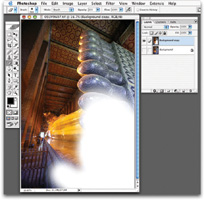
an advanced sharpening technique using Unsharp Mask and Layers. Basically, 
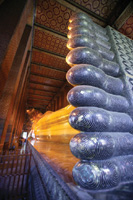
we will be selectively sharpening part of an image--the Reclining Buddha's toes in this case.

(8) Here's my original shot. As you can see, the toes are out of focus. To sharpen only the toes, I used this technique:

(9) I made a duplicate layer. Then I turned off the top layer and activated the bottom layer. I applied the Unsharp Mask to the bottom layer. The amount of sharpening (469 percent) over-sharpened most of the frame--except for the toes.

(10) Next, I went to the top layer (showing soft toes) and used the Eraser tool to erase the area over the toes--letting the sharp toes show through below. By turning off the bottom layer, I could see the area that I had erased.

(11) Here is the final image--now showing the entire scene in focus.

(12) Here's a shot I took of a butterfly in Florida. It's a bit soft.

(13) After you load a plug-in into Photoshop (or any plug-in compatible program), it appears at the bottom of the Filters Menu. Here's a look at some of the options that nik Sharpener Pro! offers.

(14) When you select the option you like, a window opens that gives you control over the sharpening effect. Those controls include: Image Width, Height, Source, Image Quality, Printer Quality, Eye Distance, and Personal Profile. After you have made your adjustments, click OK and the sharpening effect is applied.

(15) Here is my final image, sharpened with Sharpener Pro!

(16)When it comes to ink jet prints, you can control the sharpness of a print in the printer's menu, by setting the Print Quality to Fine (or Best or Highest).

Have fun sharpening. But please remember: it all starts with the image, so strive for the sharpest original picture possible in your camera.

1
Photos © 2004, Rick Sammon, All Rights Reserved

2

3

4

5

6

7

8

9

10

11

12

13

14

15

16

X