- REVIEWS
Camera Reviews 
More Reviews Mobile Reviews Photography Reviews - GALLERIES
- VIDEOS
- BUYER'S GUIDES
Cave Photography; Color, Gear, And Light Painting, Underground Style
Nothing. Absolutely nothing. Maybe the occasional splash of a drop of water, but other than that, nothing. After a few moments, the park ranger states that anyone who has a question should raise their hand now. Everyone chuckles and the lights come back on to once again reveal the huge expanse that only hints at the size of Mammoth Cave. When no artificial light source is present, all caves look exactly the same. However, when the lights come on, each cave shows its uniqueness, which offers extraordinary opportunities for photography.
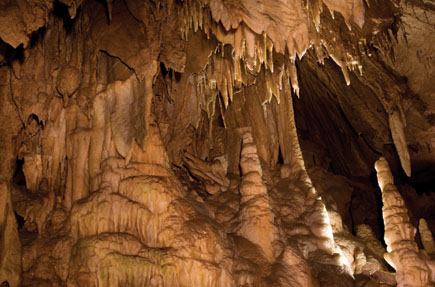
Drapery Room (On The "Focus On Formations"
Tour), Mammoth Cave National Park, Kentucky |
|
 |
|
|
Photographing in a cave is a completely different experience than photographing
above ground and requires special attention to many factors, nearly all of which
relate to light. Lighting a cave is a little like lighting a football field
with candles: some smaller details of the field will be well lit, but it's
still going to be pretty dark overall; areas adjacent to a candle will be relatively
bright while a few yards away from any candle the field will be totally black.
In other words, low-light levels and high contrast must be dealt with to create
a successful photo.
The Technique
The method I prefer to brighten the scene a little and, more importantly, to
even out the highlights and shadows, is to add artificial light of my own using
a technique known as "painting with light." I use a lithium battery-powered
flashlight to add light to dark areas by shining the flashlight in these areas
during my exposure. The light is kept moving all the time to avoid odd-looking
highlights. Compositions that include large sections of the cave may require
the light to be "painted" during the entire exposure, while photos
of cave details may require just a little painting or none at all.
I've also used a small handheld flash to fill in the shadows, but the
results haven't been as nice or as consistent as using a flashlight. The
disadvantage of using a flash is the inability to add light selectively since
flashes are designed to cover an entire scene uniformly. I've seen beautiful
photographs in which the photographer has taken hours to set up multiple lights
for a single photo, and this is the best option in caves that are not lit, but
requires both special gear and special permission. With this method, the photographer
is not augmenting existing light, but rather controlling the light, similar
to a photographer working in a studio.
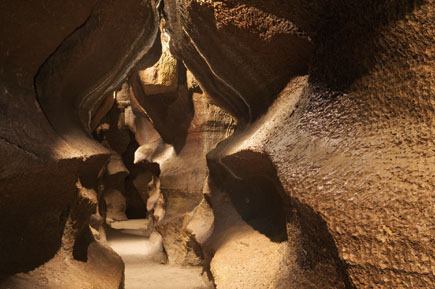
Passage In Niagara Cave, Minnesota |
|
 |
|
|
A couple of times I've been forced to use my light as the main light
because the area I wanted to photograph simply didn't have enough existing
light. In these instances I still use a single light source, but I'm careful
to move this light away from camera angle. If the scene is lit by a single light
source near the camera, the scene will appear two-dimensional and features closer
to the camera will be much brighter than those farther away. By moving the light
source away from the camera, shapes and forms are better revealed and the picture
is more likely to have depth.
When I photographed with film I normally used Polaroid film for the first exposure
or two to make sure my exposure was right and the amount of light I was adding
looked good. Even after reviewing the test shots I bracketed my exposures one
stop on each side of the best Polaroid exposure. This was tremendously time-consuming
and expensive, and consequently my Polaroid film back has been retired in favor
of digital capture.
With a digital camera it's easy to check exposure and how the "painting"
looks within moments after the exposure is made. A check of the histogram--the
graph that shows the relative values of the highlights, mid tones, and shadows--is
fully as important as reviewing the image itself. Ideally, the entire histogram
will not bleed off either end of the chart. In cave photography this doesn't
happen very often, but it's a noble goal. I always figure a cave is dark,
so it's okay if some of the histogram falls off the shadow (left) side,
but I find highlights without detail distracting, so I try to keep the histogram
from bleeding off the highlight (right) side.
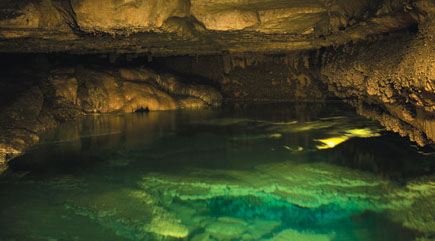
Pool In Mystery Cave, Forestville/Mystery
Cave State Park, Minnesota |
|
 |
|
|
|
| |||||||||


![]()
Get the Latest Photo Tips, News & Reviews from Shutterbug!
| Camera Reviews Other Reviews | Mobile Reviews Photography Reviews Columns | News | Features | How-To | Resources |
 © 2026 Shutterbug
AVTech Media Americas Inc., USA
All rights reserved