- REVIEWS
Camera Reviews 
More Reviews Mobile Reviews Photography Reviews - GALLERIES
- VIDEOS
- BUYER'S GUIDES
Book Excerpt: Rethinking Digital Photography: Making & Using Traditional & Contemporary Photo Tools
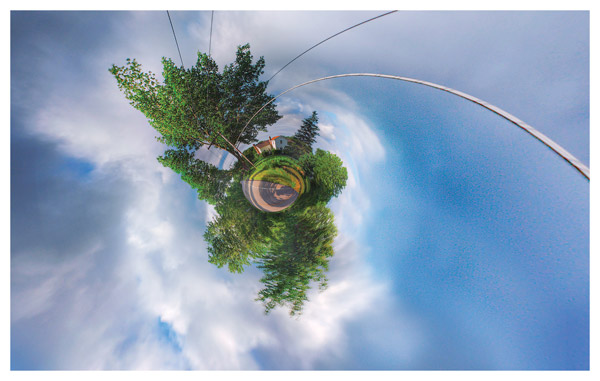
There are thousands of new planets being created in the solar system every day. Well maybe not in the real solar system, but at least in the universe of photographic play right here on good old planet Earth. Planets are an interesting type of image that are fun to create and fun to look at. The technique is relatively easy to accomplish but needs a little planning to make it work well. I like to push the envelope when I make them and have created a few that I think are first of a kind. Whatever you create with this technique, it should be fun to make these tiny little worlds.
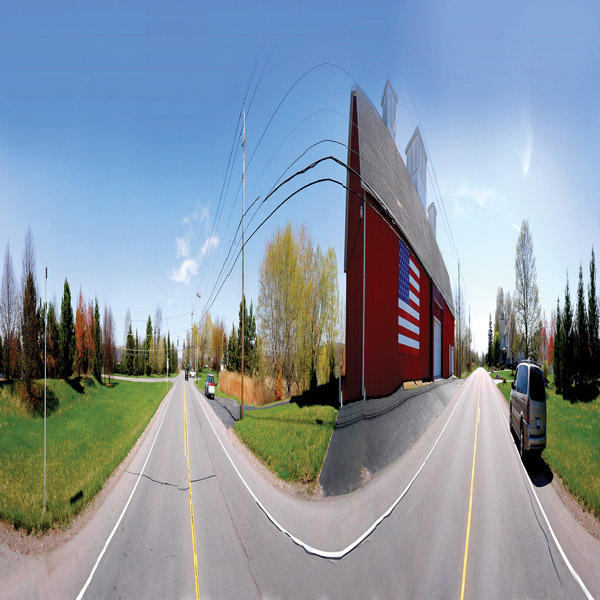
A planet is an offshoot technique generally derived from panoramic images. In fact, the images are usually (but not always) created directly from images that have been stitched together as 360˚ panoramas. A 360˚ panorama is one that starts and ends at the same point, creating an image where the image appears to be endless or rather seamless. What you might call a continuous loop. On the other hand, I have created many of these planet-like images where I like the imperfect results of mismatched ends and overflowing edges. For me, whatever works, creatively and emotionally, is what I want.


Preparation
The first requirement for this process is to take a series of images at different angles of a 360˚ rotation. Each image needs to have some overlap with the next image, so there are similar details in each consecutive shot in the sequence. I like to shoot with my camera mounted vertically on a sturdy tripod so that I can create the widest possible vertical. Ideally, the tripod head should be able to pan through the sequence and allow you to stop at predetermined angles to take each image.
I make sure that the beginning and the end of the pan are the same positions. One of the most important things to try to accomplish is to level your tripod head if you want to have a straight and level horizon (there are times when I actually want a curved horizon). Some newer digital cameras have built in digital levels that allow you to level both side-to-side as well as front-to-back. The EP series cameras from Olympus have this feature. Alternately, you can add a leveling attachment to your camera hot shoe. Most of the time, I simply level the head using an inexpensive pocket level that I keep in my camera bag. Before mounting the camera, I level the head in at least two positions, right-to-left and front-to-back, once at the beginning, and once at about 90˚. This usually gets me to a nice level for panning. I have found that a tripod with a video pan head is very useful for doing panoramas. Many tripod heads are marked in degrees of arc, which can assist in producing more precise angles for each shot.
Cameras sometimes come with a mode called Panorama Assist. This function allows you to see a portion of the previous image as a partial overlap so that you can see the details for aligning the current frame.
There are some newer cameras that will actually create the panorama within the camera software as you shoot. The ones I use can create three frames of panorama with this technique. However, I like to control the process and am happy to produce the final stitching process in Photoshop or a stitching application.
The second requirement for producing a good planet is to create a properly stitched panorama. Stitching software is sometimes included with the software that comes with your digital camera or you can use one of many third party software programs.
Creating A Planet Using Polar Coordinates
Once you have your panorama, you need to alter the image size. The image usually needs to be a square. That means that the image needs to be squished in the horizontal dimension so that the height and width match. Rather than simply finding the pixel height and making the image comply with that measurement, I like to split the difference between the width and the height such that the image maintains as much of the original resolution as possible. In order to accomplish this, I usually halve the horizontal pixel count and use that measurement to determine my square. If the panorama is 8,000 pixels wide, I use 4,000 pixels as my goal and add the difference to the height. This will give me an image that is 4,000 x 4,000 pixels square.
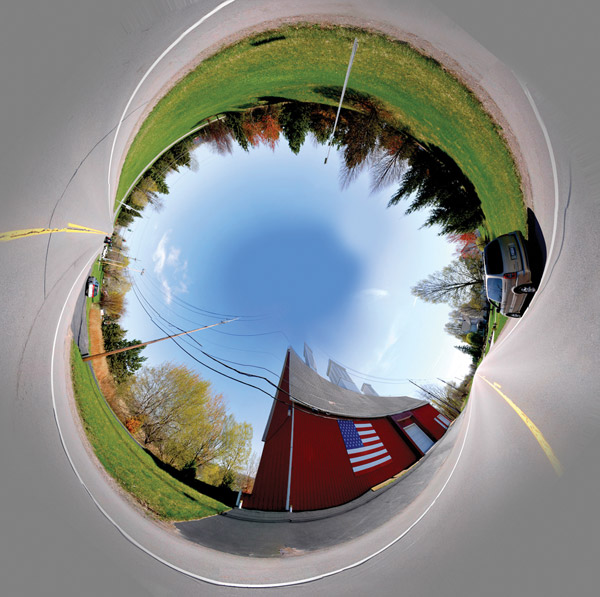
Polar Coordinates is a plug-in filter for Photoshop. The two methods of Polar Coordinates are Polar-to-Rectangular and Rectangular-to-Polar. To produce a planet, we use Rectangular-to-Polar. If you want, you can deconstruct a planet by using Polar-to-Rectangular, to reverse the process. It is possible to apply the Polar Coordinates filter multiple times.
To do this, go to Image in the top menu, pull down to Image Size to open up the Image Size dialogue box. Make sure that Constrain Proportions is unchecked and Resample Image is checked. For the resampling method choose Bicubic Smoother (best for enlargements).
In the upper portion of the window, set the width to approximately half the actual image pixel width and set the height to the same dimension. You should now have a square image.
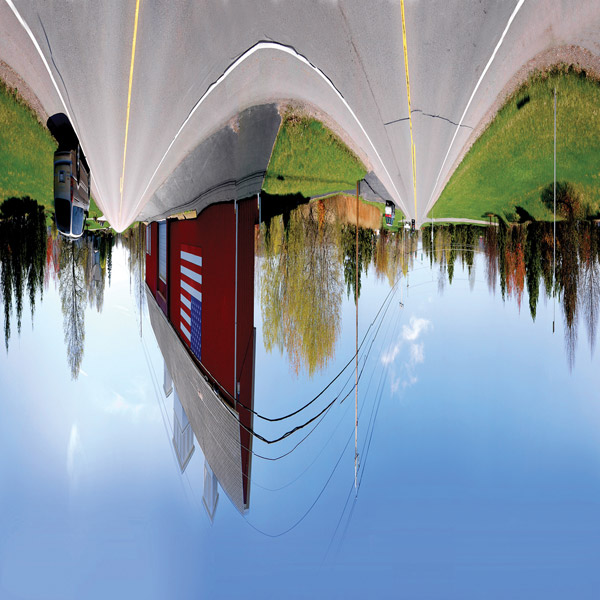
In order to make a planet, you will need to flip the image vertically or rotate the image 180˚ so that the image is upside down.
You can do this by choosing Image from the main menu>Image Rotation and either 180˚ or Flip Canvas Vertical. Once this is done, go to Filter in the main menu, move down to Distort, and choose Polar Coordinates.
In the dialogue box choose Rectangular to Polar and click OK.
You should now have what looks like a small planet.
At this point the image might need some Photoshop tweaking, a few color adjustments and possibly a bit of retouching and airbrushing to make it more believable. Some people crop the image so that the planet is not exactly centered, or for other aesthetic purposes.
Planets can be great images for greeting cards, for web graphics, for a design project, or they can be presented as huge inkjet prints, framed and hanging in a gallery. If you are going to go big, you should plan ahead and use the largest image file possible as the use of the distortion filters can cause a drastic amount of interpolated softening especially in the outer edges.
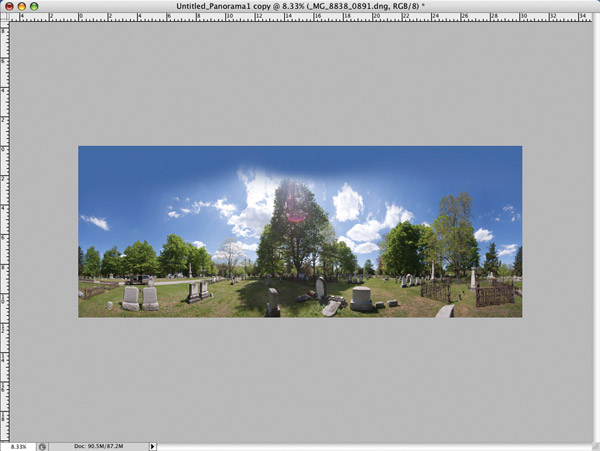
Stitching Your Panorama
Photoshop uses a script called a plug-in to accomplish this task automatically.
Step 1: Open Photoshop and select File>Automate>Photomerge.
Step 2: In the Dialogue box choose a method to create the panorama. Cylindrical should work for our purpose. Using the Browse button, choose the folder where you saved your files or if you have already opened the files in Photoshop, choose the Add Open Files button. And press OK.
Photoshop will create the panorama automatically, blending the frames using the details from one image to the next to merge the images together into a single file. The finished panorama should open up in a new window. This process can take some time, depending mostly on the resolution and size of the image files. Once you have a good panorama, you will need to crop the image so that the two end frames match at the same precise detail. The idea is to make it look seamless where these endpoints meet. If you have done everything correctly, the two ends will match.


About The Author
John Neel is a fine art photographer, experimental image-maker, artist, graphic designer, and instructor of new media and digital photography. Neel’s work has been exhibited and collected by public and private galleries in the United States, Canada, and Europe. He worked for Eastman Kodak Company for 13 years as a graphic designer and was featured as a Polaroid Gallery Artist. He lives in upstate New York with his family. To learn more about his work, visit him online at www.pixiq.com/contributors/jneel and www.jngallery.com.


![]()
Get the Latest Photo Tips, News & Reviews from Shutterbug!
| Camera Reviews Other Reviews | Mobile Reviews Photography Reviews Columns | News | Features | How-To | Resources |
 © 2026 Shutterbug
AVTech Media Americas Inc., USA
All rights reserved