- REVIEWS
Camera Reviews 
More Reviews Mobile Reviews Photography Reviews - GALLERIES
- VIDEOS
- BUYER'S GUIDES
April Showers
Techniques For Capturing May Flowers
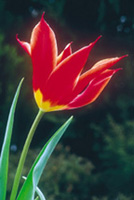
In most parts of North America, March signifies the beginning of spring, but it's the April showers that bring the best flowers. By the end of this month, gardens all around us will be lavished with vibrant colors making a highly appealing photographic subject. Whether the tulips next door or the horticultural delights at a botanical garden, stunning photographic images are there for the taking. But all too often, these turn out to be snapshots that lack the essence of the subject. It's impossible to explore the various facets of composition, lighting, color harmony, and other creative techniques in a few pages. As you work, consider the following as general guidelines. Avoid including too many different hues in a single frame, since numerous competing colors will confuse the viewer. And try not to place a dominant subject in the dead center of the frame. An off-center composition is generally more effective, although you may need to include a small, secondary element to maintain balance. Instead of composing all of your close-up pictures looking directly into a blossom, or with the stem on a vertical, vary the camera position. In my experience, the most pleasing images are those taken from an oblique angle. Move around, or at least tilt the camera off the horizontal or vertical orientation. Since the slightest blemish will be magnified, reducing viewer appeal, study your potential subject carefully through the lens; move on to another if imperfections are noticeable. Make "Establishing" Shots For some frames, try to fill the viewing screen with the identical flowers of the same color. For other frames however, include a statue, small bridge, waterfalls or a gazebo to provide a sense of place. Many public gardens include such subject matter, providing a useful secondary element as a compositional tool. Focus at the hyperfocal distance ot 1/3 of the way into the scene to maximize depth of field, keeping the entire scene within the range of apparent sharp focus at f/16. |
|||
Consider The Light On sunny days, try to shoot in the early morning or late afternoon, when the warm, low-angled light is great--especially after a rainfall or good watering with a sprinkler or spray bottle. A wet subject can be rendered with richer color saturation while the drops add a pleasing, sparkling accent. Look for backlighting as well at these times with flowers that are translucent. Meter for the highlights and let the shaded background go black for a dramatic effect: glowing blossoms against a richly dark backdrop. |
|||
Control Depth Of Field Saturate The Colors Get Close |
|||
€And Closer These accessories are compact and the clear glass does not reduce light transmission. To optimize the optical quality, stop down to f/11 or f/16. The most commonly available models are the Nikon 3T/4T (in 52mm filter ring) and the more powerful 5T/6T (in 62mm ring). Canon's 250D and the more powerful 500D are available in other filter ring sizes up to 77mm. Be sure to buy the largest size you'll need and then use an inexpensive step down ring to adapt it to various lenses. If you become serious about extreme close-focus photography, consider a true macro lens for the ultimate in sharpness and resolution of fine detail. A 100mm focal length is useful because it does not force you to move too close to the subject for high magnification. The 180mm or 200mm macro lenses are even more desirable for this reason and offer a bonus: their narrow angle of view makes it easier to frame a small subject against a narrow patch of greenery for a "clean" background. After taking the conventional photos at f/22, try making some impressionistic images at f/4 using selective focus when shooting extreme close-ups (1/2 life-size or greater). Include both foreground and background petals, focusing on the pistil or stamen, for example. At such wide apertures, only a narrow plane appears sharp with the rest of the subject blurred into a soft wash of color and texture. This technique will produce semi-abstracts, with one critical point in sharp focus to satisfy the viewer's eye. |
|||
In close-up photography, a reflector panel can be highly useful for bouncing a bit of extra light into essential subject areas. White poster board, cardboard covered with wrinkled aluminum foil, or a commercial reflector panel will work well. Look through the viewfinder while holding the reflector in one hand, watching the effect change as its position is varied. When you lighten shadows, colors become more saturated and small details such as pollen become more visible. The image gains a luminous quality, transforming an average subject into the extraordinary. A commercially available diffuser panel can also be useful. Set it up between the sun and the subject to soften the light; if desired, use fill flash or a reflector to add extra sparkle to essential subject areas. Note: If using a reflector and/or a diffusion screen, do not activate the meter until after the accessory is in place; this will help to produce proper exposure. Metering For Optimum Results Naturally, your camera may call for different compensation factors. Models with "intelligent" evaluative metering systems recognize an ultra bright subject--such as white blossoms in strong sun--increasing exposure automatically. With slide film, use less "plus compensation" to prevent washed-out colors. (Experiment with your own equipment by bracketing.) Negative films actually benefit from some overexposure however, shedding grain and increasing color saturation. |
|||
Control Wind Induced Motion Wind poses the least problems in early morning. After the breeze starts to pick up, find the most sheltered spots in the area. Shoot at wide apertures such as f/4 with an ISO 100 film for high shutter speed; 1/125 sec should be adequate except in high-magnification photography. Compose and set focus, waiting for a lull in the wind. In stiff wind, or when shooting at small apertures for extensive depth of field, use a "faster" ISO 400 film for a high shutter speeds. In extreme close-up work, ask a friend to hold a large sheet of cardboard to block the wind. For additional guidance, I would recommend the Amphoto book The Field Guide to Photographing Flowers, by Allen Rokach and Anne Millman. Most cities have parks and public gardens where numerous potential subjects are readily available. Check the telephone directory or the Index in the AAA Tour Book under Botanical Gardens, Arboretums, and Parks or call the local Tourist Bureau. In any location use the appropriate techniques for high-impact images. Whether you're a dedicated nature specialist who wants to hone his or her skills, or a general photo enthusiast "rusty" after a long winter, there's no better opportunity for creating beautiful springtime pictures. |


![]()
Get the Latest Photo Tips, News & Reviews from Shutterbug!
| Camera Reviews Other Reviews | Mobile Reviews Photography Reviews Columns | News | Features | How-To | Resources |
 © 2026 Shutterbug
AVTech Media Americas Inc., USA
All rights reserved