It is in point of fact a great and useful piece of info. I am glad that you simply shared this helpful information with us. Please keep us informed like this. Thank you for sharing.
Ocean Front Suites
- REVIEWS
Camera Reviews 
More Reviews Mobile Reviews Photography Reviews - GALLERIES
- VIDEOS
- BUYER'S GUIDES
Adobe Photoshop 6.0 Page 2
Shooting Straight
Of course, many serious photographers have little interest in combining drawings and type with their photos, or adding cool special effects. They just want to create the best possible renditions of their "straight" photos, as traditional photographers have done for decades in the darkroom—crop, adjust contrast, color balance and saturation, dodge and burn, etc. Photoshop lets you do anything you could do in the darkroom—and then some—without the dark, the chemicals, the wasted paper, and the waiting. Photoshop allows you to adjust things by eye or precisely by the numbers. (One simple way to quickly improve a photo is to use the Levels command (Image -> Adjust -> Levels): Move the left slider to the left edge of the histogram to make the darkest thing in the photo black, and the right slider to the right edge of the histogram to make the lightest thing in the photo white; then move the middle slider left or right to adjust the mid tones to what you want.) Everything you do appears right there on-screen. If you don't like what you see, just Undo and try something else. You can make adjustments to each color channel individually (red, green and blue in RGB mode; cyan, magenta, yellow and black in CMYK mode).
Making Things Easier
When you activate a tool in Photoshop 6.0 (by clicking on it in the traditional Photoshop toolbox), a context-sensitive options bar for that tool appears across the top of the window, giving you quick and easy access to all of the tool's features. You can move the options bar to the bottom of the screen, or anywhere you like (we liked it at the default position at the top). You can create a handy palette well, storing frequently used palettes together so you can find them quickly and easily (this is especially nice for new Photoshop users, who can become a bit overwhelmed by all the palettes). Click the tab for the palette you want, and its options window appears. Click away from the options window, and it tucks back out of sight. Very handy. (Most submenus work that way now—click once to display the submenu; click again to close it—much more convenient that having to click and hold the mouse button down to see what's on the submenu.)
Of course, many serious photographers have little interest in combining drawings and type with their photos, or adding cool special effects. They just want to create the best possible renditions of their "straight" photos, as traditional photographers have done for decades in the darkroom—crop, adjust contrast, color balance and saturation, dodge and burn, etc. Photoshop lets you do anything you could do in the darkroom—and then some—without the dark, the chemicals, the wasted paper, and the waiting. Photoshop allows you to adjust things by eye or precisely by the numbers. (One simple way to quickly improve a photo is to use the Levels command (Image -> Adjust -> Levels): Move the left slider to the left edge of the histogram to make the darkest thing in the photo black, and the right slider to the right edge of the histogram to make the lightest thing in the photo white; then move the middle slider left or right to adjust the mid tones to what you want.) Everything you do appears right there on-screen. If you don't like what you see, just Undo and try something else. You can make adjustments to each color channel individually (red, green and blue in RGB mode; cyan, magenta, yellow and black in CMYK mode).
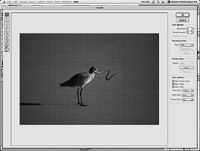 |
| Liquid asset: New in Photoshop 6.0 is Liquify, a feature that lets you manipulate desired portions of the image in a variety of cool ways, including distortions and reflections. |
When you activate a tool in Photoshop 6.0 (by clicking on it in the traditional Photoshop toolbox), a context-sensitive options bar for that tool appears across the top of the window, giving you quick and easy access to all of the tool's features. You can move the options bar to the bottom of the screen, or anywhere you like (we liked it at the default position at the top). You can create a handy palette well, storing frequently used palettes together so you can find them quickly and easily (this is especially nice for new Photoshop users, who can become a bit overwhelmed by all the palettes). Click the tab for the palette you want, and its options window appears. Click away from the options window, and it tucks back out of sight. Very handy. (Most submenus work that way now—click once to display the submenu; click again to close it—much more convenient that having to click and hold the mouse button down to see what's on the submenu.)
Recently opened images appear in the Open Recent submenu under the File menu, giving you quick access to those images without having to try to remember where you stored them. (You can choose the number of recent images that will appear in the Open Recent menu.)
 Brushes have been consolidated in the context-sensitive tool options bar—another great time-saving convenience. Previously, you had to deal with two brush palettes: Paintbrush Options to select such things as blending, opacity and fades; and the Brushes palette to select the brushes. Now, you can select all brush settings in one place, including pressure and fade settings. (If you use a graphic tablet like the Wacom units, you can control pressure et al. with the pen itself.) You can even load additional brushes "on the fly" without having to track them down on your hard drive.
Photoshop 5.5 limited you to 99 layers for a single image, but Photoshop 6.0 allows you to create hundreds of layers for an image. While few photographers will need to create hundreds of layers for an image, anyone who uses even a handful of layers will be happy to know that Photoshop 6.0 lets you organize your layers into related sets, and even color-code them for quick identification. Layers, introduced in Photoshop 3.0, let you divide an image (the original, all added components, and your modifications to each) into separate individual parts that you can work on without affecting the original image (or the other components) until you want them to. You can check the effects of any or all of these layers on the final image, then apply any or all of them to the original image when you're satisfied with the results.
A new Preset Manager lets you save, delete and load custom brushes, swatches, gradients, layer styles, patterns, contours and custom shapes in one centralized place, and offers instant access to the extensive libraries of presets included with Photoshop 6.0.
There are lots of other other useability enhancements. For example, the crop tool appears at the top level of the toolbox for easier access, dims the area outside the defined crop area for easier reference, and allows you to transform the perspective of the cropped area. It's easier to save your Photoshop files to any file format (including PDF files with embedded ICC profiles for precise color control) with newly merged Save As and Save a Copy commands. You can quickly load non-image files (swatches, brushes, actions and layer styles) by double-clicking them. You no longer have to specify the TWAIN source to access TWAIN devices. You can embed written notes or recorded voice comments directly in your files (including PDF files), and folks who review the files can add their comments. You can now do more with 16-bit files, including applying Gaussian Blur, Add Noise, Median, Unsharp Mask, High Pass, Dust & Scratches and Gradient Map filters.
NEXT: Page 3 »
|
| |||||||||
- Log in or register to post comments

Great Review!
Submitted by Daniel_R on August 1, 2013 - 3:06am
I adore photoshop 6.0 and how it continually surpasses mankind's expectations.


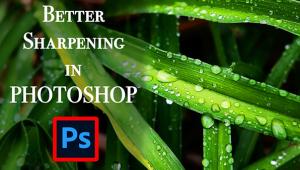


PHOTO OF THE DAY

Today’s photo is Soft Light by Duane Nixon
eNEWSLETTER SIGNUP
![]()
Get the Latest Photo Tips, News & Reviews from Shutterbug!
| Camera Reviews Other Reviews | Mobile Reviews Photography Reviews Columns | News | Features | How-To | Resources |
 © 2025 Shutterbug
AVTech Media Americas Inc., USA
All rights reserved