Wedding And Portraiture
Unlimited Vision With Medium Format

Photo 1.
Photos © 1999, Monte Zucker, All Rights Reserved

My Hasselblad gives me unlimited vision. "Ideal" is another way of putting it. I never have to think or compose any of my images to fit into a pre-prescribed format. Horizontal? Vertical? Things I never have to consider. Cropping? Why not compose on the ground glass before you make the picture? Why not fill the space as you ideally would like to see it? All of these reasons and more are why I feel that the medium format (square, to be more exact) works so well for me.
Sure, I own a couple of 35s. They really work for me for convenience sometimes, but my camera of choice is, undoubtedly, the Hassy. Let my pictures speak for themselves. If they don't, then I'll help you see what I see, know what I know.

Let's first take a look at Photo 1, the young lady in the blue gown. What you are looking at is my vision of her at her best. Does her bare shoulder and the draping of her dress around the shoulder increase the interest of the portrait? Of course, the picture could have been created as a vertical, but at what loss of interest and composition? I love the image just as it is. I've used every square inch of the format for specific reasons. Let me explain.

There's more space in front of her because she's looking in that direction. I've cropped the portrait, so that her eyes are 1/3 the distance from the top. I've even got the background lighter in front of her face and darker behind her to keep the interest on the highlighted side of her face. All visible on the ground glass before the exposure was made.

The portrait was created by window light split-lighting her face. I added a bare-bulb flash to my right, two f/stops less than the daylight to help wrap the light around onto the right side of her face. Exposure was for the daylight. The medium format allowed me to check out my daylight to flash relationship with Polaroid. Only with a medium format camera can I do that.

Photo 2.

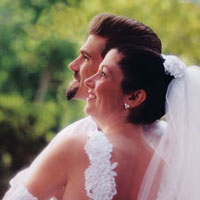
Similarly, in the outdoor portrait of the bridal couple (Photo 2) I've carefully placed the heads with more space in the direction that they're looking. On the ground glass I posed them, so that their heads would be close together and, believe it or not, even made sure that their noses would be parallel. Their arms leading down to the left hand corner of the print are all a part of the full square composition. Could the picture have been cropped to a different format? Probably. Better? I don't think so. Square for me again.

The lighting, by the way, was achieved by placing the couple under an overhang of the building, shielding the light from the top of their heads and from my view of their faces. The light came from beyond the overhang. A Westcott Monte Illuminator (silver/black reflector) placed camera left pushed the light around onto the left side of their faces and kept the light from flaring into my lens.

I used a 150mm lens for the first two portraits and Photo 3, the profile of the bride. There's absolutely nothing that I could crop out of this picture. Make a composition like this fit into a rectangle? I think that it would be destroyed. What about the retouching? Even with this bride's beautiful complexion, there are many areas where I would want corrections. I just never feel that any portrait is complete before it's retouched.

Photo 3 .

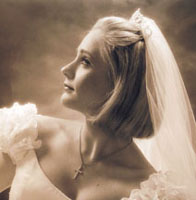
The sepia tone of the portrait is a result of using Kodak's T-Max 400 CN film. Lighting, of course, was by my complete Photogenic portrait studio and Westcott Mini Apollos. There's a total of five lights on this portrait. With all the pains that I take to create fine portraiture, I can't think of any reason to use any less than a medium format camera.

As a matter of fact, years ago when medium format began to replace 4x5 cut film, I was very skeptical about the smaller sized film. Okay, I accepted it--with pleasure. A lot less of a camera to carry around. But leave my square format Hasselblad behind now? I don't think so.

Photo 4.

Photo 4, the studio portrait of the family group, was undoubtedly made with 21/4 film. The fantastic studio props are by Off the Wall. The setup was in the studio of Tim Roberts, Boca Raton, Florida. I'm a consultant for Roberts, helping him with many of his different photographic endeavors. This group was created by Roberts, using his Hasselblad, too. Where/how would you crop it, other than the way it was composed? No way.

Roberts and I again used Photo-genic/Westcott lighting. Two main lights both came from camera left. The first light came in at a 90° angle to the faces. The second came in at an angle much closer to the lens. We were careful to pose each person, so that both lights would illuminate their faces. The fill light, high and behind the camera, lit up the entire scene.

I'm a firm believer in keeping things simple, especially when you have two young children, each with their own personalities and desires to escape the confines of the portrait environment. The square format kept everything within bounds, and just look at the way we used the diagonal composition of the steps, played against the verticals of the back wall. Once again, everything fit perfectly into the square format. A 150mm lens worked here, too. Thankfully, Roberts' studio is huge. Otherwise, we could have had used a 120mm lens (if we'd have had it).

Photo 5.

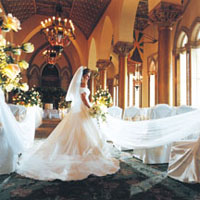
Photo 5 is of a bride at the entrance to Roberts' studio. Just kidding--it's really the Cathedral Room in the Boca Resort and Club. Anyway, take a look at that setting. Don't you think that this bride wants to remember every single detail of the room in which she got married? What would she want to eliminate from this setting? Not much.

Once again the medium format camera is a winner. Switching lenses to a wide angle lens allows all of this to happen. Keeping the bride up close to the camera keeps her the center of interest, in spite of everything that's happening in the background. The square Hasselblad format once more saves the memories.

This image was created by exposing for the existing light on the bride, complemented with two Quantum flashes. One was in profile position--all the way over to the right. It was set to automatically match the f/stop on the camera. Quite an accomplishment at such a great distance and in such a huge room, don't you think?

A second flash was placed behind the bride to backlight her veil. That flash was one f/stop greater than the other. Without it, her veil and the back of her gown would have faded into the background.

The ribboned aisle, the series of windows, arches, and the candelabraes above her all set the scene. I wouldn't want to change a thing. By placing her profile left of center and against a plain dark background, Roberts positioned her perfectly in this square format.

Roberts has been a fast-learn. He was already a hugely successful photographer in the Boca area before I began working for him. He told me that he had attended several of my lectures, before I even approached him about possibly becoming a consultant for him. Now, he's keeping me (in my retirement) busier than ever.

You can check my web site--www.montezucker.com--for information on my classes. Of course, you'll also find countless pages of additional photographic and digital instruction there at no charge to you.

Just about all of my images on film are done with a Hasselblad on Kodak film. As you can see, it's the medium format for me and most of the people with whom I work. What we see is what we get. No need to change, adjust, or crop composition. Besides, my lab, North American Photo, loves to work with my 21/4 square negatives. Plenty of image size there for retouching close-ups, and plenty of negative there for any size enlargements that I want to produce.

Nope. No question. No limitations with this format. I see it all clearly before I take the picture, and my vision is unlimited, to be sure.

X