- REVIEWS
Camera Reviews 
More Reviews Mobile Reviews Photography Reviews - GALLERIES
- VIDEOS
- BUYER'S GUIDES
Sekonic LiteMaster Pro L-478DR: Outdoor Lighting Control
A handheld meter is not just for studio work. Tricky lighting situations, high contrast, and unusual subject tonalities can often pose problems for camera metering systems, as advanced as they are. Beyond that, the camera meter can’t help with studio flash.
Product shots courtesy of Sekonic
The first step toward taking tighter control with a broader range of lighting situations is to use a handheld meter. Enter the new Sekonic LiteMaster Pro L-478DR (PocketWizard version). Out of the box, it measures incident light. This exposure meter will also prove valuable when working with studio (or any manual) flash or a mix of ambient light and flash.
Toward that end, the “DR” version tested has a built-in PocketWizard transmitter to fire remote strobes (with PocketWizard receivers attached). Outdoors you need radio triggering for consistently reliable operation with off-camera flash. This meter also works with suitably equipped ControlTL-connected flashes for remote TTL flash output control.
I tested the L-478DR in a number of outdoor situations, often with the optional 5-degree viewfinder so that I could bias exposures to key reflective subject values.
With the help of an optional profiling target, the L-478 can also guide you toward controlling exposures within the camera’s dynamic range (see “The L-478 and Camera Profiles” sidebar below). This aims to prevent or minimize clipping of highlights and shadows.
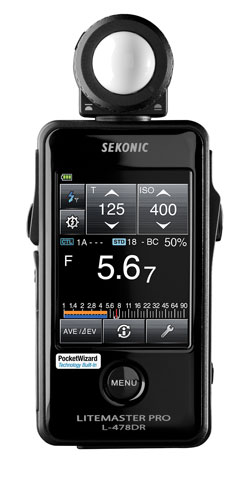
Touch-Panel Control
At its heart, this Sekonic handheld meter is an incident flash/ambient light meter. It features a built-in retractable dome. The dome is raised for incident exposure readings; retracted for lighting ratio/contrast readings, namely of key-to-fill light. As an incident meter, it avoids being unduly influenced by subject brightness and tonality.
The L-478 stands apart from every Sekonic meter that has come before. You’ll note that there are only three buttons (aside from on/off)—and no jog wheel. The only button needed to access the majority of settings is the Menu button on the front. Beyond that, the huge touchscreen panel does the rest, keeping things simple for Custom Settings and lots more besides. I’ve almost mastered operating the touchscreen with one hand—almost. The other two buttons trigger and memorize readings.
This screen is in full color. Under normal conditions, I can easily read the alphanumeric display without glasses. (However, I do need my glasses to make out what’s going on in the analog display, which is important if you’re also using the meter to work within the camera’s dynamic range when using analog indicators.) In open shade or especially a bright outdoor setting, the problem gets worse, although the display is still readable—with some effort. (An anti-glare film is included, but good luck getting that on without air bubbles.)
Screen shot © Jack Neubart
Working With The L-478
The L-478DR adds the built-in PocketWizard transmitter, so you can trigger remote strobes connected to PocketWizard receivers by pressing the Measuring button. That provides a much more convenient flash triggering option than either cord or cordless, which are also available. What’s more, the L-478DR gives you full digital control over PocketWizard ControlTL-connected flashes using TTL automation. That said, I should add that the optional AC3 ZoneController for ControlTL is easier to use, albeit in a less trendsetting, more mechanical form.
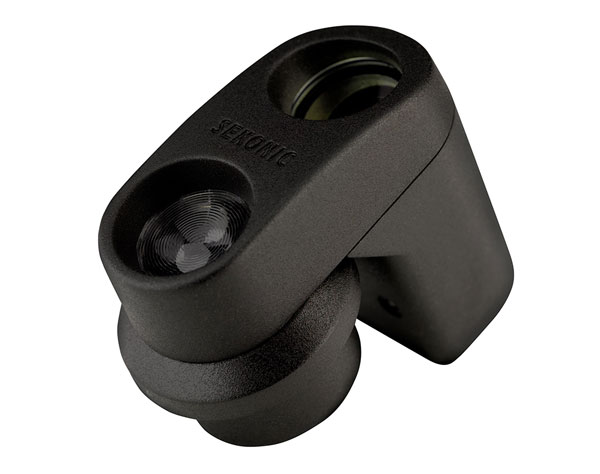
I wish the Measuring and Memory buttons, which reside opposite each other, had a more distinctive feel and, better yet, that the Memory button was positioned elsewhere—on the front, close to the Menu button perhaps. I often hit Memory by accident just because it’s resting under a finger. If you’re right-handed, the Measuring trigger falls under your thumb on the right, with the meter facing you. When working with the rotating spot attachment, however, this arrangement can get turned around, depending on how you aim the accessory finder. Establish a working protocol, which hopefully will avoid such problems.
I can’t say enough about how much I love the compact size, but not having spot measurement built in is a drawback. Removing the dome and attaching the accessory isn’t too much of a hassle, but it does impede the workflow, which can be a problem under changing light conditions. Using the 5-degree attachment is fairly simple and straightforward. Outdoors I find myself using it more often than the incident dome, since I’m always measuring highlight and shadow values, and others where warranted—and usually averaging them with the help of the meter. Again, not something most cameras can do
for you.
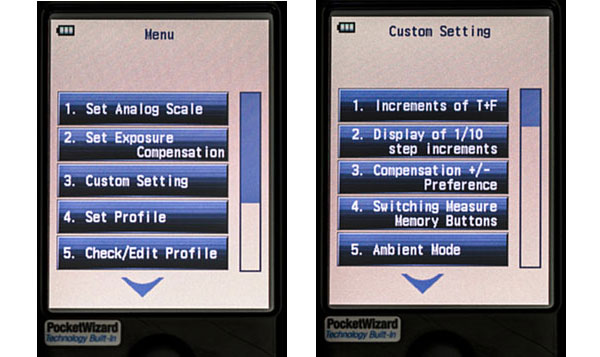
Total Recall And The Tool Box
The individual readings are immediately displayed digitally and all memorized readings, plus the current measurement, are shown on the analog scale. Take two or more readings, hit Average on the display, and you have the final recommended exposure setting at a given ISO. If you switch back and forth between the incident dome and optional 5-degree attachment, memorized readings remain in place. However, you’ll lose the latest reading in the process of switching, so be sure to store it in memory first.
Now, let’s say you’ve made some poor choices and want to modify the settings. You can use the touch panel to change ISO, f/stop, or shutter speed on the fly, and the readout changes accordingly. However, when you do that with memorized readings, the modified settings remain in memory.
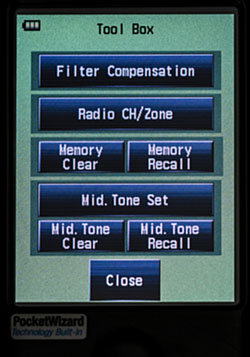
By using the Tool Box (wrench icon), you can recall and erase one or all measurements. All it takes is the mere tap of a finger. Well, several taps actually. Thanks to a fail-safe procedure, you can’t accidentally erase a reading. Why erase anything? Well, I did say it’s possible to hit the Memory button by mistake. Besides, the lighting may have changed or a prominent bright or dark cloud may have entered the picture and needs to be factored into the averaged reading.
There’s a quick and easy way to clear memory entirely of all readings. Simply switch from ambient to any flash measuring mode, or from one flash mode to another or to ambient.

© Jack Neubart
© Jack Neubart
Some Added Touches
If you work with filters, the Tool Box provides settings to automatically compensate for them. Either enter a compensation value or select a filter pack with pre-assigned compensation settings for up to four filters at one time (these can be modified under Menu). Use the Menu button on the face of the meter to set exposure compensation (apart from filter usage). Icons at the top of the display indicate which overrides were set in place and the displayed measurements reflect these settings. (Some photographers hold the filter over the dome or in front of the 5-degree attachment to find the difference, and factor that in. That can get tricky with a polarizer or variable ND.)
Providing a flash-to-ambient light percentage is another feature found on this meter. If you’re shooting by a mix of flash and ambient light, the meter will tell you how much light the flash is contributing, as a percentage, in the applicable flash mode. If you want the background illumination to contribute more or less, adjust shutter speeds on the fly and the meter will provide a corresponding reading without necessitating another reading. But if you adjust flash output or distance to vary the relationship, you’d be wise to follow that up by again reading the exposure. I never found this percentage data to be practical with any meter, but it can prove helpful if you like to play strictly by the numbers.
In The Field
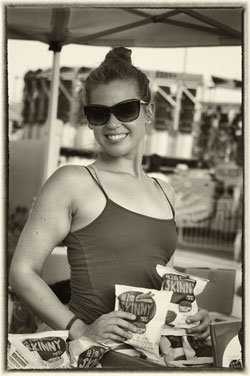
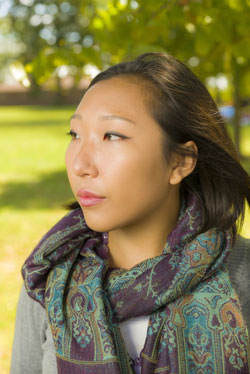
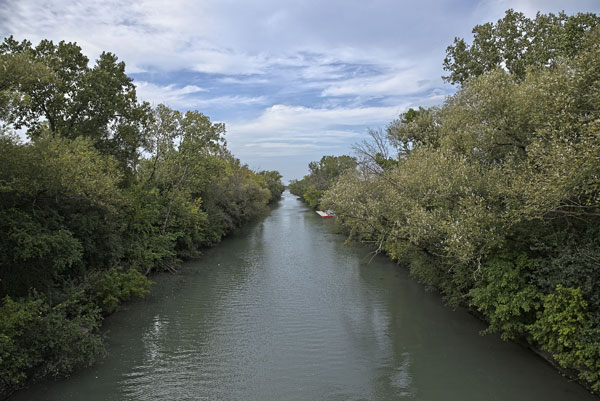
I worked with the L-478DR in various settings. At a carnival, I took a reading in the shade to simulate lighting underneath an open-air tent, and then photographed an attractive young woman working under the shade of the canopy. The meter also came in handy at night when photographing illuminated rides and displays. In another situation, I set up an outdoor portrait shoot, with the model under the shade of a tree, against a park setting. Here I made use of the meter’s built-in PocketWizard radio transmitter to trigger a remote PocketWizard-enabled flash. And I even used the meter for scenic shots: I made selected readings with the 5-degree attachment of various tonalities and averaged them with the meter. And I even used such readings for an HDR merge with great effect.
Concluding Remarks
Using a handheld meter means taking a methodical approach to exposure measurement. It’s like stopping to look both ways before crossing the street—it may take a bit longer to achieve the desired result, but at least you get there without mishap. And the Sekonic L-478 gives you the tools to do just that, so that you avoid any potholes along the way.
Okay, the L-478 is not perfect. The tiny size is great, but I do miss the 1-degree spot meter built into my L-558 (and the newer L-758): I’m not so crazy about switching out the dome for the viewfinder to take reflective measurements. But having said that, I found the accessory 5-degree viewfinder indispensable, and I often left it attached to the meter, since much of my outdoor work with this meter involved reflective readings.
And I’m still getting used to the touch panel—but much better at it than when I started. Still, it is a decided asset. Bottom line, I’m impressed and very tempted to buy this little gem—being sure to add the accessory finder, if only because it means I’ll always carry a handheld flash/ambient meter with me. And I can see many situations where this meter would come in handy, so that I wouldn’t have to spend so much time bracketing. The Sekonic L-478 may finally be the one light meter that brings back the once valued art of exposure measurement to a jaded digital world.
The L-478 And Camera Profiles
The L-478 is available on its own, or bundled. The bundled package (available online or at select US retailers) comes with X-Rite’s ColorChecker Passport and Sekonic’s Data Transfer Software (DTS). Used together, they measure and define the camera sensor’s dynamic range and thereby create a camera exposure profile. This will help prevent or minimize clipping and resulting tonal distortion and loss of detail in highlights and/or shadows that fall outside the camera’s dynamic range.
For those unfamiliar with the Passport, it comes bound in plastic and is about the size of its namesake, handily slipping into a vest pocket alongside the meter. (Make sure the bundled version you purchase includes the Sekonic gray card, which is used for profiles.) Alternatively, you could buy Sekonic’s Exposure Profile Target I or II instead to produce exposure profiles.
When using the Passport, you can also generate a calibrated camera color profile for color consistency. The stored profile becomes available to you in Lightroom and Photoshop. The included gray card on the Sekonic version of the Passport and Profile Target can also be used for white (gray) balance.

Screen shot © Jack Neubart
How It Works
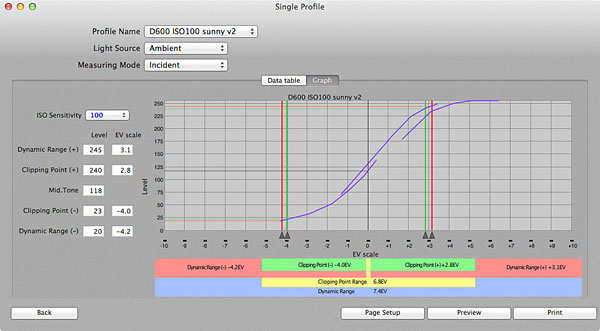
The basic procedure for generating exposure profiles is fairly straightforward, though somewhat time-consuming. Using a uniform light source, shoot a bracketed series (normal, +3, and -3 EV) of the Passport target page (or Profile Target) using the incident reading as the base exposure. Be sure to set increments to the “1 step” option via the Custom Menu, and change it back when done. Record the exposure, including the EV values in tenths. If you don’t have the viewfinder…no problem, just use the incident exposures (the reflective readings are supposed to improve accuracy of the profile). This data is then fed into DTS on your computer, which plots a graph (a modified characteristic curve) and then generates a profile of the camera’s exposure performance/dynamic range.
You then transfer this camera exposure profile from the software to the L-478 (also applicable to its big brother, the L-758) via USB so that the meter will be calibrated to your camera’s mid-tone value. The meter can store a number of profiles for different cameras. You activate the required profile for a specific camera via the L-478 Menu. Then, when shooting under high-contrast conditions, take a base-level exposure reading and set that as the mid-tone on the meter via the Tool Box. The graphic analog display then reflects that as variously colored bands, indicating the dynamic range and the highlight/shadow clipping points.
In theory, the exposure profile applies to a single ISO and light condition for one camera body/lens combination, but you have considerable leeway here. Don’t go crazy profiling every possible combination. Where it will matter is with high ISO settings, which tend to distort tonal relationships.
If you bought the bundled version, the next step is to use the correctly exposed Passport shot for a color profile. (This step of course can be done with the Passport purchased separately, with your camera.) X-Rite’s ColorChecker Passport software translates that data and saves the profile for use in Lightroom and Photoshop. It’s remarkably quick and easy. And, when you see the difference it makes in your images, you’ll be thankful you took the time.
Prices (Street)
$469 L-478DR PocketWizard version alone ($518 bundled w/ColorChecker Passport)
$389 L-478D alone ($438 bundled)
$109 5-degree Viewfinder for L-478
For more information and full specifications, contact Sekonic at www.sekonic.com.


![]()
Get the Latest Photo Tips, News & Reviews from Shutterbug!
| Camera Reviews Other Reviews | Mobile Reviews Photography Reviews Columns | News | Features | How-To | Resources |
 © 2025 Shutterbug
AVTech Media Americas Inc., USA
All rights reserved