- REVIEWS
Camera Reviews 
More Reviews Mobile Reviews Photography Reviews - GALLERIES
- VIDEOS
- BUYER'S GUIDES
RGB 2 B+W; Conversion Strategies For Tonal Control
Every digital image starts out as a color image, an RGB that, when shot in Raw format and loaded as a 16-bit file, contains millions of color and brightness codes. These codes, or pixel addresses, can be manipulated in many ways using presets or “manual” adjustments to create looks that range from “true” to highly stylistic interpretations of the content within the image. Exploiting this malleability, photographers can now have black-and-white tonal control over each image even before delving into Curves or Levels and/or burning/dodging tools; in fact, using color conversion tactics previously required tonal controls and selections often became unnecessary.
 |
|
|
 |
|
|
 |
|
|
|
 |
|
|
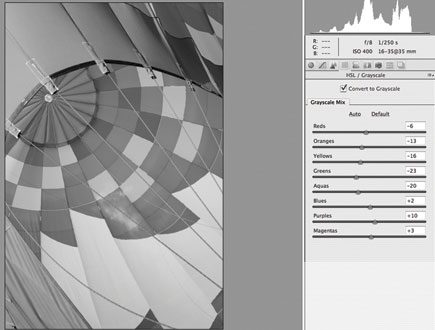
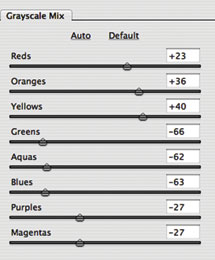
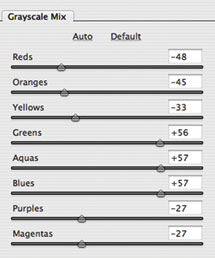
This tactic is an extremely enhanced version of using filters over a lens when exposing panchromatic film, in that you can create highly refined filter combinations to attain the desired effect. For example, to emulate the look of a red filter when exposing panchromatic film, choosing the red filter preset will deepen blue and green, leading to a stark, deep sky and often rendering green-colored subjects as silhouettes. However, you can also choose to boost the yellow and orange color tonal conversions in the image in ways that using a red filter alone could never achieve.
 |
|
|
 |
|
|
 |
 |
||
|
|
 |
 |
||
|
|
|
You can set the “basic” monochrome filter effects in the camera prior to exposure, but this will not allow for nuanced control. However, this “immediate” post-exposure processing has its uses, especially when the photographer wants to previsualize the effect and “see” how the processor will handle the image as a monochrome in Live View mode. This ability—to see in black and white prior to making the exposure—is a very new breakthrough for photographers and photography, something I think we might take for granted these days, but which not too long ago required a keen, experienced eye and the use of viewing filters and other tricks. In essence, previsualization is now easily accomplished by just knowing how to program the camera software and by having the ability to see the “final” image prior to exposure in a Live View setup.
|
| |||||||||
- Log in or register to post comments


![]()
Get the Latest Photo Tips, News & Reviews from Shutterbug!
| Camera Reviews Other Reviews | Mobile Reviews Photography Reviews Columns | News | Features | How-To | Resources |
 © 2025 Shutterbug
AVTech Media Americas Inc., USA
All rights reserved