- REVIEWS
Camera Reviews 
More Reviews Mobile Reviews Photography Reviews - GALLERIES
- VIDEOS
- BUYER'S GUIDES
Preparation And Planning: Working In The Field
All Photos © Sean Arbabi
Safety In The Outdoors
The old adage, nothing in this world is worth trying if you don’t take a risk, may be true when it comes to taking chances with the images you design, but risking your safety should never be a part of making “adventure” type photographs. Being well prepared and having a healthy respect for nature is undoubtedly the best approach. Nature is wild, unpredictable, powerful and dangerous.
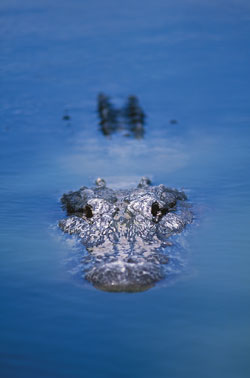
When you document these locations you may be traveling alone. While this can provide a great peace and focus to your art it can also carry an inherent risk. As passionate photographers we tend to push the limits of what we are comfortable with to get the angle or composition we desire. This is acceptable as long as we are not reckless in our ways. In over 25 years of traveling through wilderness areas I have yet to ever find myself in serious danger. I use the knowledge and experience I gain on each trip, gather information from rangers and outdoor experts and, although I have had my fair share of bumps and bruises, difficult and nerve-racking moments (#2) such as when photographing alligators in Florida’s Big Cypress National Preserve, never did I truly feel my life was at risk.
Climate
Having an idea of the expected weather can help you determine what to pack and how to prepare. A useful, modern resource taken for granted is the round the clock access to weather reports, from daily updates to 7-day television and web forecasts to full live Doppler radar on my iPhone. As you can see (#3), I have a mix of apps including snow and tide reports, wind and weather updates. Nevertheless, no report is 100 percent accurate and information should never replace extra care in regard to Mother Nature’s unpredictability.

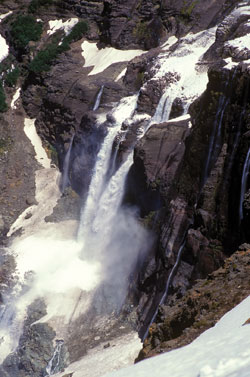
Shooting in the mountains, where storms can roll in at a moments notice, temperatures can drop from 100°F to 40°F, and avalanches can occur, it’s always smart to carry additional clothing and gear. This became evident on Argentina’s Mt. Tronador as I heard the repetitive loud cracks of its glacier breaking away and large chunks of snow falling into a valley close by (#4). Lightning strikes are catalysts for creating forest fires that often spread fast. Traveling at speeds much faster than any hiker and blocking roads and trails, such as this fire spreading over the Grand Canyon, (#5). Know your exit points and leaving an area immediately if you smell or sense a fire.

Photograph in a desert and heat and exposure-related issues (sunburn, dehydration) become a major concern, as it was in California’s Anza Borrego state park (#6). Always have more than enough water, know where you are and where you are headed and stay covered to avoid sunburn. Desert canyons make for wonderful photography but also create the risk of flash floods. Water is another hazardous and powerful force in nature, whether you slip and fall in, become injured or hypothermic, or get swept away by a powerful current. Animals regularly visit rivers, ponds and lakes as a drinking source; it’s a great spot to set up for wildlife captures, but it can also draw animals that can be hostile to 2-legged visitors (photographers) as well.

Walking Trails
Following a trail does not mean you cannot get lost. Knowing exactly where you are and where you are going is critical. Trails become overgrown if used infrequently, making them tougher to follow. As a dirt path traverses a rocky area it is easy to lose the trail unless it is clearly marked. Going cross-country, off-trail and hiking a few hundred yards through a dense forest can take you hours: snakes, twisted ankles and the potential for getting lost also increases. Walk along a cliff-side trail and catch a boot string, stumble, or fall and serious injury or death can be a possibility.
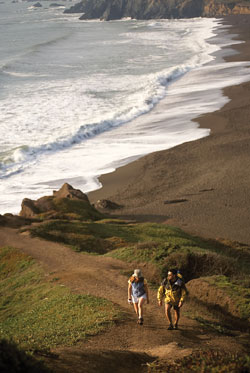
And while cliffs may provide great photo ops, erosion can be a real danger, clearly evident as I hiked up a trail along the California coast (#7). In recent years, I know of one prominent photographer falling over a cliff sustaining a bad back injury, another getting lost and one becoming dehydrated and needing a rescue, all while following trails. Nature may be beautiful and inspiring, but is it also unforgiving.
Wildlife
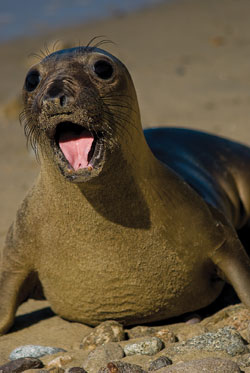
Before I enter any wilderness, I always find out what type of animals I may encounter. Never underestimate the hazards of setting foot into bear, alligator or wild boar territory. Most animals prefer to flee than attack, but empower yourself with a little knowledge and few extra items and you can lessen the risks. Knowing how they act and behave in certain situations gives you a leg up on photo opportunities while making sure you are safe in the process. For example, knowing that this newborn elephant seal pup was begging for food and not being aggressive (#8) made me feel a bit more comfortable photographing it at a relative close distance.
Documenting wildlife can require a great deal of effort, carrying heavy photographic equipment over rough terrain, making strength and stamina a requisite. As nature photographers, we are often alone during times of the day when most are back at their campsite, in their tent or home, but these are prime times when animals venture out for water or food. Being clued in to your surroundings, to the distance between you and the animal, what type of wildlife may inhabit the area and where you are photographing is very important.
Packing Your Gear
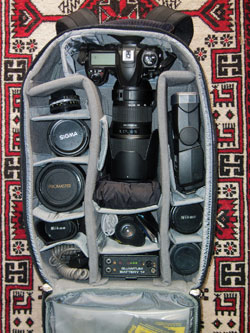
I always pack depending on my photographic goal and approach all of my trips and assignments this way—“methodical, detail oriented and repetitive.” Organizing makes it easier and faster to locate a piece of gear, allowing me to be as ready as I can be, able to concentrate on the subject at hand. I also find the more efficient I pack the less weight I carry, and these two details are worth the effort alone. As you can see (#9), everything has a place in my bag and every piece is put back in the same place. Zippers are always closed to prevent loss of memory cards and accessories; I always use lens caps to avoid damage to the glass and pack extra batteries, charged and ready for action.
Let’s Make A List
Actually, some of the most important gear doesn’t involve camera equipment. Your lists may vary, but here are some essential items I always pack. “Non-photo” items I always have with me include:
Head Lamp (fully charged): This is great for hands free dawn, dusk or nighttime shoots.
Cellphone (fully charged): Besides the weather apps mentioned, many have compasses, and with cell towers sprouting up in new locations, many people have been saved in wilderness emergencies by carrying one along.
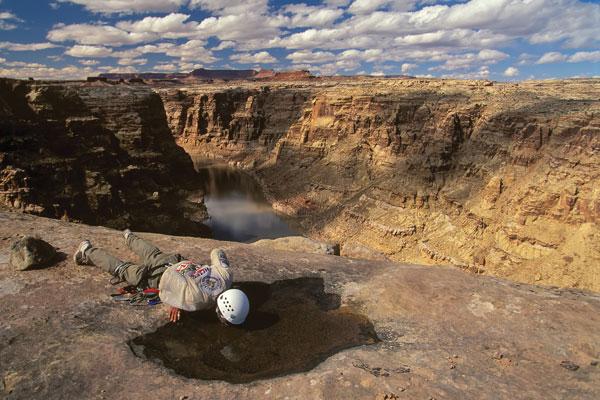
Water: Having more than you may need is vital to any photo trek. Here (#10), an adventure racer takes advantage of a small rain pool in the Utah desert after a hard climb. Hydrating like this carries risk, so always pack enough water to get you through.

Optional items:
Pepper Spray: Bear protection.
Bear Canister: Food protection.
Water Pills/Water Filter: Just in case you need to use available water.
Emergency Blanket: A lightweight item with multiple uses.
Emergency Beacon: For winter backcountry avalanche areas.
Walkie-Talkies: When cellphones have no service, or to direct a person/model from a distance.Camera Gear And Packing
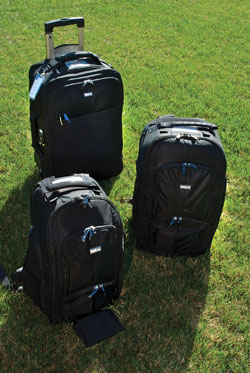
Every photographer carries a different amount of equipment into the field, depending on goals or personal preferences. Options include a small shoulder bag with limited gear up to a large photo backpack filled with cameras and lenses. I use Think Tank Photo (www.thinktankphoto.com) equipment and alternate between their Airport Roller and a few different-sized backpacks (#11). What factors determine the amount I bring on a trip? I weigh speed versus weight versus the essential tools needed for the journey, but essential to almost any photo outing will include:
A D-SLR camera.
1-5 lenses covering a range from 24mm-300mm.
A flash/speedlight.
Filters: polarizer, graduated neutral density, neutral density.
A tripod with ball head.
Extra camera batteries (2-4).
Memory cards (3-6).
A Hoodman loupe: great to cover and view your LCD preview images, (www.hoodmanusa.com).
A photo backpack with a rain guard.
Optional Items May Include:
An extra camera to use as a backup.
An extra lens: a big heavy long telephoto or a super-wide angle.
The camera manual: great when you can’t find a function.
A Quantum battery pack: portable and rechargeable.
A speedlight: an additional unit.
A tripod: larger for long lenses.
Extension tubes: for macro photos.
Watch Your Weight
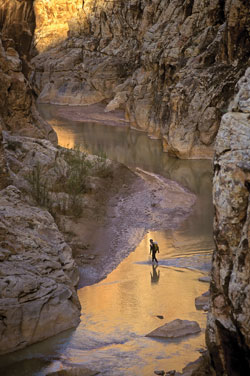
Shooting from a vehicle makes it fairly easy to bring the kitchen sink, but hike any kind of distance and the extra weight of camera gear adds to every step. A tripod is indispensable in nature photography, providing many options to capture steady, sharp, creative scenes, like the low light canyon shot (#12) yet can be heavy and cumbersome. Long lenses usually mean big weight and require extra effort. Prime lenses (lenses with fixed focal lengths) offer crisper renditions and a wider maximum aperture for faster exposures, but more lenses are needed to cover the range of one zoom lens. When I backpack, I carry as little as I can. On occasion, I use makeshift straps to attach tripods, or wrap a bandana or a pair of socks around a lens for extra protection.
Protect Your Equipment
Dropping a lens, breaking a filter, ruining a memory card, or soaking a camera—I have seen and done it all. The potential for water damage is usually the biggest concern, whether through rain, rafting down a river or simply knocking your tripod into a lake. While shooting just north of the Big Sur coastline, I captured this image (#13) by holding and pressing my tripod deep into the sand to keep it from being dragged into the receding waves. Use a rain cover for D-SLRs and lenses and if rafting or working around lots of water bring along waterproof rubber floatable dry bags. Even large Ziploc bags, a parka, a poncho or a photo backpack with a water resistant rain cover can do the job. An empty ice chest is another way to save the LCD screens in extreme heat. Difficult to carry, it is for vehicles and close campsites. Cold weather conditions drain battery life, but if you store your batteries in your parka or coat, your body heat helps them last longer. Setting up a 4-season waterproof tent or a nearby vehicle to keep your equipment dry during non-shooting times is another good protective rule to implement. A storm can appear in the middle of the night when you least expect it.

Park Rules
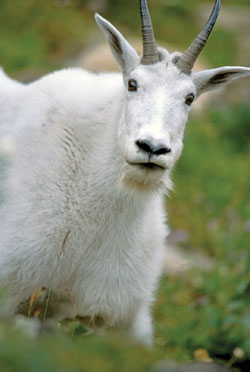
State and national parks are places nature photographers flock to in droves, and because of this the park system have become acutely aware of our presence. In general, you are not required to obtain a permit or special permission to photograph unless you plan to use your images for commercial purposes. There are usually no restrictions against using tripods, with the exception of restricted areas or closures, and documenting wildlife or marine mammals is allowed as long as you stay over 100 yards away. Provided that an animal approaches you (#14), as did this mountain goat in Glacier National Park, and you are not altering its behavior in any way, most rangers will not be concerned. Regardless, I believe if you are using a camera you represent all photographers, so awareness and respect for the rules helps all photographers avoid future restrictions. Represent yourself as if you are the face of all photographers, because you are.
My Code Of Behavior
Besides challenging myself to capture great scenes, I always have a few other objectives in mind. Some are part of my personal philosophy, but most should be universal.
Inform: Let people know where I am going—specific roads, trails and destinations.
Prioritize: Make safety a first priority in all my decisions, especially when I’m alone.
Self-Sufficiency: Expect to be 100 percent self-sufficient.
Tread Lightly: Leave no mark on the areas I travel through and leave nothing behind.
Resources
Here are some resources that I often use to source my gear:
Acratech Inc.: www.acratech.net
Gitzo & Manfrotto: www.bogenimaging.us
Hoodman Corporation: www.hoodmanusa.com
Nikon: www.nikonusa.com
Pelican Products Inc.: www.pelican.com
ProMaster: www.promaster.com
Really Right Stuff: www.reallyrightstuff.com
Recreational Equipment Incorporated: www.rei.com
SanDisk Corporation: www.sandisk.com
Tamron: www.tamron.com
Think Tank Photo: www.thinktankphoto.com
Wimberley, Inc.: www.tripodhead.com


![]()
Get the Latest Photo Tips, News & Reviews from Shutterbug!
| Camera Reviews Other Reviews | Mobile Reviews Photography Reviews Columns | News | Features | How-To | Resources |
 © 2026 Shutterbug
AVTech Media Americas Inc., USA
All rights reserved