- REVIEWS
Camera Reviews 
More Reviews Mobile Reviews Photography Reviews - GALLERIES
- VIDEOS
- BUYER'S GUIDES
The Portrait Photographer’s Triple Combo; Two Programs (Photoshop CS2 & CPAC Imaging PRO) And One Plug-In (Kodak DIGITAL GEM) To Help You Speed Production
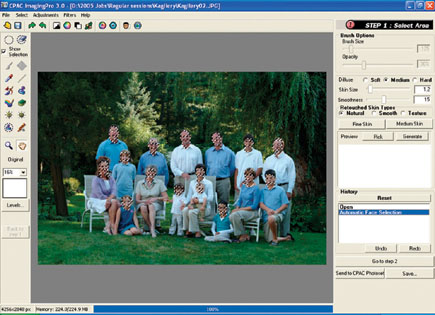
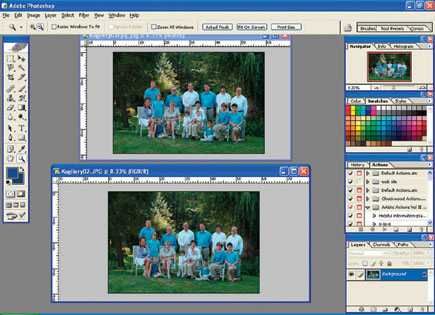
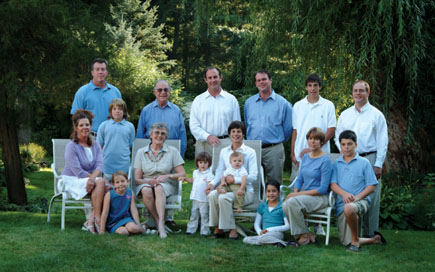
In this article I'm going to show you how combining two software programs and one plug-in can make your life easier and your workflow faster. As a bonus (see sidebar), I'm going to show you a way to handle dodging and burning that is nondestructive to your files. First up, we've got a family portrait with 16 people to retouch. That sounds like an hour's work, easy! Have no fear--it's CPAC Imaging PRO (see my review in the July 2006 issue of Shutterbug, or type CPAC Imaging PRO into the Search box at www.shutterbug.com) to the rescue. First, open the image in Photoshop and dupe it. Close the original and dupe this file again. Take the second dupe and open it in CPAC. Click "select faces" and watch some magic. The program automatically selects the faces and even holds back the eyes and lips so that they aren't softened! Then click "retouch faces" and it automatically retouches them. You can even do this in one click if you're really lazy, but I like to see just what's happening. Bright outdoor areas sometimes fool the program, but overall it's quite remarkable. Do a small group of 6-8 people in the studio and it's spot on.
 |
|
|
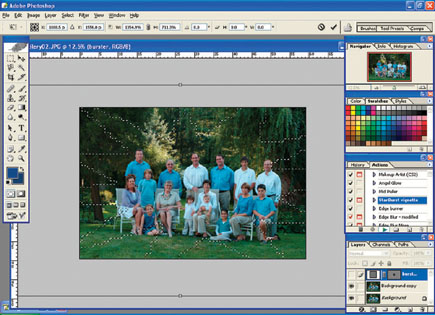
There are many adjustments in the program to control the degree of softening, but I just prefer to "overdo it" and then reopen the file in Photoshop. Make sure you don't re-size the file and drag it back over the original. Then you can adjust the opacity to suit your taste, and then flatten the image. With a big group you'll probably have to go back in with Photoshop and do minor cleanup on a few spots. Once you're all done, make a dupe layer and add a vignette for a more finished and dramatic look. I use Kevin Kubota's Starburst Vignette (http://kubotaworkshops.com). It's really funky and seems crazy, but it looks amazing. To manually burn in without "damaging" pixels, see the sidebar. I made the dupe layer because the Vignette Action is usually too strong, a good thing, because then I can control its effect by just using the opacity control on that layer. Here is the finished result:
 |
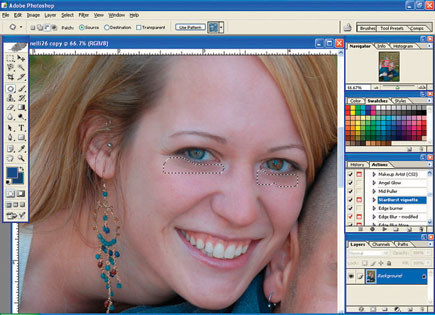
For preparing files with bigger or fewer head sizes, or people who don't require much retouching, it's sometimes quicker and more convenient to stay in Photoshop. Taking this photo of an engaged couple as an example, we can quickly do a little eye retouching with the Patch tool (J). Hold the shift key down to select both eyes, then drag to a smooth skin area, usually the forehead. Real people have eye lines and will miss them if you make them totally disappear; Cosmo covers are different. I always "fade" the Patch tool so it's not 100 percent. You have to immediately key in Ctrl/Shift/F and an opacity box will appear. I might use anywhere from 20-90 percent, depending on age, sex, and severity of the eye lines. You'll get very good at it with a little practice.
 |
 |
Here is the photo after being faded. Hit Ctrl/D to remove the selection.
 |
Once you've completed your retouching using the Patch tool and Healing Brush, it's time to soften the skin texture as we did with the CPAC software, which both retouches and softens in one step. But sometimes you don't want the same amount of softening. In this case, we probably want to soften the female more than the male. To do this, make sure you're working on a dupe layer (Layer>Duplicate), use the Lasso tool with about a 5-pixel feather, and select the area you want softened. There's no need to be very exact in your selection, a little softening around the edges is not noticeable. Then go to the Filter menu and open the Kodak DIGITAL GEM Airbrush filter. As far as I can tell, the softening technology between the Kodak plug-in (about $100) and the CPAC program (about $500) is similar, but not identical. And I get ticked off at the DIGITAL GEM sometimes because if head sizes are too small (350x350 pixels minimum), it refuses to help me out. You must have at least the minimum number of pixels selected or it won't budge.
 |


![]()
Get the Latest Photo Tips, News & Reviews from Shutterbug!
| Camera Reviews Other Reviews | Mobile Reviews Photography Reviews Columns | News | Features | How-To | Resources |
 © 2026 Shutterbug
AVTech Media Americas Inc., USA
All rights reserved