- REVIEWS
Camera Reviews 
More Reviews Mobile Reviews Photography Reviews - GALLERIES
- VIDEOS
- BUYER'S GUIDES
PHOTOSHOP 101: How to Use the Healing Brush for Portraits & More (VIDEO)

Photoshop’s easy-to-use Healing Brush is typically considered a tool for editing portrait photos, and rightly so because that’s how it’s often used. But it can be very valuable for cleaning up other types of images too.
If you're* unfamiliar with Healing Brush edits the tutorial below is for you, as you’ll learn several easy methods for getting the job done. Instructor Nino Batista is a photo-retouching expert, and he considers this episode to be in the category of “Photoshop 101.”
Batista is working on a portrait of a pretty model who happens to have a few spots and creases on her face—much in the same way a landscape shot may have small, distracting artifacts that you may want to remove. In either case the easy tips or techniques he discusses provide all you need to know for achieving nice and clean photos.

Using Photoshop’s Healing tools can be as simple or as complicated as you make it, and Batista’s goal for this 14-minute episode is the former. He explains all the basics for using the Healing Brush and the Spot Healing Brush, and provides some thoughts about using these tools with what’s known as “Frequency Separation.”
Batista notes that when editing portraits, “Healing is mostly for high-frequency areas like dots, zits, and moles.” Healing tools can also be very helpful when working on flyaway hairs and other elements that need to be removed or repaired.
The demonstration begins with a discussion of the differences between the regular Healing Brush, and the Spot Healing Brush. Batista says, “The Spot Healing Brush is the most direct; you choose your brush size and paint over the area you’re working on.” As you’ll see, the regular Healing Brush works differently. In simple terms this option enables you to sample a clean nearby area with similar texture and use it to replace the offending spot.
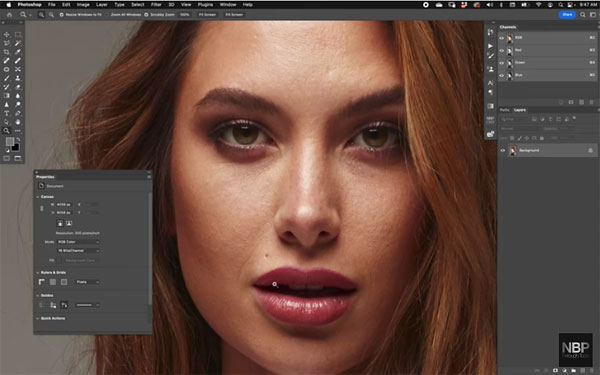
After demonstrating the basics, Batista move on to a few additional tricks you can employ in difficult situations when a bit more care and precision is required. One somewhat unfamiliar method is to do your healing on a “blank layer,” and this trick works with either of Photoshop’s Healing tools.
After watching the video head over to Batista’s YouTube channel, where you’ll find a bunch of great tips to use when you find yourself in a bind
And for another very helpful explainer be sure to watch the tutorial we posted recently, explaining how to make the most of Photoshop’s Object Selection tools.


![]()
Get the Latest Photo Tips, News & Reviews from Shutterbug!
| Camera Reviews Other Reviews | Mobile Reviews Photography Reviews Columns | News | Features | How-To | Resources |
 © 2025 Shutterbug
AVTech Media Americas Inc., USA
All rights reserved