- REVIEWS
Camera Reviews 
More Reviews Mobile Reviews Photography Reviews - GALLERIES
- VIDEOS
- BUYER'S GUIDES
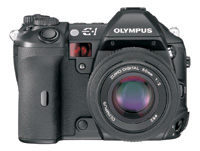
The Olympus E-1
A New Pro-Oriented Digital SLR System
One of the glories of digital cameras is that you have as many options as you could desire in terms of exposure, white balance, file format and compression, sharpness, contrast, color saturation, bracketing, flash modes, and ISO settings, etc., all in each frame. This allows you to bring all your photo knowledge to bear with each and every shot you make without changing film or camera bodies. In theory this is great, but too many digital cameras give you these options with one hitch--you have to wade through a host of menus and submenus and the choices are not always clear. Having had time to work with the new Olympus E-1 digital SLR I can say that this is one camera where someone actually seems to have thought about how photographers work (or would like to work) and have designed a camera that allows them to make just about every decision required while actually making pictures. |
|||||
|
|||||
|
|||||
|
|||||
|
|||||
Drive Modes |
|||||
Handling And Setup |
|||||
There is, however, what you
might call a learning curve to take advantage of this design. This would
include knowing, first, what each button does, and, second, finding it
in less than ideal conditions. But like loading a metal Nikkor reel in
the darkroom (how's that for an archaic reference) all this can
be accomplished with some time set aside just to get familiar with this
formidable machine. |
|||||
The Digital Menu Side Focusing Control |
|||||
Exposure Modes |
|||||
The Raw Deal |
|||||
The (included and "free")
Viewer software does just fine and allows you to change parameters such
as contrast (which I used quite often), color space (going from sRGB to
Adobe RGB is quite instructive), white balance, and exposure compensation.
It's quite comprehensive, and also quite slow. I do love shooting
in raw format, as I can sculpt each image, if you will, without doing
much when I photograph, but this version, at least, requires patience.
Each raw edit takes longer than it should to do the task, even a fairly
simple one like EV compensation. My main complaint with this software,
however, was with file management, as the software does not offer any
easy Save As and renaming files is awkward to say the least. I did talk
with the good folks at Olympus about this and they are aware of the problem
and I am sure that this will be addressed very soon. But my version of
raw editing was clunky and slow. Other aspects of the Viewer, however,
were very good and allowed me to Browse, see attributes, etc., like any
good editor should. Sensor Sensitivity |
|||||
White Balance Options |
|||||
Interesting Options |
|||||
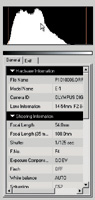
Playback offers the usual
options, with a very good information panel that can be scrolled through
many levels of data. You can look at the picture unadorned with data;
with time, date, and file number; with highlights (overexposed areas blink);
with a histogram; and with a fairly full profile of the settings used.
You can also zoom in for critical judgments and get a multi-shot version,
useless for judgments but great for finding a series or quickly locating
one image in a set. The monitor, by the way, does not articulate, something
we found to be a bonus in other digital cameras. Four-Thirds System |
|||||
But numbers such as this,
confusing as they are, do not tell the whole story. Their lenses, say
Olympus, are built just for their camera body, thus do not have what they
claim are inherent faults in "adapted" lenses for 35mm. First
off, says Olympus, they are highly corrected, with three aspherical elements
and ED glass, and virtually eliminate light falloff at the edges and,
more importantly, deliver light to the sensor at less of an acute angle
than wide angle lenses adapted from 35mm. The CCD, it turns out, likes
parallel delivery, and when the angle is acute it tends to be less efficient.
Not being an optical engineer I cannot attest to or negate this claim.
Being a photographer, however, I can say that I do not see a great difference
and have yet to be bothered by it. In The Field Technical Specifications |


![]()
Get the Latest Photo Tips, News & Reviews from Shutterbug!
| Camera Reviews Other Reviews | Mobile Reviews Photography Reviews Columns | News | Features | How-To | Resources |
 © 2026 Shutterbug
AVTech Media Americas Inc., USA
All rights reserved