- REVIEWS
Camera Reviews 
More Reviews Mobile Reviews Photography Reviews - GALLERIES
- VIDEOS
- BUYER'S GUIDES
Now Where Did I Photograph That Cactus Flower?; iPhoto ’09’s “Places” Gets You Maps And More
I realized the importance of taking location notes years back when preparing a large selection of slides for a stock agency. I was going through my “Italy” file and began to segregate out images of church interiors. Spectacular and, at the time I shot them, unforgettable locales quickly turned into a confusion of altars, statues, and naves, most of which I couldn’t honestly label as being from one or another church. That problem arose because I failed to take notes on the road, either visual ones (a shot of the church’s name in the sequence of images) or on paper, which frankly never worked out because I inevitably lost my notes.
 |
|
 |
|
|
Now, with GPS devices aplenty available for digital cameras, and the ability to identify when and where an image is made, I would simply photograph the exterior (with the church’s name) and organize the images from that one church as a defined time stack, and be able to label accurately and quickly, and even provide a map and aerial image of the site as well.
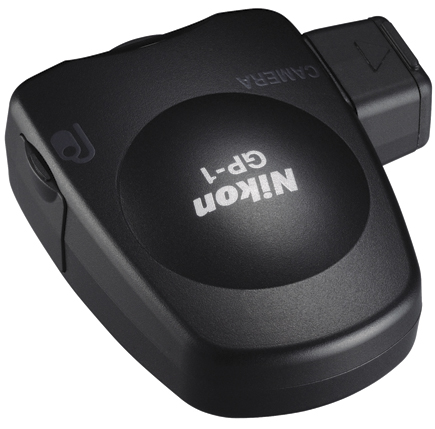
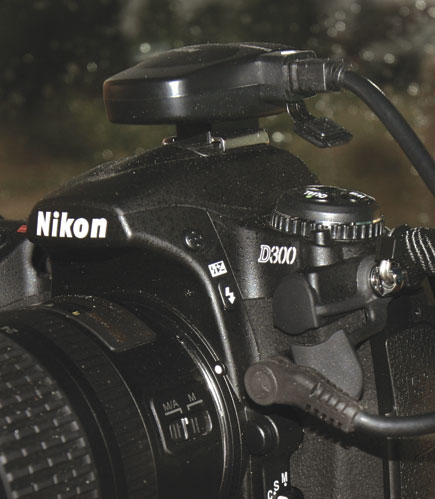
Having edited stories for the magazine by Jack Neubart and others on GPS-enabled devices and techniques, I decided to try one out for myself. I checked out a few and decided upon what I now consider the most straightforward and easiest combination of gear and software—a dedicated Nikon GPS camera device and iPhoto ’09’s Places feature on a MacBook Pro. My test camera was a Nikon D300 with their Nikon GP-1 accessory.
First, the camera setup. The GP-1 mounts in the camera’s hot shoe and attaches to the D300 via the GP1-CA10 10-pin cable. The unit gets its power from the camera battery, and has a clip that you can place on the neck strap to stow it when not in use.
Once you turn the camera on and have the unit attached in the hot shoe it stirs into life, taking a minute or so to catch the satellite signals used to set up the data. Note that the unit must have a certain “line of sight” with the satellites and will not work indoors, so in the church scenario mentioned earlier I would photograph the exterior then use the “time stack” sort to add keywords or captions to that set of images later.
Once you get a solid “GPS” signal on the LED you are assured that the GPS data will be recorded. You can double-check this in the field after the shot by going to GPS>Position in the camera menu, where you will see the longitude, latitude, and UTC (universal time) information. All in all, no sweat. (Note: In the case of the Nikon setup, check Nikon’s website for compatible cameras, but many sold after 2008 have this feature.)
Like I said, my aim was to find the easiest setup, and the iPhoto ’09 software (requires Mac OS X 10.5.6 or later on a Mac Intel setup) is as easy to use as the Nikon GP-1. The first step is to import the images into iPhoto. When those photos have GPS data that information is automatically loaded with the image. In addition, the program converts the data into a set of what Mac calls “friendly” names for locations, with points of interest, etc. This seems to work fine for places like Paris (not that I shot there for this test) but not so much for shots in the middle of the desert, though it will pick out a state and the general locale.
What really knocked me over, however, was the precise detail the program revealed of shots I made in the proverbial middle of nowhere, and how the program even showed me the exact spot on a topo and even a road map.
|
No GPS In Camera? No Problem
|
|
 |
|
|
Here’s how it works: once the image is loaded you can get the location in a number of ways. You can type the name of a place in the Search field and the program will find all the images made in that area for you, even if you personalize that place (such as “my house”). You can refine searches as you wish and get fairly detailed about neighborhoods, etc.
You can also explore via an interactive Google map and find images made marked with a pin and get terrain, satellite, or what are called “hybrid” views. And if you are just searching around the Events folder (which sets up albums created by you or downloads) you can click on the photo and “flip it” and reveal where the photo was taken and a map showing the pinpointed spot.
|
| |||||||||


![]()
Get the Latest Photo Tips, News & Reviews from Shutterbug!
| Camera Reviews Other Reviews | Mobile Reviews Photography Reviews Columns | News | Features | How-To | Resources |
 © 2026 Shutterbug
AVTech Media Americas Inc., USA
All rights reserved