- REVIEWS
Camera Reviews 
More Reviews Mobile Reviews Photography Reviews - GALLERIES
- VIDEOS
- BUYER'S GUIDES
Multi-Image Portraits; Combining Images For A Unique Look
I had a thought (it happens!) back in the `80s. I was thinking how great it would be to create a portrait piece of someone that combined several images together to show the many facets of that individual. Let's take an example. Suppose you were commissioned to do a portrait of a young man. His interests may include playing football, swimming, sailing, playing guitar, etc.
"Morning Ritual" |
|
 |
|
|
My thinking was to photograph this individual while he was doing these activities, and somehow combine all these images together into one super image with all the individual ones. Great idea, right? Man, I thought, I could get paid a fortune for doing this kind of work! The only problem was, I couldn't figure out how to do it! Make a few small prints and tack them up and copy them? Not quite the elegant image I was going for. Print them on one piece of paper using masking techniques? Possibly, but not an easy task for someone not owning a color lab. Do a "brain shot" like at weddings, where you put the bride's face in the groom's head? Yuck! Oh well, nice idea, but just too complicated and time consuming. Time to move on.
 |
|
|
Fast forward to 2006. Film is fast becoming a memory, and anyone with image-editing software is capable of combining images to create spectacular effects. Of course, the key word here is capable, because the old computer axiom of "Garbage In, Garbage Out" is especially true of today's digital photographer. But in the hands of a skilled artist/photographer, wonderful things can happen.
 |
|
|
By combining excellent photography with Photoshop or other software skills, today's photographers can create multi-image masterpieces that were unthinkable just a few years ago. The most successful ventures usually involve preplanning with the finished image in mind before any photos are taken. Much like a video production, a "storyboard" is often made that lays out approximate images and image placement before photography begins.
"The Hunter" |
|
 |
|
|
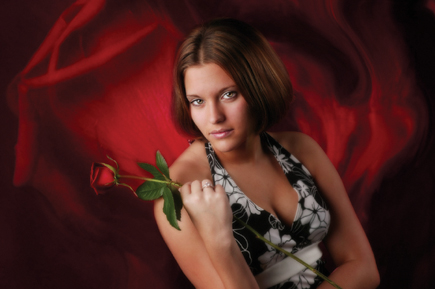
"Rose" |
|
 |
|
|
Types Of Multi-Image Portraits
To my way of thinking, there are 2 main types of multi-image portraits, those
that use several images of the subject and those that combine other random images
that are good candidates for adding texture and depth to an image. Those that
involve several images of the subject are self-explanatory. Examples of random
images to be included with the subject include clouds, flowers, sand, rocks,
marble, weeds, grass, etc. With random images, the goal is to enhance the subject
or add interest, not compete with the main subject. And remember, with image-editing
programs, you can change colors, contrast and opacity at will to find just the
look you desire.
 |
|
|
|
 |
Technical Considerations
My combos were done relatively easy. Once I picked two images I thought would
work well together, I made sure they were the same size, such as both at 11x14"
at 300dpi. That allowed me to drag one image on top of the other and have it
all aligned properly. Before doing that, I ran each image through levels and
curves as needed, and even desaturation in both these cases. Once I had the
opacity I liked, I simply used the eraser tool at about 14 percent and erased
areas I wanted to show through more. Once I had it the way I liked it, which
is very subjective, I flattened the image and saved it as a JPEG for printing.
I first saved it as a PSD so I could go back to the image in layers and make
changes without starting over.


![]()
Get the Latest Photo Tips, News & Reviews from Shutterbug!
| Camera Reviews Other Reviews | Mobile Reviews Photography Reviews Columns | News | Features | How-To | Resources |
 © 2026 Shutterbug
AVTech Media Americas Inc., USA
All rights reserved