Making Enlarged Negatives In The Darkroom; Excerpt From Steve Anchell’s The Darkroom Cookbook, Third Edition Page 2
Some points to remember when making an enlarged negative are to:
1. Try to keep your f/stop between f/11 and f/16 for sharpness, with an enlarging time of 1.5 to 6 seconds to avoid reciprocity.
2. Times less than 1.5 seconds may lead to inconsistent results because of variables in lamp warm-up. Use Neutral Density (ND) filters to adjust the EI as necessary and allow for longer exposure times.
3. When learning the process get in the habit of making three negatives, with a one-stop increment difference between each, for example, 1.5 seconds, 3 seconds, and 6 seconds.
4. Because all enlargers leak some light, it is a good idea to use black photographers or gaffers tape to seal off any light leaks after the positive is positioned in the negative carrier.
 |
|
|
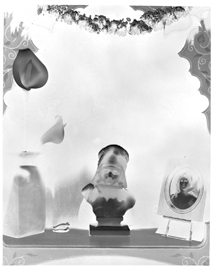
Treat the film as if it were paper. If using ortho film (Adox 25 ORT) you may use a Wratten #1A or 2 safelight filter. Otherwise work in total darkness. Do not use a contact printing frame or cover the film with glass as you will pick up dust spots which will contact print later as black. There are a number of ways to position the film in the dark. One is to use a cut-sheet film holder placed in the corner of an easel and pull the dark slide just before making the exposure. Make certain the holder is sitting level.
Another method is to tape a cardboard corner to the enlarger baseboard. Into this corner, place a piece of black paper to absorb the light passing through the negative. If there is a problem with the negative curling (in areas of high humidity) use lithographers tape in the corners to hold it flat.
 |
|
|
An alternative is to use an enlarging easel and black paper one size larger than the film size. For example, if you are going to enlarge to 8x10” use an 11x14” easel with a piece of black paper covering the base. Close the blades down to exactly 8x10” to fit the film. In the dark you can lay the film in-between the blades and on top of the black paper. Or use a magnetic copy board. Again, use a black piece of paper and position the magnetic strips so that the film can be placed in the dark.
My favorite method is to use a Ganz Speed Ez-el®. Speed Ez-els come in various sizes from 2x3” to 16x20” and the negative can be easily slid in and out in the dark. If you use a Speed Ez-el paint the inside flat black to avoid light bouncing back through the negative.
 |
|
|
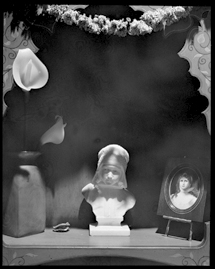
Start by composing the positive image onto a sheet of white paper. Once composition is achieved remove the white paper and replace it with a scrap piece of film for focus. If you don’t have a piece of scrap film (because you never make mistakes) you will need to sacrifice one sheet, which you can keep to use over again. Any piece of 4x5” film will do as they are all within microns of the same thickness. Always use a grain focuser for fine focus.
Remove the film used for focusing, make certain all the lights are off (unless using ortho film), place the unexposed film into position emulsion side up, and cover one-quarter with cardboard (do not use paper as light will bleed through). Horizontal or vertical makes no difference as long as the remaining negative contains enough of the subject to judge the densities later. Make a 3-second exposure of the remaining three-quarters. In the dark, cover each of the remaining quarters of the negative and expose in 3-second increments (you may want to set up some kind of raised guides to butt the cardboard against in the dark). You will now have a blank strip, a 3-second exposure, a 6-second exposure, and a 9-second exposure.
Develop the negative in any film developer, MQ, PQ, pyro, etc. Use whatever developing procedure you would normally use for film.
When the negative is dry place it in a contact printing frame with the base side against the glass then do one of the following:
1. Make a proof for maximum black using the blank strip and a piece of photographic enlarging paper or piece of paper coated for the alternative process you intend to use and the appropriate light source (the procedure for this can be found in Appendix 4 of the Cookbook).
2. Make a print using the entire negative and a piece of paper coated for the alternative process you intend to use (e.g., salted paper, plt/pld, etc.), and the appropriate light source (e.g., sun, UV printer, etc.).
If you use the second method, choose the strip that makes the best print according to your taste. You may now make your final enlarged negative using the settings for that strip or you can fine-tune the negative, either by altering the enlarger exposure time, or by increasing or decreasing the development time. Remember, expose for the shadows and develop for the highlights.
Steve Anchell is a writer and photographer who teaches darkroom and digital workshops from his home in Salem, Oregon. Anchell will be teaching his popular five-day workshop “Alternative Large Format Techniques” for the Photographers’ Formulary Workshops in Montana from July 5-10, 2009. For more information, visit his website at: www.steveanchell.com.
Resources
.dr5 Chrome Lab: www.dr5.com
Freestyle Photographic Supplies: www.freestylephoto.biz
Photographers’ Formulary: www.photoformulary.com
The third edition of “The Darkroom Cookbook” (ISBN: 978-0-240-81055-3) is available directly from Focal Press, an imprint of Elsevier, at: www.elsevier.com.
- Log in or register to post comments


