- REVIEWS
Camera Reviews 
More Reviews Mobile Reviews Photography Reviews - GALLERIES
- VIDEOS
- BUYER'S GUIDES
Low Light Scenarios: Challenges And Solutions

Aquariums
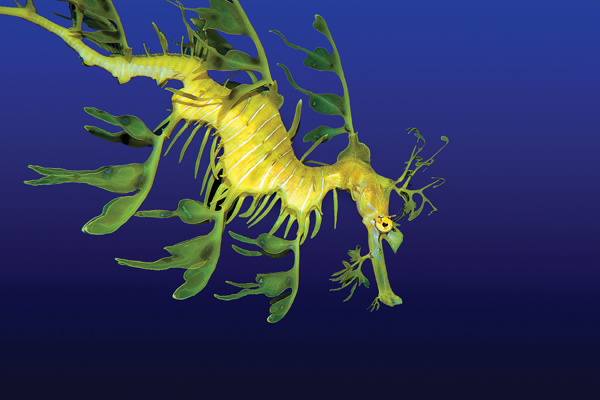
The picture of the sea dragon (#1) is one of my favorite aquarium shots because I think this creature is especially intriguing and beautiful. I spent a lot of time at this exhibit at the Ripley’s Believe It Or Not Aquarium in Gatlinburg, Tennessee (www.ripleys.com) because I wanted a successful picture.
All Photos © Jim Zuckerman
However, photographing in an aquarium is particularly difficult for many reasons. First, the light is quite low. Second, the subjects are usually constantly in motion and this was the case with the sea dragon. Third, the optical quality of the Lucite that makes up the aquarium is pretty bad. Fourth, there are often reflections in the Lucite from lights behind you and these can totally ruin the pictures. And fifth, depth of field is usually an issue because most aquarium photography entails shooting small subjects and you want to fill the frame with them as much as you can. Since fish and other creatures are moving, depth of field has to be sacrificed more often than not.
I first had to address the issue of low light. I couldn’t use a tripod because the sea dragon was moving and a tripod would set the camera about a foot away from the face of the aquarium. As a result, the lights in the room would reflect in the Lucite. Therefore, I had to raise the ISO until my shutter speed was fast enough to freeze the sea dragon’s motion. I wanted a decent amount of depth of field (actually, I wanted complete depth of field but I didn’t have enough light to use a very small aperture) so I set the lens to f/7.1. In order to have a shutter speed of 1/125 sec—the speed I guesstimated would freeze the movement—I had to raise the ISO to 800. This was essentially trial and error. I kept raising the ISO until I got the shutter speed I wanted.
I used a 50mm macro lens because this has more depth of field than a medium telephoto, and it also forced me to be close to the tank, thus my body and the camera could block the reflections of the lights behind me.
As I mentioned, the lack of optical quality of the plastic isn’t ideal, and the way to optimize the sharpness of the pictures was to make the lens axis as perpendicular to the Lucite as possible. As soon as the lens was angled to the plane of the plastic, the quality of the photographs went downhill very fast. Therefore, instead of keeping the sea dragon in the frame by remaining in one spot and angling the lens to follow it, I moved with it so the lens was constantly at a 90˚ angle to the front of the aquarium. If you like to shoot in aquariums, keep this technique in mind because it’s very important.
To maximize the depth of field, I waited until the sea dragon was swimming left to right or right to left. If it was facing the camera, the depth of field was too shallow and much of the fascinating detail would be out of focus. I didn’t want that. The f/7.1 lens aperture just didn’t provide enough depth of field. I took the picture you see here when the animal was close to the front of the aquarium so I didn’t have to shoot through a lot of water.
Another aquarium subject presented a different set of variables. The beluga whale I shot in the spectacular facility in Atlanta, Georgia (#2) was constantly moving, but this obviously wasn’t a macro shot. That meant that the shutter speed didn’t have to be as fast as when I filled the frame with a small subject.
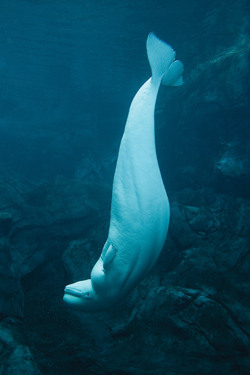
Keep in mind that close-up work magnifies not only the subject but movement as well. With a huge creature like the whale, I felt I could obtain a sharp picture with a shutter speed of 1/60 sec and this permitted the use of a lower ISO. The ideal in all photography, and especially in low light situations, is to use the lowest ISO possible. When I use the word possible, I mean as long as the shutter speed is fast enough to provide a sharp picture. If lowering the ISO means that the shutter becomes dangerously slow (anything less than 1/60 sec), then one or more of the following has to happen:
1. The ISO must be raised and/or
2. More light must be added to the scene, such as from a flash and/or
3. A larger lens aperture must be used, thus sacrificing depth of field.
When I photographed the whale, I put my camera lens up against the tank with a rubber lens hood fitted to my 16-35mm wide angle lens. The rubber hood protected the tank and the lens from being scratched and by placing it in contact with the plastic I was able to eliminate unwanted reflections from lights behind me.
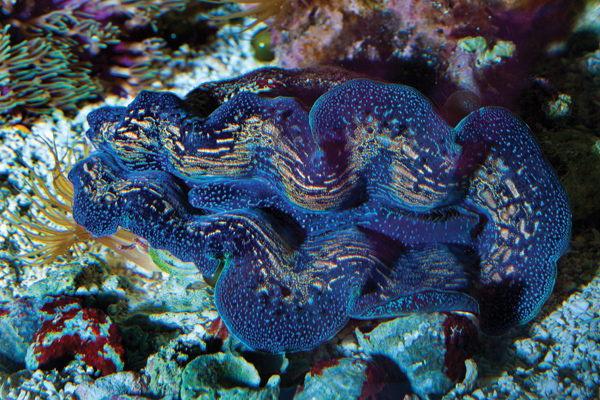
A third image (#3) is a blue clam in a friend’s aquarium. The clam wasn’t moving, but there were currents in the saltwater from the action of the filtering system and the aeration of the tank. The light in the tank was so dim that I didn’t want to punch the ISO to 3200, so instead I used an off-camera flash. That froze any motion that was occurring in the water, it provided excellent color and because I held the flash to the side, I created texture and depth. The ISO setting was 200, and I used a Pocket Wizard (www.pocketwizard.com) to trigger the flash wirelessly.
Firelight At Dawn
I took a spectacular hot air balloon ride over Cappadocia in Turkey and part of the photographic adventure of this experience is shooting the inflation of the balloons. This is often done at sunrise, but this particular morning it started in the pre-dawn darkness. The light was abysmal. It was very dark and most of the illumination was coming from the burner used to heat up the air inside the canopy of the balloon (#4).

A tripod didn’t make sense because everything was moving. Besides, I didn’t bring one since I couldn’t use it once we were airborne. Therefore, I conducted an experiment. I wanted to see how slow the shutter could be and still get a sharp picture if I used image stabilization. Since I don’t like high ISO settings, I was hoping I could get away with a fairly low number.
I set the ISO to 640 on my Canon 5D Mark II. This made the shutter speed 1/8 sec. I was using a 24-105mm Canon lens set to the wide angle end of the zoom and this worked to my advantage. Movement is more noticeable when an image is magnified, such as when a telephoto lens is used, and therefore the 24mm focal length contributed to my goal: Get a sharp picture with a slow shutter speed.
To be honest, I was extremely surprised that hand holding the camera with such a slow shutter produced a sharp picture. I tried the same thing using ISO 400 and 1/6 sec but the image wasn’t tack sharp. The combination of the wide angle lens, 1/8 sec and a reasonable ISO setting produced a successful picture. I would not hesitate to make a very large print (30x40”) with an image taken at this ISO setting.
Tech Tip: The main problem with using image stabilization is that you will inevitably forget to turn it off when using a tripod. In most cases, pictures will not be sharp when the IS (or VR) feature is left turned on and the camera is resting on a tripod, a beanbag or any kind of solid surface. I have heard that some lenses and cameras have worked out this problem, but in my experience the IS feature must be disabled or turned off when using a solid support. Too many times I have been using image stabilization only to forget to switch it off when using a tripod and the resulting pictures aren’t sharp. This drives me crazy, and I swear to myself I’ll never use the IS again. Then, when I’m faced with a shot like the inflation of the balloon at dawn, I have no choice but to use it.
The moral of the story is that if you use image stabilization, you must be conscious of the fact it needs to be turned off when you are no longer shooting in a low light situation without a tripod. Stick a small piece of masking tape on the camera with large red letters that say, ‘IS OFF!’ so you don’t forget. Don’t trust your memory.
Close-Ups In Muted Light
I took the photograph of the dried dahlia flowers (#5) in overcast conditions. The cloud cover was thick and the light is what I call “muted”. The reason I am including this picture in a discussion of low light photography is because it was important to use a small lens aperture here for complete depth of field, but this wasn’t possible without a tripod. In my opinion, doing macro photography like this while hand holding the camera is a mistake. You will never be happy with the results. Macro photography is all about the detail. That’s why we appreciate and photograph small subjects and if some of that detail isn’t sharp, the pictures will be disappointing.
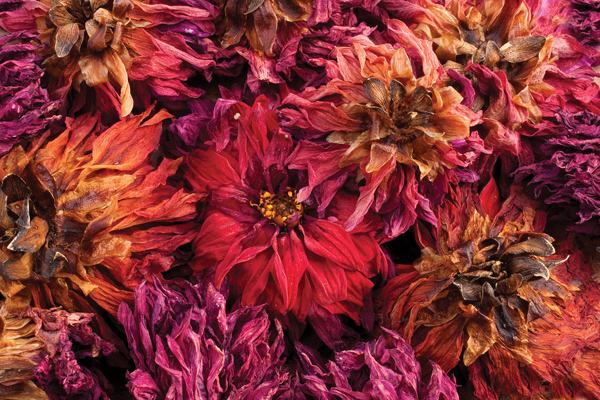
I had arranged the dried flowers on an outdoor table and it wasn’t convenient to shoot straight down on the arrangement. That would have made it easy to have complete depth of field because the back of the camera, i.e. the plane of the digital sensor, would be parallel to the flowers. Standing next to the table meant that the back of the camera would be oblique. That meant the depth of field would be limited. The only way to regain the loss of the depth of field would be to use a very small lens aperture such as f/32. Since the light was muted, that meant the shutter speed would have to be very slow unless I raised the ISO, which I didn’t want to do.
This is why a tripod is necessary. It allows the use of small apertures without the loss of picture quality associated with a high ISO and at the same time a small lens aperture is possible without worrying about how slow the shutter speed will be. I took the shot with a 50mm macro lens, f/32, ISO 200 and the shutter speed was .3 sec. Notice how the image is sharp from edge to edge so we can see and appreciate all of the beautiful detail in the dried flowers.
Traffic At Night
I consider night photography a trial and error proposition. Even after decades of experience, I still can’t know exactly how my pictures will turn out. Sure, I can previsualize streaks of traffic lights, star bursts from streetlamps and illuminated buildings against a dark sky, but there are so many variables that make up a night composition that it’s not possible to know how the final pictures will look until you examine each one on the LCD monitor. Even when you do that, if you take two successive pictures from a tripod of the same scene, you’ll get two different images simply because the motion you captured in one photo won’t be duplicated in another. And when you alter the focal length of a zoom lens, the exposure time and the lens aperture, the additional factors make predicting the outcome impossible.
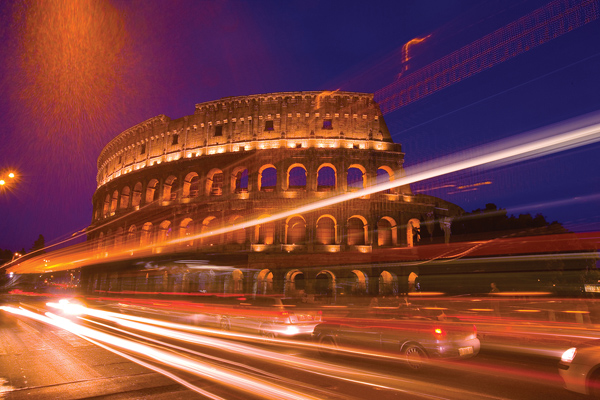
A case in point is the pair of images of the Roman Coliseum (#6 and #7). They were both taken from the same place and I used a tripod. This was obviously essential since I opted for ISO 100 for minimum noise and I chose an f/11 f/stop in both instances to maintain depth of field on the traffic as well as the ancient structure in the background. Even though my intention here was to create an abstract of the traffic, the streaks of color still needed to be sharp.
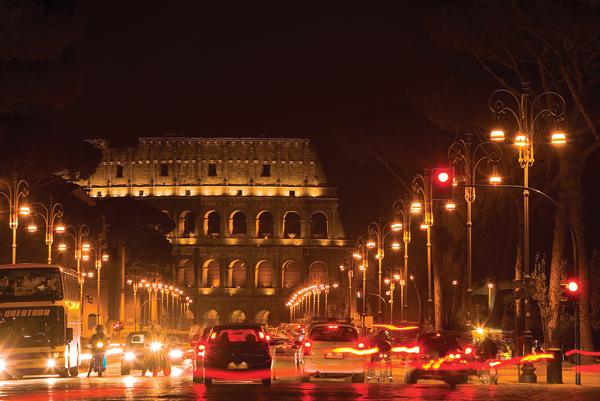

I took photo (#6) with a 6 second exposure, while I used only 2 seconds for (#7). You would think that the longer exposure would produce more streaks of light and normally this would be true. However, during the 6-second exposure the cars were stopped at a red light and they weren’t moving. On the other hand, during the 2-second exposure I used for (#7) the cars were turning a corner and multiple streaks resulted because of this movement. This is why it’s impossible to predict what the pictures will look like. You don’t know what kind of activity will happen during the exposure.
Exposure is perhaps the biggest issue to deal with when shooting at night. When shooting traffic, assuming you want long streaks of colored lights, use a long shutter speed. In addition, use a tripod if you want everything to be sharp except for the streaks of lights. In both photos (#6 and #7), notice how the architecture, the cars and everything else is sharp, and it’s the juxtaposition of the sharp elements against the traffic streaks that make the images successful. Had I not used a tripod and the Coliseum and the cars were unsharp, I would have trashed the image as soon as I opened it on my computer.
Where you position yourself with respect to the traffic pattern is very relevant. In another shot taken the same evening in Rome (#8), I set up my tripod at the edge of the slow lane just down from a bus stop. I knew many buses passed the Coliseum at this point, and that enabled me to photograph them passing by. Notice that some streaks of light go right through the middle of the frame. These are the running lights on the top of a bus, and I often try and capture these elevated lights because I feel it adds additional interest to the photograph.
If you want to create some wild abstracts of traffic lights, shoot them while you are in the passenger seat of a car and a friend is driving through the lights at night. With the shutter open for 5-10 seconds, every time the car hits a bump or the driver breaks or accelerates, the streaks of light go haywire and create the most interesting abstracts. You will have to experiment with the lens aperture as to the correct exposure. This will vary depending on how bright the lights are and how long the shutter is open.
Photo (#9) is an example where I combined one of these wild images of traffic with a picture I took from the back seat over my friend’s shoulder as he drove through a tunnel. I used .6 second exposure, just enough to abstract the dashboard, and then I added the streaks of traffic in Photoshop. This was an attempt at conveying the idea of drunk driving for my stock photo agency.

Museum Photography
Virtually all museums prohibit tripod use, and for good reason. They don’t want patrons tripping over the legs of a tripod and causing damage to invaluable works of art. There are ways around this vexing obstacle to taking good pictures in the low light environments of museums. One such scenario involves shooting into a glass case by resting the lens directly on the top of the glass. This isn’t always permitted, but sometimes it is.
I was in Turkey leading a photo tour when my group visited the Tomb of Mevlana, the founder of the Dervish philosophy (of the Whirling Dervishes fame). On display are many very old and beautiful Korans and they are displayed in glass cases open so we can see at least one of the artistic and very detailed pages. No tripods are allowed, and the light is so low that good photography is virtually impossible. However, I really wanted to capture the medieval artistry of a particularly beautiful double page spread (#10). The distance from the glass surface to the Koran was about 12-14”, and in order to get the entire book in the frame I had to use a wide angle. I chose a 16-35mm lens and rested the camera dead center.

I leaned over the camera to focus it and to make sure the composition was correct. I set the camera to aperture priority and chose the largest aperture, which was f/2.8, because depth of field was irrelevant here. I was shooting a fairly flat surface with a wide angle lens, so I had enough depth of field. Would I have preferred to use f/8 for maximum sharpness and to ensure I had enough depth of field? Yes, but I was afraid that my shutter would be too long and someone might bump the display case. I was also afraid that a security guard might tell me I couldn’t do what I was doing. With an f/2.8 aperture and ISO 400, the shutter speed was 1/15 sec. To minimize vibration, I used the built-in self-timer in the camera and set it to 2 seconds. The available light illuminated the manuscript perfectly, but it was tungsten lighting. That meant I had to choose tungsten white balance to get the most accurate colors.
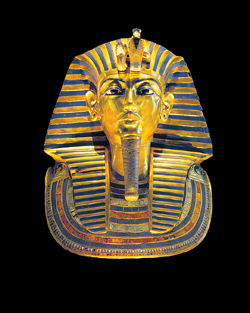
In another museum scenario, I photographed the famous gold mask from King Tut’s tomb in Cairo (#11). Of course, no tripods were allowed and the interior was quite dim, so I did something that has served me well in many low light circumstances when I didn’t have a tripod or a ball head with me. I took my leather wallet and placed it on a glass case opposite the ancient Egyptian artwork. I then rested the camera lens on the wallet with the rear edge of the camera body resting on the glass. The wallet served 2 purposes: First, it protected the glass from being scratched, and second, it allowed me to angle the camera in order to compose the mask correctly. I used a low ISO (because I was using a stable support) as well as the self-timer and the mirror lockup feature. By applying a continuous downward pressure on the camera, I was able to get a sharp picture.
Indoor Sports
My students often ask me how to photograph their kids during indoor sporting events. It’s a challenging situation and it gets more challenging depending on the sport. The faster the athletes move, the more difficult it is to take sharp and well exposed pictures. Basketball is more difficult than shooting wrestling, for example.
My son is on the wrestling team of his middle school and I had the opportunity to photograph one of his matches recently (#12). A tripod was allowed but it wouldn’t have helped me because the issue is how fast the shutter speed is versus how fast the kids are moving. The choice of shutter speed is a function of:
1. The lens aperture.
2. The amount of ambient light.
3. The ISO.
4. How much blur you are willing to accept.

When I shoot sporting events, I forego depth of field. (This is similar to shooting wildlife—the shutter speed is more crucial than the lens aperture.) The picture of my son was taken with a 70-200mm f/2.8 lens wide open. The shutter speed is much more important than depth of field, assuming that sharpness is the main concern. Besides, a telephoto is usually the lens we use for capturing sports action and telephotos have such shallow depth of field that closing down 1-2 f/stops won’t gain much detail in the subjects. It’s not worth the loss of light considering that fast shutter speeds are so important.
Lighting indoors is virtually never bright enough for fast shutter speeds. On-camera flash is not a good option because of the light fall off and with most sporting events, it is ill advised. Dark or black backgrounds don’t look good, so we just have to deal with the low level of light.
The ISO and the amount of blur you are willing to accept are the big questions. The strategy I use in a situation like this is to use the largest lens aperture available and raise the ISO until I get the shutter speed I want. In the case of the wrestling match, I used ISO 800 and f/2.8, which made my shutter speed 1/90 sec. However, if you look at this picture closely, you can see that neither of the boys is sharp and that’s not really what I wanted. A creative blur is fine, but when subjects are slightly blurred the picture looks like a mistake. I should have doubled the ISO to 1600 and used a shutter speed of 1/180 sec. I don’t like to use ISO 1600, but the choice I had was to have extra noise or a blurred picture. In this shot, I made the wrong decision.
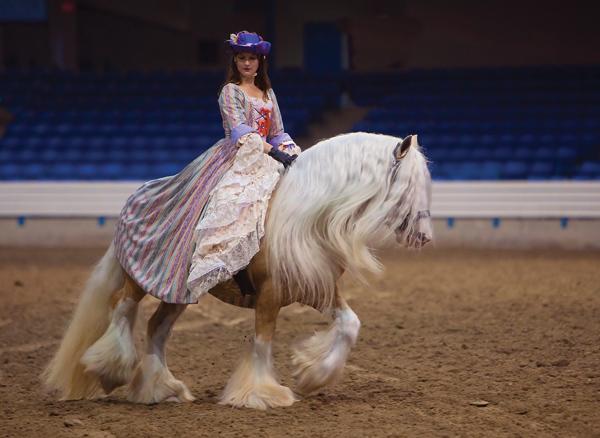
I photographed an indoor horse show with the same 70-200mm f/2.8 telephoto (#13), and this time it was very important to me that the fine detail in the horse’s mane, tail and feet were clearly defined. I also wanted a sharp rendition of the 19th century outfit the young lady was wearing. I raised the ISO to 1250, and this pushed the shutter speed to 1/125th of a second. I felt this was a good compromise. Even though the feathered feet are slightly soft due to the movement of the horse, most of the image is sharp.
Every picture you take of a moving subject in a low light environment is a debate between shutter speed and ISO. It’s a good idea to bring a 4x loupe with you at these events so you can closely examine the image on the LCD monitor on the back of the camera. This will help you decide if you need to raise the ISO so you can use a faster shutter or if you can get away with a lower ISO and a slower shutter.
Interiors
Photographing in a dimly lit interior like a bar, restaurant or even a cozy B&B leaves you with 3 options, and none of them are good.
1. You can use flash. Since on-camera flash is probably what you would be using, this means that the background will be dark unless you bounce the light off the ceiling. If the ceiling is high or if it is very dark, then bounce flash won’t work. You can try to diffuse the light with one of the many diffusion devices available (such as the Lightsphere by Gary Fong, www.garyfongestore.com), but if your subjects are fairly close to the flash, the background will still be dark. This almost defeats the purpose because the background environment will be eliminated from the picture.
2. You can use a long exposure. This will result in a blurred picture, but that isn’t necessarily bad if you want to create something artistic. In a pub in Ireland, I hand held a 2.5 second shot to create an impression of the atmosphere in the pub (#14). I used a lens aperture smaller than you might expect—f/11—but I did this for 2 reasons.
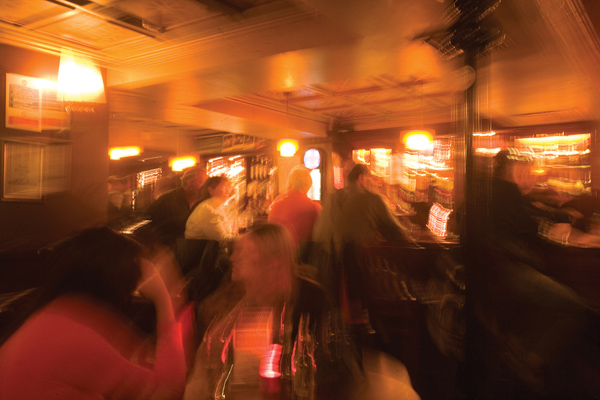
First, I wanted to make the exposure longer to make sure I captured a blend of color and form, and second, I wanted a certain amount of depth of field. I actually like this interpretation of the pub better than if I had taken this as a straight shot. In another instance, also in an Irish pub (#15), I handheld a 1 second exposure, holding my breath and pushing the shutter button gently. I had no hope of getting a sharp picture and the ISO 1600 I used tells you how abysmally dark it was in this corner of the pub. Nevertheless, for a fun memory, I would call this picture a success. In terms of excellent photography, it’s obviously not successful at all.
3. You can raise the ISO. With the ability of digital cameras to use ISO settings never before possible, this allows you to use a shutter speed fast enough to freeze movement. For posting images on Facebook (www.facebook.com) or e-mailing low-res snapshots to friends, super high ISO settings are fine. For fine art photography, however, they introduce too much digital noise and if you are very particular about quality, using ISO settings of 3200 and higher will be disappointing. Using noise reducing software like Nik Software’s Dfine 2.0 (www.niksoftware.com) will help a lot and this is certainly a strategy that can be used—to raise the ISO and then combat the noise with post-processing techniques.
Using a tripod, if possible, is sometimes the best solution, though one that wasn’t practical in the above examples. I photographed a remarkable situation in a bed and breakfast establishment near Nairobi, Kenya (#16) in which I captured 2 giraffes sticking their heads through a window looking for a handout—corn pellets that the staff at the Giraffe Manor has been feeding the giraffes for years. I wanted to show the interior of the room as well as the animals to give these a sense of context, so a normal lens or a medium telephoto wouldn’t work. Therefore, I used a 16-35mm wide angle zoom set to 16mm and placed the tripod in front of a chair as if this were a landscape composition in which I used a dominant foreground element to create a sense of depth and dimension.
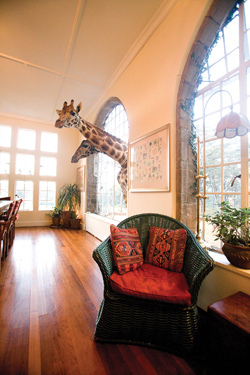
Due to the extreme contrast between the shadows of the interior and the bright daylight outside, I had to choose between these extremes. Retaining shadow detail was more important than holding on to the detail outdoors. HDR would have been nice here but it wasn’t possible because the giraffes were constantly moving. Therefore, I chose to expose for the darker portions of the composition and that meant ISO 1000 and 1/50 sec. I would not have used such a slow shutter with a telephoto lens when taking pictures of wildlife, but I felt I could get away with it because I was using a wide angle. Seen through a 16mm focal length, the giraffes appeared to be moving more slowly, hence I used a shutter speed that I consider bordering between sharp pictures and images with a slight amount of blur. By using 1/50 sec, I could keep the ISO to a reasonable setting.
I had to use a large f/stop—f/3.5—to gather as much detail as possible, and although this isn’t the ideal, I felt that the wide angle lens produced enough depth of field such that if I were about 4 feet from the chair, I could expect that both the foreground and the animals would be sharp. As you can see, both areas of the image are sharp.
Fireworks
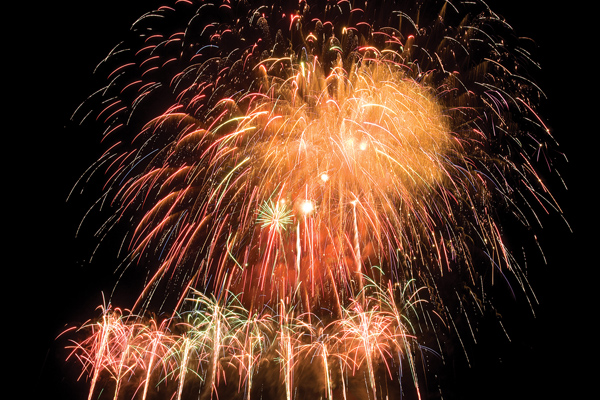
Photographing fireworks is quite easy. All you need is a tripod. You should focus manually (switch the AF to off), and focus on a distant object such as a tree or streetlight. Estimate that this distance will be about the same distance from the fireworks to you. Keep your focus ring in that position and don’t change it during the fireworks display. Set the Exposure mode to Manual as well. Don’t use auto exposure. I recommend using a daylight white balance as I did in (#17). The exposure setting I use for the fireworks is 1.6 seconds at f/8 and ISO 100 or 200. I do not use a cable release or the self-timer in the camera—I simply push the shutter button on the camera to take the shot.
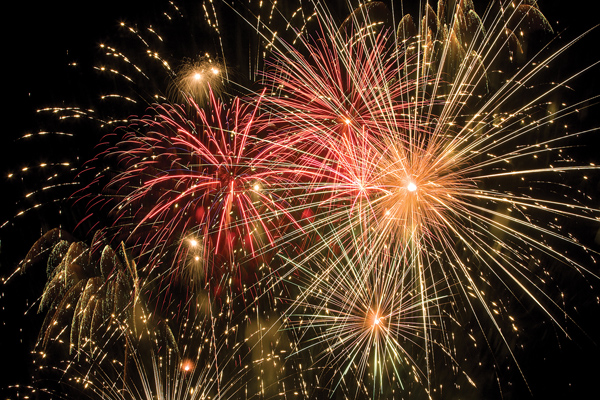
If you want to include multiple bursts over several seconds, then leave the shutter open longer. During the finale when multiple bursts are exploding rapidly, as in (#18), I use the 1.6-second shutter speed because I’ve found that too many bursts can create a visual mess.
A good lens choice would be something in the range of 24-105mm, or even 18-55mm if you don’t have a longer-range zoom. This gives you compositional choices, and depending on your distance from the fireworks, you can adjust the focal length to fill a significant part of the frame with all the color. When you choose your camera position somewhere in the viewing area, it’s hard to determine what focal length you’ll need because you don’t know exactly where the fireworks will explode and how much of the sky will be covered by them. Therefore, a zoom lens is what you need to adjust to any situation.
Landscapes In The Dark
One of my favorite landscape shots (#19) was taken when it was so dark I could hardly distinguish the river from the snowy forest. I barely had enough light to compose and focus the picture. This is the Rogue River in Oregon, and I found this shot at twilight. In winter, the light from the sun disappears very quickly and I worked fast to set up my tripod to get the shot. I was still using film when I took this, and the medium format camera—the Mamiya RZ 67—took longer to set up than a digital camera. Of course, with film I couldn’t see the immediate results on the back of the camera, so I had to get it right the first time.

One of the magical aspects of photography is that long exposures enable film and digital sensors to accumulate light. Extremely dark subjects can be made to look like daylight with a long exposure, something that our brain can’t do, and the resulting images are almost always a pleasant surprise. This picture of the Rogue River was taken with a 20 second exposure, and it turned out much brighter than what I could see with my eyes.
How did I know to use 20 seconds? I didn’t. It was an educated guess, but to cover myself I bracketed the exposures. We don’t hear the term “bracketed exposures” very much any more because we can see our exposures as soon as we take a picture. When we shot film we didn’t have that luxury and therefore we had to cover our bases with many exposures, usually in 1 or 1/2 f/stop increments. I took 4 shots of the river, 5, 10, 20 and 40 seconds. I used the same f/stop, which was f/11 in this case (for landscape work, I always use f/32; however I wanted to shorten the exposure times since I was losing light, thus the f/11 aperture), and then when I got the film back from the lab it turned out that the 20-second exposure was the best one.
The cobalt blue color resulted from the high Kelvin temperature typical of dawn and twilight. I was shooting daylight film (Fujichrome Velvia 50), which in today’s lingo is equivalent to using a daylight white balance or 5500˚ Kelvin. Even with digital cameras, if you shoot at dawn, twilight or in deep shade the pictures will be bluish. Digital cameras have a “cloudy” white balance setting to mitigate the blue color in cloudy conditions, but for a picture such as this snow scenic, the cloudy setting would not eliminate the cobalt blue. Only if you raise the Kelvin temperature to about 8000 would the blue be removed. However, one of the aspects of this picture that always appealed to me was the saturated blue tones, and that’s why I never made an effort to correct it.
Note that the film I was using had an ISO of 50. Since I used a tripod, there was no need to use a faster film even though it was so dark. The same is true in digital work. If you take the trouble to use a tripod, take advantage of that by using a low ISO when shooting in dark conditions. This will help you minimize digital noise and maximize picture quality. I recommend that every time you pick up your camera after not using it for a while—even a few hours—check the ISO to make sure it is set where you want it.
Also in Oregon I photographed the Pacific Ocean from a cliff using an 8-second exposure (#20). In this case, I was not dealing with a static landscape. The motion of the waves were a factor, and even though I like the soft, blurred look of the ocean’s surface, I really had no choice because the light was mostly gone. You can see the last bit of color from the sunset, but to my eye it was hard to discern any color at all because compete darkness was just a few minutes away. Again, I used a low ISO, a tripod and I bracketed the exposures. A light meter—whether hand held or built into the camera—isn’t very accurate in extreme low light. Exposures based on light meters in these situations tend to be too light.

Lessons Learned: A Failed Low Light Picture
The photo of a male cardinal (#21) isn’t sharp. I took a chance at getting a decent picture (notwithstanding the busy background) of this bird from my kitchen window on a very dark day. The cloud cover was thick, making the afternoon look unusually dim. The cardinal was perched on a tree about 45 feet away and since the bird is so small I needed a long telephoto to fill enough of the frame to make the effort worthwhile (I don’t crop my images).

I mounted my camera and 500mm f/4 telephoto on a tripod and added a 2x teleconverter, giving me 1000mm of focal length. This gave me a maximum lens aperture of f/8—2 f/stops down from f/4 because that’s the price I had to pay for using the 2x converter. Due to the diminished light, I pushed the ISO up to 1250 hoping for a decent shutter speed, but what I got was 1/30 sec.
The general rule for choosing a shutter speed when shooting with a telephoto lens when you are not using a tripod is that the shutter should be the reciprocal of the focal length of the lens, or faster. In other words, if you are using a 300mm lens, your shutter speed should be 1/300th or faster. If you’re using a 1000mm lens, the shutter speed should be 1/1000th or faster. A tripod allows you to use a slower shutter, but with tremendous magnification the slightest movement of the lens (such as what occurs when pushing the shutter button or even taking a deep breath while holding the camera or lens) seems like an earthquake.
Nevertheless, I tried the 1/30 sec just to see what would happen. As you can see in the picture, it’s not as sharp as it needs to be. I could have raised the ISO to 2500 and that would have given me a shutter speed of 1/60th, but I don’t like nature images taken with such a high ISO. The fine detail and the quality of the images are compromised in my opinion, so in this particular situation I couldn’t get a successful picture. A much better approach would be to set up a bird feeder closer to my home and then I could use a shorter telephoto. This would immediately save 2 f/stops of light and the magnification wouldn’t be so great. The point is—you learn from your successes and take credit for the knowledge and practice that went into them, but you might learn even more from your failures and do better next time.


![]()
Get the Latest Photo Tips, News & Reviews from Shutterbug!
| Camera Reviews Other Reviews | Mobile Reviews Photography Reviews Columns | News | Features | How-To | Resources |
 © 2026 Shutterbug
AVTech Media Americas Inc., USA
All rights reserved