- REVIEWS
Camera Reviews 
More Reviews Mobile Reviews Photography Reviews - GALLERIES
- VIDEOS
- BUYER'S GUIDES
ImagePrint RIP
Finally, Quality Black & White Digital Prints Page 2
 |
|
 |
|
 |
|
|
Preparing
As you explore options in ImagePrint, you soon find that it isn't designed
like most Windows or Macintosh applications. There is no "undo"
available anywhere. If you make a mistake you'll normally need to start
over again with that particular image by deleting it from the layout and then
adding it back in. You'll also find that most dialogs have an "Apply"
and "Cancel" button but no "OK." When you're done
with the dialog you click the close button in the title bar.
You'll start by either dropping your image file onto ImagePrint, or opening
the file from within ImagePrint. Opening multiple files at once in Version 5.6
can only be done by using the drag-and-drop method. Version 6.0 introduces a
very useful Image Browser that adds the ability to see thumbnails of your files,
and perform multiple select operations.
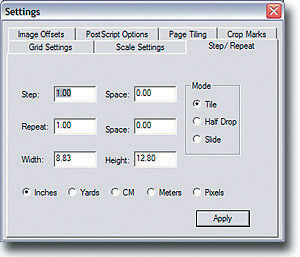
The ImagePrint layout control features are quite good. You can repeat an image,
set precise offsets and spacing between repeats. New to Version 6.0 are file
groupings. It's now possible to scale, move, and perform other layout
functions to some or all images in a layout at once.
 |
|
|
One of the most amazing features
of ImagePrint is in the control over the output choices. Each image in the layout
can have its own profile, rendering intent, and, in the case of gray scale on
the supported Epson printers, each image can be output with a different tint.
This makes for an excellent proofing method, especially for the large format
printers. The ability to proof all of the output options in one print job saves
on expensive roll paper and time.
ImagePrint Version 6.0 adds some new functionality to make workflow easier as
well. There are two new options in the Settings menu--Best Fit and Proof
Sheet. Best Fit will automatically rotate and size your images for the selected
layout. Proof Sheet will create a layout optimized for multiple images with
user control over spacing both horizontally and vertically. A new annotation
option will allow you to include file name and date information with your prints,
very useful with proof sheets. Auto Flow is another new feature. Anytime an
image will not fit in the current layout, a new page will be created for the
image.
Printing
Once you've opened your image or images for printing and have the layout
you want, you'll need to select the correct printer profile. If you've
selected a gray profile and are using the Epson 2200/7600/9600 series of printers,
you'll have the ability to set the tint for your photo. This is a great
feature, allowing you to have different tints from the same photo--you
can try your photo with a warmer or cooler tone.
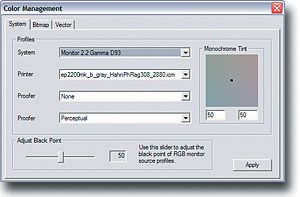
As I mentioned earlier, ImagePrint is a completely color managed system. You'll
set the monitor profile, printer profile, and image color space all within the
Color Management dialog. Again, each image in the layout can have a different
profile assigned to it, something particularly useful when mixing black and
white and color images on the same page.
New to Version 6.0 is the ability to embed multiple profiles in a single image.
This feature is used to great effect for giving your black and white prints
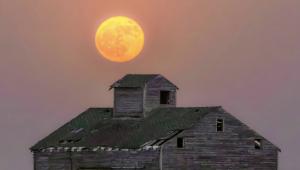
a handcolored look. To see how well this new Colorization option worked, I opened
an image in Photoshop CS and then created a duplicate of the background layer.
I next desaturated the duplicate layer, and erased the areas I wanted to have
color applied, in this case the barn. By changing the Opacity of the eraser,
you can control the amount of color saturation.
In ImagePrint, you'll assign a gray profile for the overall image, then
select a color profile for the colorized portion of the image. This gives you
all the benefit of full control over the gray scale, including the ability to
tint on supported printers.
 |
|
|
The final step is to select Print.
With this version of ImagePrint, quality and ink choices are filled in automatically
based on the printer profile. In previous versions the user needed to fill these
in. Kudos to ColorByte for this update! If you are using the supported Epson
printer, you also have the option to print centered. This actually works to
center your output on the page, not the printer margins as with the Epson drivers.
Printing is the one trouble spot I had. I did my printing on the Epson 2200
with sheet paper. ImagePrint defaults to roll paper. I kept sending the print
job only to have my printer flash a red light and do nothing. Finally, after
some exploration I noticed the check box in the Print Setup dialog for Auto
Cut and Sheet. If nothing is checked, ImagePrint defaults to roll paper. Once
this was corrected, I was rewarded with beautiful prints.
The Results
I've struggled with getting neutral black and white prints for years.
Prints always had a green or magenta hue to them that I could not correct on
a consistent basis. My struggles are over now. ImagePrint delivered gorgeous
black and white prints with the first page. I can detect no color shift whatsoever.
I was surprised at the improvement in my color prints as well.
I have been very happy with color output using the Epson drivers. ImagePrint
tends to deliver slightly less saturated color images but they have improved
detail, particularly in shadow or dense areas of the image. I have now quit
printing directly from Photoshop and use ImagePrint exclusively for my photo
printing. Another new feature in Version 5.6 is "Wide Gamut Technology."
ImagePrint sets separate ink limits to each chromatic area of the image. This
helps to reduce the bronzing effect that you may see with the Epson print drivers
since they set ink limits based on the entire image. Finally, there is now a
shadow point adjustment slider that allows you to control the richness and detail
in the shadow areas.
Recommendation
The Lite version of ImagePrint is all that most individuals with a desktop printer
will ever need. The package printing (templates) option would be a nice addition
to the Lite version but the other differences--color correction, page tiling
and auto-print--are all more suited to production environments. These features
are enabled in the Lite version but you'll have "DEMO" overlaid
on all your prints. ColorByte makes upgrading to the full-featured version easy
should you decide later there is a need for the additional features.
For more information, visit ColorByte Software's website at: www.colorbytesoft
ware.com.
Jon Canfield, a landscape and macro photographer, has been involved with digital imaging from the earliest days, both as a user and on the software development side. His first (co-authored) book "Photo Finish: The Digital Photographer's Guide to Printing, Showing, and Selling Images" is currently available from Sybex. Jon can be reached through his website at: www.joncanfield.com.
|
| |||||||||
- Log in or register to post comments


![]()
Get the Latest Photo Tips, News & Reviews from Shutterbug!
| Camera Reviews Other Reviews | Mobile Reviews Photography Reviews Columns | News | Features | How-To | Resources |
 © 2025 Shutterbug
AVTech Media Americas Inc., USA
All rights reserved