- REVIEWS
Camera Reviews 
More Reviews Mobile Reviews Photography Reviews - GALLERIES
- VIDEOS
- BUYER'S GUIDES
Image Enhancement; Soft Focus; Make It Serene Or Surreal
Whether you shoot portraits, landscapes, still life, or nature, soft focus effects can add an evocative, mysterious tone to your photographs. With a portrait, you may want to soften skin tones for a smoother look, or to add a dreamy quality. For black and white landscapes, a diffusion effect can add a striking, eerie atmosphere.
Two digital techniques simulate soft focus lens filters. One echoes the effect
of shooting with a filter on the camera lens, where glowing highlights spread outward. The second recreates the darkroom effect of using a diffusion filter over an enlarger lens, where dark areas spread into highlights.
To fine tune results, you can use different Blending modes, vary the opacity of the blurred layer, and add levels or curves adjustment layers. These examples were created with Adobe Photoshop CS2, but you should be able to accomplish similar effects with other image-editors that offer layer options such as Corel Paint Shop Pro 10 or later and Ulead PhotoImpact 11 or later. Furthermore, check the sidebar box for information on additional software and plug-ins specifically for soft focus effects.
Camera Lens Type Soft Focus Filter Techniques
When you want a light, bright, airy soft focus look simulate the effect of a soft focus filter placed on a camera lens. Try this for portraits as well as to enhance landscapes, flowers, or still life subjects.
 |
 |
 |
|
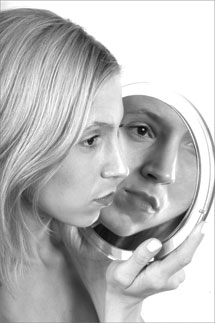
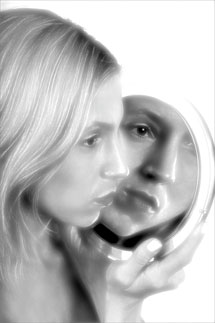
1. I began with this studio shot of Heidi McAllister. Paul Buff Ultra-Zap flash units, large umbrella and softbox, reflectors, Canon EOS.
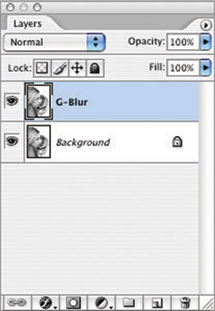
2. Next, I selected Layer>Duplicate Layer to create a copy of the background layer. I named the layer “G-blur” and clicked OK.
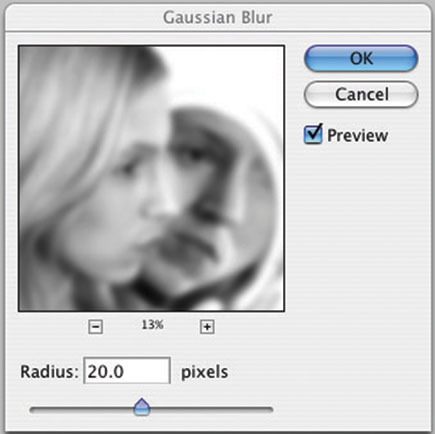
3. Next, I defocused this top layer by choosing Filter>Blur>Gaussian Blur. For a high-resolution image for printing, try a radius amount of 20-50. If the image will be printed smaller in size, use a stronger radius setting. For an 8x10 print, for example, a radius of 20-30 may be fine, but for a 3x4” reproduction, a stronger setting, like 50, is necessary for the effect to be visible. For a low-resolution web or on-screen presentation image, use a lower radius amount, say 5-20.
 |
 |
 |
|
4. For this 6x9”, 300dpi 14MB image, I chose a Gaussian Blur radius of 20. The image now looks totally out of focus.
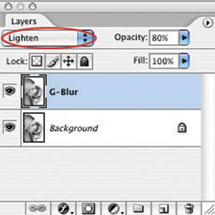
5. In order to let some of the sharp background layer show through, change the Blending mode at the top left of the Layers palette, circled in red. This changes how the layer interacts, or blends, with the layer below it. Experiment with different Blend modes to achieve dramatically different effects.
Here, I switched the Blend mode from Normal to Lighten for a bright, high key soft focus look. If there is too much blur, it’s easy to tone down. Just lower the Opacity of the top G-blur layer by pulling the Opacity slider (at the top right of the Layers palette) to the left. Try 80-60 percent as a starting point.
You can further fine-tune the effect by adding a Levels or Curves adjustment layer. Finally, you could apply the soft focus effect selectively by using a Layer Mask, for example, to keep the eyes and lips at their original sharpness.
6. With a Gaussian Blur setting of 20, and after changing the Blend mode to Lighten, Heidi’s portrait now displays a light, airy soft focus effect, reminiscent of 1930s Hollywood movie stills. Highlights on the skin glow, while the hair appears almost as if it has been painted by hand.
Darkroom Type Diffusion Effects
When you place diffusion or a soft focus filter under the lens of an enlarger, the result is that the shadows and dark areas spread and bleed into the highlights of the print. This can add a mysterious, supernatural mood to a landscape, portrait, or still life.
 |
 |
1. (8 as key) Open the image that you want to add the darkroom diffusion effect to. Here I chose a red motorcycle.
Create a duplicate of the background layer by choosing Layer>Duplicate Layer. Name the layer G-Blur and click OK.
 |
 |
2. Now defocus this top layer by choosing Filter>Blur>Gaussian Blur. Refer to step 3 in the “Lens” example for details on choosing the amount of blur appropriate for a given image. For this 5.5x10”, 300dpi, 14MB file, I selected a radius of 20, then clicked OK.
3. The image on this top layer will now be totally blurred.
 |
 |
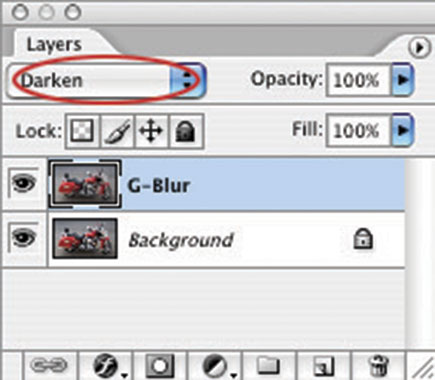
4. Next, in the Layers palette, change the Blending mode (circled in red) from Normal to Darken using the drop-down menu. This will blend the sharp background image with the blurred layer. You can decrease the soft focus effect with the Opacity slider at the top right of the Layers palette. Here I left it at 100 percent.
5. After selecting the Darken mode, the motorcycle now looks almost like an airbrushed painting, but the contrast is rather flat.
 |
 |
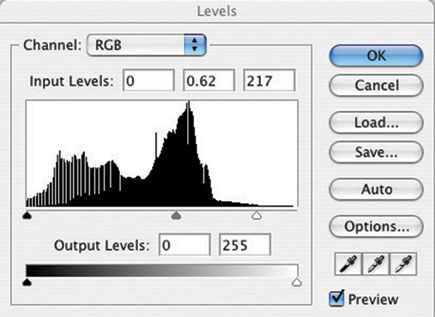
6. If you don’t want to reduce the diffusion effect but the image is too flat, or too dark or light, add a curves or levels adjustment layer. Here, I chose Layer>New Adjustment Layer>Levels and set the sliders to increase the contrast. First I moved the highlight slider (white triangle) to the left until it was beneath black area of the histogram (the foothill of the mountain, so to speak). Then I adjusted the midtone slider (gray center triangle) for the right brightness level as judged visually on-screen.
7. Here’s how the final layers are stacked, original background layer at the bottom, Gaussian Blur layer above it set to the Darken Blend mode, and the levels adjustment layer on top.
8. In this final version, note how the contrast and color saturation have been increased by my levels adjustment. Also, notice how the Gaussian Blur causes the black seat and other shadow areas bleed softly into the lighter areas, creating a moody, atmospheric effect.
Contacts
Adobe Systems Inc.
345 Park Ave.
San Jose, CA 95110
(800) 833-6687
www.adobe.com
Auto FX Software
141 Village St., Ste. 2
Birmingham, AL 35242
(205) 980-0056
www.autofx.com
Corel Corp.
7905 Fuller Rd.
Eden Prairie, MN 55344
Canada K1Z 8R7
(800) 772-6735
www.corel.com
Digital Film Tools, LLC.
(818) 761-6577
www.digitalfilmtools.com
Power Retouche
www.powerretouche.com
Soft Focus Software
In addition to the image-editing programs mentioned in this article, there are a number of program and plug-in options available specifically for soft focus effects. An excellent choice from Auto FX software is Dreamy Photo, which offers controls for the type and intensity of blur, the amount of blend (between the sharp and soft versions), ghosting, a tint color, and more. It’s part of DreamSuite Series Two, $149, www.autofx.com. From Digital Film Tools, 55mm features 68 special effects, including separate Halo, Diffusion, Mist, Fog, and Soft Focus plug-ins, $195, www.digitalfilmtools.com. The Corel KPT Collection includes 24 plug-ins from Kai’s Power Tools Versions 5, 6, and 7 including KPT Blurrr (yes, that’s how they spell it) which offers 9 types of blur including Kraussian and Camera Optics, $99.99, www.corel.com. From Power Retouche, the Soft Filter plug-in is $32, the complete Pro Pack of some 20 plug-ins is $175, www.powerretouche.com.


![]()
Get the Latest Photo Tips, News & Reviews from Shutterbug!
| Camera Reviews Other Reviews | Mobile Reviews Photography Reviews Columns | News | Features | How-To | Resources |
 © 2026 Shutterbug
AVTech Media Americas Inc., USA
All rights reserved