- REVIEWS
Camera Reviews 
More Reviews Mobile Reviews Photography Reviews - GALLERIES
- VIDEOS
- BUYER'S GUIDES
How to Shoot Mind-Bending Infrared Digital Photos with a Modified Camera
Shooting incredible color infrared (IR) photos is fascinating and surprisingly easy if you use the right tools and techniques. In this two-part story we first look at the conversion of a DSLR to shoot IR photos, and then later in Part 2 we explore everything you need to know to get great infrared imaging results (setting White Balance, Channel Swapping and post-processing techniques). Ready for some mind-blowing colors? Read on…
Want to shoot IR with your digital camera without using a dense screw-in filter or fussing with long, tripod-bound exposures? Then have your camera converted. It’s a straightforward process that any highly-skilled, expert technician can do. The procedure involves removing the thin piece of glass that covers the imaging sensor in your camera and replacing it with a filter that passes only the appropriate wavelengths of light.

Need more motivation? Check out a couple IR Photography articles I wrote on these pages over the past couple of years by clicking HERE and HERE.
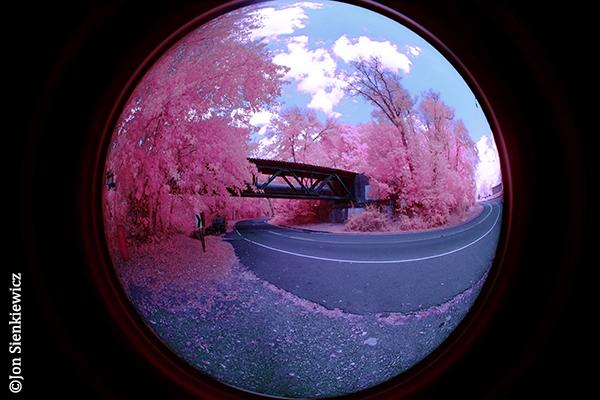
The image at the top of this story was shot with a converted Fujifilm X-Pro1 and a Meike 6.5mm f/2 Circular Fisheye lens (which I reviewed here a couple weeks back). Settings were as follows: 1/150 sec at f/5.6, ISO 200, Custom White Balance. (C)Jon Sienkiewicz
A few words of caution before we dig deeper. Don’t have a hack perform the conversion. If dust is trapped between the sensor and new filter it will stay there until you smash the camera in an unavoidable fit of frustration. In other words, use a well-established, highly regarded firm to perform the service. More on that, and some recommendations, in a moment. Second, this procedure understandably negates the camera manufacturer’s warranty. And finally, with rare exception, IR conversion is a one way street—converted cameras no longer can be used for plain old color photography.

Why is a “conversion” necessary for convenient IR photography?
Camera sensors are sensitive to infrared light when manufactured but lose this talent when installed in a camera because they are covered with a nearly clear glass filter to mitigate a phenomenon called “aliasing” which causes some objects—like a tweed jacket, for example—to be rendered as a dizzying moiré pattern. This aptly-named Anti-Aliasing filter (also called AA, Low Pass or UV-cutoff filter in some journals) simultaneously absorbs IR.
Some digital cameras are natively sensitive to IR because the manufacturer omitted the AA filter. The original Minolta Dimage 7 is a perfect example. But to shoot IR with this gem, the photographer must use a filter (e.g., Hoya R72) in front of the lens to block (actually, absorb) visible light wavelengths. This filter requires excruciatingly long exposure increases. And that’s a pain in the spectrum.
Conversion Companies
I have had personal, hands-on experience with three conversion companies. All have performed absolutely flawless conversions. Cost, as you might imagine, depends on the type of conversion you want and—to some extent—which camera brand/model you want converted. All three clearly list pricing information on their websites, and any of the three can sell you a camera that has already been converted, if you’d prefer to go that route.
The companies I have used are:
LifePixel
Kolari Vision
Max Max (LDP LLC)
If you’re like me and want to do your homework before taking the plunge, all three of these companies’ websites provide outstanding examples of IR photography, comprehensive tutorials and great FAQs that should assuage any fear you may have.
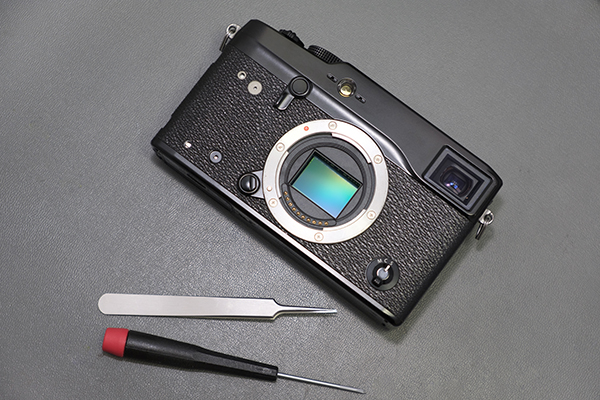
LifePixel, in Mukilteo, WA, converted my Fujifilm X-Pro1 which is featured in this article. They also provided the photos of my camera being transformed.

IR Sensitivity Range (Filter Choices)
As you may recall from Junior High, when the visible spectrum is refracted through a prism it breaks down into that familiar ROY G BIV acronym which starts at Red and ends at Violet, just like a rainbow. In more scientific terms, that’s backwards. Beginning instead with the shortest wavelengths and highest frequency, visible light begins at wavelengths that are around 400 nanometers (Blue) and ends around 720 nanometers (Red), which is where IR takes over. Camera sensors typically top out at around 1200nm.
Your camera will be converted to match a specific range of wavelengths depending on which filter is installed over the image sensor. Several different filter choices are available. LifePixel offers an excellent video, options chart (shown below) and even Raw files to download and dissect.
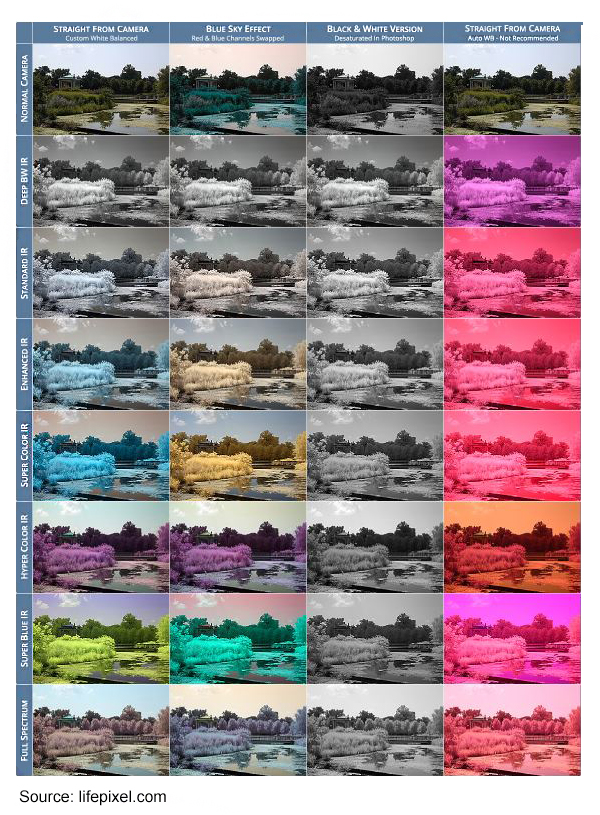
The most common options, using LifePixel’s labels, include:
• Standard IR, 720nm (Equivalent to Hoya R72 Filter, Kodak Wratten 89b filter)
• Deep BW IR, 830nm
• Enhanced Color IR, 665nm
• Super Color IR, 590nm
• Hyper Color IR, 470nm
• Super Blue IR (LifePixel patent-pending color infrared filter)
• Full Spectrum (as the name implies, not strictly IR)
Daniel Malkin, co-owner of LifePixel, provided this input: “Historically, Super Color at 590nm has been our most popular filter since we started offering it all those years ago, followed closely by our Standard IR filter at 720nm. With these two filters, you can do just about anything as far as IR goes. Super Color remains our most popular because it allows a larger tonal range to pass compared to most of our other filters, and that gives you much more control in post processing. Standard IR is the filter we started the company with and has been almost as popular as our Super Color because how it looks straight from the camera after a custom white balance is set without any other processing is just so beautiful for so many, especially those who shot with IR film previously.”
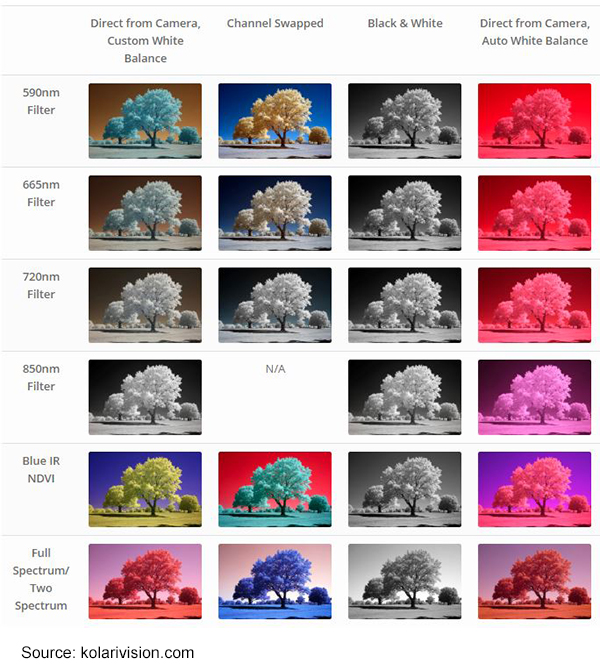
Kolari Vision uses slightly different nomenclature. But they offer approximately the same choices.
Which Camera Model
Mirrorless cameras are the better choice, according to Malkin. He says, “Mirrorless cameras are great to convert because we adjust them to focus correctly with all lenses no differently than before the conversion.”
Since the wavelength of IR light is different, you could encounter slight focus-shift problems with conventional DSLRs. Sometimes this can be adjusted by the conversion company—check with them if you are concerned about this issue.
Instead of any other camera, I had my Fuijfilm X-Pro1 converted because a) I own two of them and know their exceptional capabilities, b) the X-Pro1 can capture in Raw image format, and c) I want to be able to explore IR with my excellent Fujifilm lenses.

The other reason I decided on the Fujifilm X-Pro1 is its flexible White Balance options. We’ll explore this more in Part 2 of this story, but for now know that three WB characteristics are imperative (in my mind, at least). First, the camera must allow custom White Balance (Preset in Nikon’s vocabulary). Second, it must permit setting of WB in terms of Kelvin. And third, the WB setting must be adjustable beyond the basic setting—Fujifilm calls it White Balance Shift. It allows you to easily adjust the final WB on the Red-Blue axis and the Green-Magenta axis.
For the record, in addition to my newly-converted X-Pro1, I currently own a converted Nikon D5000 (made 720nm IR-only by MaxMax) and a Canon PowerShot A710 compact camera that was already converted by actors unknown when I bought it. The Canon is easy to carry but less satisfactory than the others.
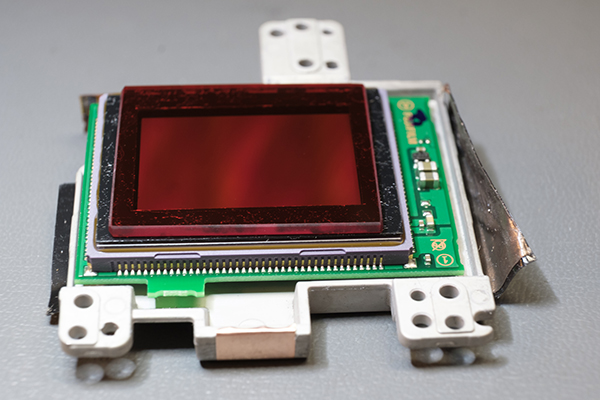
The Physical Process
As briefly stated above, the conversion process involves removing the AA filter from the camera sensor and replacing it with the filter of your choosing. Easier said than done, of course, and not recommended as a DIY project.
Here are some images of my Fujifilm X-Pro1 undergoing the surgery.


Upcoming: Part 2
In part two we go out into the field with my converted Fujifilm X-Pro1, do some shooting and then process the image files in Photoshop and/or Photoshop Elements 2020. Unless I change my mind before then, the second installment will include the following:
• Best Subjects for IR
• Importance of Raw Format
• White Balance
• Avoiding Hot Spot Hazards
• IR Post Processing
• Monochrome Processing
—Jon Sienkiewicz


![]()
Get the Latest Photo Tips, News & Reviews from Shutterbug!
| Camera Reviews Other Reviews | Mobile Reviews Photography Reviews Columns | News | Features | How-To | Resources |
 © 2026 Shutterbug
AVTech Media Americas Inc., USA
All rights reserved