- REVIEWS
Camera Reviews 
More Reviews Mobile Reviews Photography Reviews - GALLERIES
- VIDEOS
- BUYER'S GUIDES
How to Modify Your Camera to Shoot Amazing Infrared (IR) Photos

For centuries, scientists have labored to understand the nature of light. Some ancient Greeks believed that light was emitted from the eyeball the same way a bat sends out an echolocation chirp which allows him to determine his precise position in physical space. Understandably, there were problems with that hypothesis. Other theories followed. Those who embraced the wave theory were right—mostly. Light behaves like a wave up to a certain point. Similarly, those who professed the particle theory were also correct—partly.
It took the genius of Albert Einstein to define light in terms that our frail minds can comprehend. In the quantum theory of light, he theorized that light consists of chunks or particles he called photons. Building upon the work of Max Planck and others, Einstein went on to theorize that we live in a quantum universe that consists entirely of extremely small packets of energy and matter.
Our planet is continuously bombarded with electromagnetic radiation from the universe around it. The spectrum that we can measure spans from very short wavelength, high frequency gamma rays on one end to very long, low frequency waves used for TV and radio broadcast on the other. Somewhere near the middle—in the 400nm (nanometer) to 700nm range—lies the visible spectrum, the portion that enables vision.

As you may recall from elementary school, when the visible spectrum is refracted through a prism it breaks down into that familiar ROY G BIV acronym which starts at Red and ends at Violet, just like a rainbow.
The region above violet, appropriately labeled Ultra Violet, is problematical for photographers. These very high frequency, short wavelength rays scatter easily and can cause unsharpness, particularly in photos of distant landscapes. This is why we use UV filters on our lenses (despite what the camera store salesman told you).
UV can also burn your skin, discolor your lawn chairs and do other bad things. There are some scientific applications for UV photography, but few of us find them interesting.

Where Infrared Begins
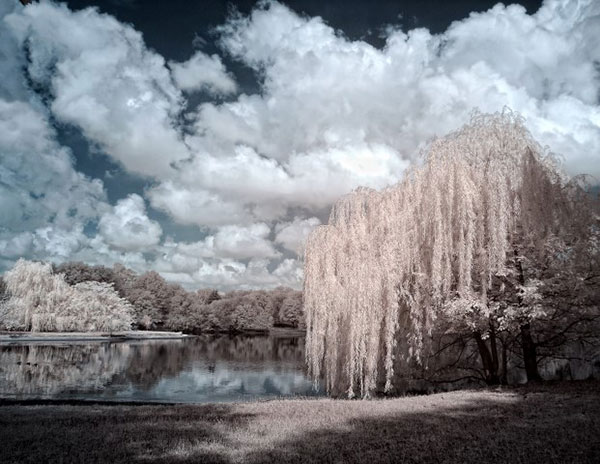
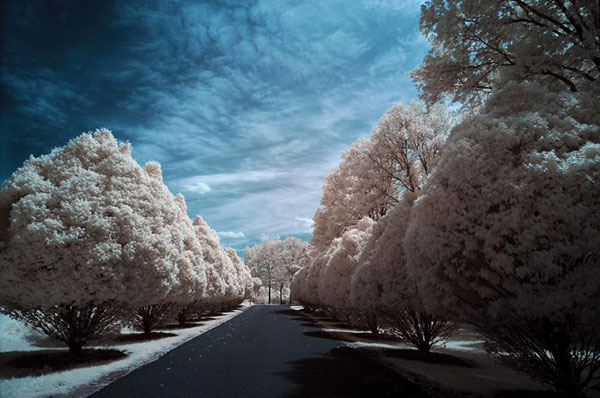
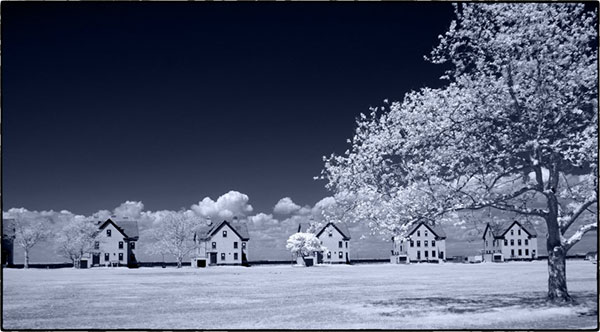
The other end—the region that begins around 720nm—is far more interesting. That’s roughly where IR, or Infrared, begins. Images formed by infrared light appear quite different than conventional images. The sky, for instance, is usually rendered very dark or black, deciduous trees turn out white and other objects take on false colors.
Most imaging sensors are born sensitive to infrared radiation. Camera manufacturers place filters over the sensor to absorb the IR light and to reduce a phenomena called “aliasing” which causes some objects—like a tweed jacket, for example—to be rendered as a dizzying moiré pattern.

There are three popular ways to enjoy the false colors and dramatic tonality of infrared photography. The first is to shoot images in the traditional way and then alter them in Photoshop so that they resemble IR photos. Some people are very good at this, but for most of us the ability is way out of reach.
The second way is to start with a regular digital camera, preferably one with a very weak IR-cutoff filter like the venerable Minolta Dimage 7. To absorb most of the light waves shorter than infrared, we place a filter—often an R72—over the front of the lens.
Let’s take a step back and examine this setup again. Inside the camera there is a filter that prevents most of the IR from reaching the sensor—and on the outside of the camera there is a filter that prevents most of the non-IR light from reaching the sensor. You can see where this is going.
This is not an easy way to shoot IR. The R72 filter is so dark that it’s impossible to see through it, let alone focus, so you must tripod the camera, focus and then attach the filter. Metering is guesswork for obvious reasons.
And exposure times are long—even in bright daylight. The resultant image requires post-processing to remedy the hot spot that often occurs near the center. Yes, you can shoot IR this way, but it’s a chore.
Convert a DSLR to Shoot IR
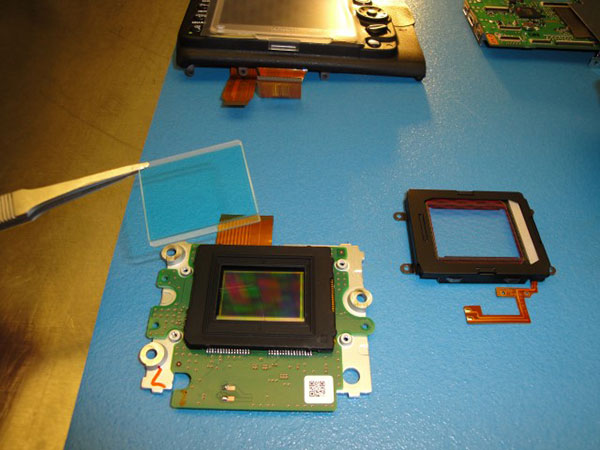
If you plan to shoot IR often, the better option is to have a DSLR converted to IR-only. In a nutshell, a trained technician disassembles the camera and removes the IR-cutoff filter covering the imaging sensor. Next he replaces it with a filter that absorbs everything except IR.
The modified camera no long shoots normal images, it’s good for infrared and only infrared, but the advantages are huge. You don’t need a filter over the lens, you can easily see through the viewfinder to compose and the autofocus works correctly. Exposure may require a little tweaking, and White Balance must be set manually for best results.
This modification is offered by several reliable firms (see website sources listed at the bottom of this story). You supply the camera, or in some cases they can sell you a body that has already been converted. Kolari Vision, in New Jersey, provides your choice of six different modifications: 720nm standard infrared, 850nm deep infrared, 665nm extra color infrared, 590nm infrared, full spectrum and two spectrum. The last two options require external filters over the lens but deliver the flexibility of shooting IR and normal photography with the same camera.
Images captured with an IR-only camera require channel swapping to release the colors. It sounds complicated, but it’s really quite simple. Once you’ve mastered the steps you can build a Photoshop Action to automate the process.
Of course, experimentation produces different results. And the companies that perform IR conversions provide full post-processing instructions and helpful hints on their websites. In fact, on the Kolari Vision website you’ll find a complete tutorial and a readymade Photoshop Action to get you started.
Sources for Infrared Modification
Kolari Vision: www.kolarivision.com
LDP LLC: www.MaxMax.com
LifePixel: www.lifepixel.com


![]()
Get the Latest Photo Tips, News & Reviews from Shutterbug!
| Camera Reviews Other Reviews | Mobile Reviews Photography Reviews Columns | News | Features | How-To | Resources |
 © 2026 Shutterbug
AVTech Media Americas Inc., USA
All rights reserved