- REVIEWS
Camera Reviews 
More Reviews Mobile Reviews Photography Reviews - GALLERIES
- VIDEOS
- BUYER'S GUIDES
How to Shoot Mind-Bending Infrared Digital Photos with a Modified Camera: Part Two
In this two-part story we first looked at the conversion of a digital camera to shoot color IR photos. Link to that story is here. Here in Part 2 we go out into the field with my converted Fujifilm X-Pro1 and explore everything you need to know to get great results when shooting and processing infrared images.
One of the best things about photography is that it’s self-renewing. It’s virtually impossible for photo enthusiasts—that group I call ardent photographers—to become bored or apathetic because there is always something else, something new or something different to try. So if you ever feel like there are no more creative rabbits to pull out of your hat, dive into infrared.

Best Subjects for IR
Rule number one is to avoid photographing people with an IR camera. On second thought, maybe you should try it just to see how disgusting it is. Landscapes and landscape components— i.e., trees, foliage, bridges, rivers, miscellaneous vegetation—make great subjects, as do the sky, puffy clouds, most bodies of water and some buildings.
When shooting color IR, anticipate the color shifts (which of course depend on the type of conversion you had performed on your camera). When first starting out as an IR-shooter you may find it helpful to shoot many different subjects and then carefully analyze your results to develop sort of a mental reference table.
Images that are unsatisfactory in IR color may be stronger when processed into an IR monochrome image. More on that below. So don’t delete images even if they stink up the room.
Importance of Raw Format
The benefits of shooting Raw format images are multidimensional, but the single most important one is the full control of White Balance you gain. I’m guessing that if you’re on the verge of having a camera converted to IR you are already well acquainted with all of the advantages of Raw. If not, read the next couple of paragraphs.

When an image file is processed into a JPEG several changes occur. The image data is compressed, a certain amount of sharpening is applied and the colors (including White Balance) are adjusted to match a preconceived notion of what reality should look like.
The image compression slightly degrades image quality, but frankly speaking, with most of today’s cameras you’re not going to see much of a difference until you go pixel-peeping at 100% magnification or larger. And the sharpening won’t hurt much because it’s usually on the low side, and most images need some amount of sharpening anyway.
The big debacle is the color adjustment. Shoot Raw and YOU make the color adjustments—and color choices—yourself. Shoot JPEG and those decisions are made by a set of rules created by a group of highly skilled engineers who are trying their best to adjust the colors to make them acceptable to the largest percentage of users.

White Balance
Do not use Auto WB under any circumstances. The image will be red. And do not use any of the WB settings like Daylight or Fluorescent. Take a Custom WB reading (Nikon calls it Preset) using a gray card as the target. Some sources recommend using the open sky and others suggest using green vegetation. Those options may work with some cameras, but they have never worked for me.
If your camera allows direct setting of Kelvin temperature, start at 2500K or lower and compare the results to those obtained from a Custom WB reading. You don’t have to settle on one or the other; you can switch back-and-forth between Custom and Kelvin as I usually do.
Remember that no matter how you set the White Balance, that is just a starting point. You must make adjustments when lighting conditions change and when the scene changes significantly (e.g., change from shooting a forest to shooting an ocean beach and sky).
Can you fine tune the WB? On many cameras, including my Fujifilm X-Pro1, you can tweak the WB along the Blue-Red and Green-Magenta axes. Experiment.

Or you can shoot in Raw and have full control of White Balance when you process the image. Even though Raw gives you magical powers, you’ll still get better results by starting with a custom gray card reading. And if you shoot Raw+JPEG like I do, you need the custom setting to get a decent JPEG.
Avoiding Hot Spot Hazards
Under certain conditions and with certain lenses, an IR image (B&W or color) will be noticeably lighter in the very center area. These undesirable, overexposed pale blotches are called Hot Spots. Hot spots are a bit like UFOs. We know they exist but we’re not 100% sure what causes their appearance.
My formula for combating central hot spots is simple. Avoid using extremely wideangle lenses and shoot on Aperture Priority at an f/stop around f/5.6. Hot spots seem to worsen at smaller apertures and with super wideangles. If you’re shooting with a typical 18-55mm kit lens, shoot some test shots at both ends of the zoom range and compare.
IR Post Processing
“Technically speaking, post-processing an IR image is no different than processing an image from a regular camera,” says Daniel Malkin, co-owner of LifePixel, the outfit that modified my Fujifilm X-Pro1 to full-time Super Color IR. (The process is detailed in Part 1 of this story.) “Anybody with a working knowledge of Photoshop and/or Lightroom is usually able to apply their editing skills to process an IR image into a masterpiece.”
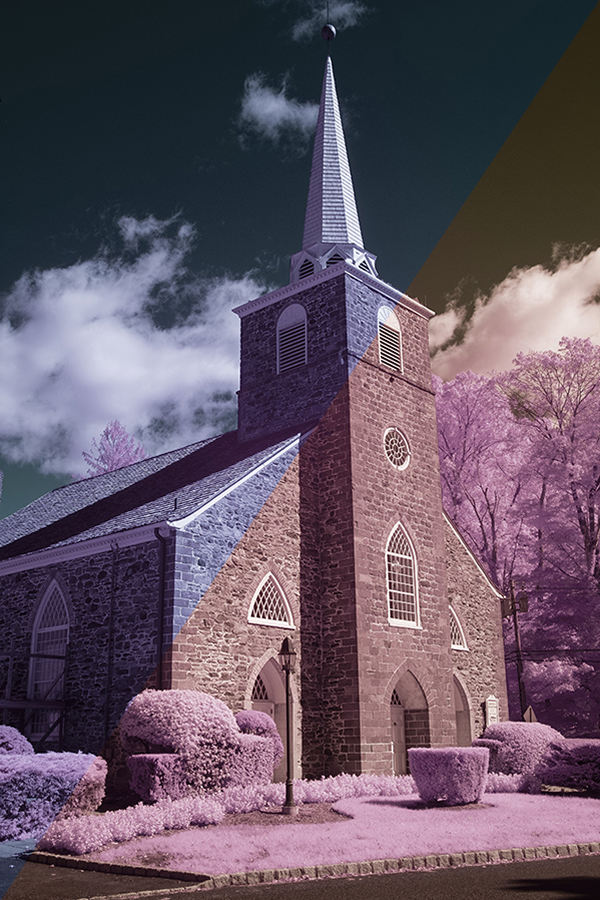
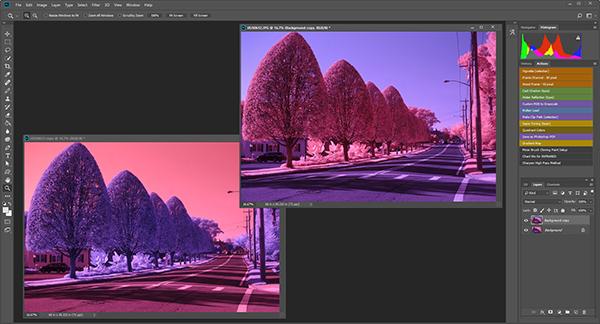
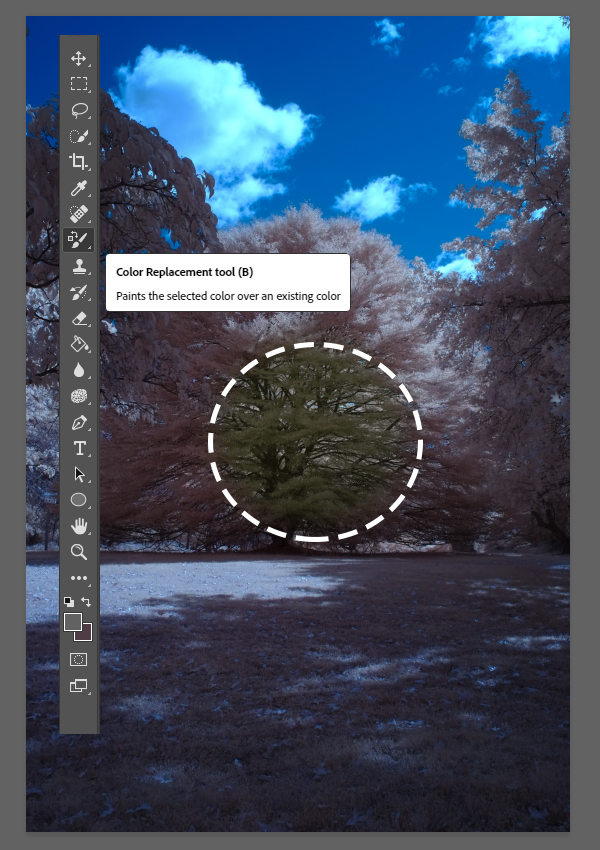
Processing a file into a color IR image usually begins by swapping the Red and Blue channels. You can automate this by creating a Photoshop Action. Bear in mind that this is a starting point. You can do endless adjustments after the channels have been swapped. You can read more about it here.

To swap channels, open the unprocessed color IR image file in Photoshop. Next, open a New Adjustment Layer from the dropdown Layer menu and select Channel Mixer. In the Red Output Channel, adjust the Red slider from 100% to 0 (zero) and the Blue slider from 0 to 100%. Then switch to the Blue Output Channel and adjust the Blue slider from 100% to 0 and the Red slider from 0 to 100%. The watchword here (again) is experiment. Try making Red or Blue only 75% and so forth, for example. And fool around with the Green Channel to see what happens.
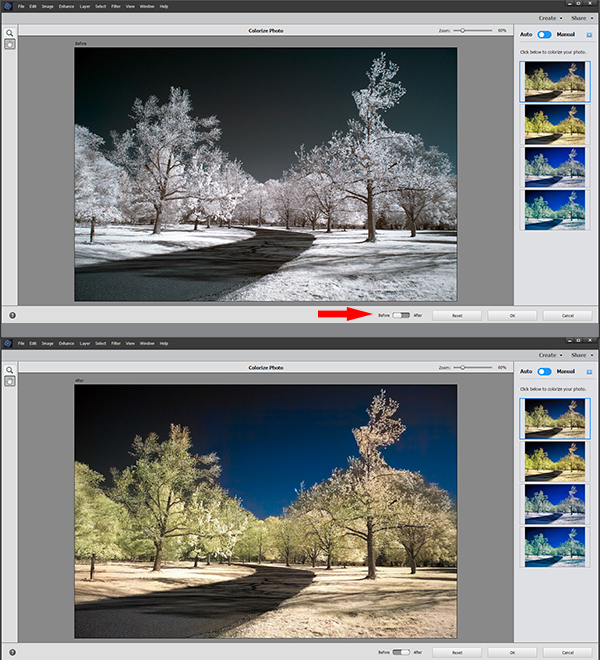
You can get amazing results using Adobe Photoshop Elements 2020 to colorize digital images. The full directions with examples can be read here. Begin with either an unprocessed image file or one that has swapped channels.

Monochrome Processing
The most direct way to create a monochrome IR image using a color IR camera is to set the camera on Monochrome from the beginning. This is not the best way, however.
Open a color IR image file in Photoshop and then open a Black & White Adjustment Layer. Play with the sliders until you get the results you’re looking for. Optionally you can select a preset from the dropdown menu as shown above. And if you achieve the perfect adjustment, you can save it as a Preset and use it over and over. It’s that simple, and yet that powerful.
JPEG shooters have similar control by clicking Image from the top navigation bar, selecting Adjustments and then picking Black & White from the Adjustments menu. Or they can press Alt+Shift+Crtl+B to see the same Black & White adjustment input screen.
Conclusion
In the early days of digital photography we struggled to attain good color rendition. That’s old hat now but you can relive those thrilling days of yesteryear by shooting and processing color and monochrome infrared images.
Shooting amazing IR images is easy and fun. Have a camera converted and you’ll find yourself carrying it along on every photo excursion you take.
—Jon Sienkiewicz


![]()
Get the Latest Photo Tips, News & Reviews from Shutterbug!
| Camera Reviews Other Reviews | Mobile Reviews Photography Reviews Columns | News | Features | How-To | Resources |
 © 2026 Shutterbug
AVTech Media Americas Inc., USA
All rights reserved