- REVIEWS
Camera Reviews 
More Reviews Mobile Reviews Photography Reviews - GALLERIES
- VIDEOS
- BUYER'S GUIDES
Here’s How to Change a Drab Sky in 3 Easy Steps in ANY Version of Photoshop
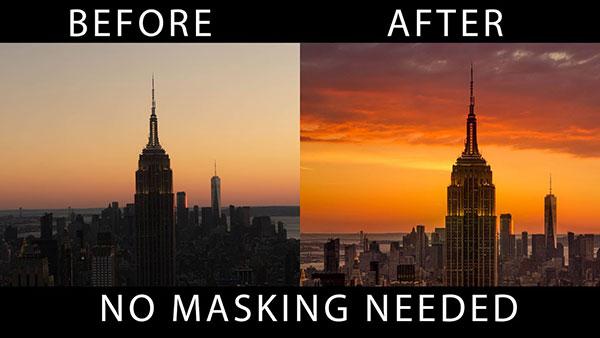
The way the sky looks can make or break or break a landscape or cityscape photo. If you have a boring sky, you will likely have a boring photo. An exciting sky, on the other hand, draws the viewer in and makes everything in your image look better.
If your image straight out of the camera has a dull sky, you can bring out its true colors and add drama to the shot in post-processing. One way, of course, is to use Photoshop. But Photoshop can be intimidating to some photographers which is why we like the tutorials from Serge Ramelli who shares easy tips and tricks on how to get the most out of this powerful editing program.
In the below video, Ramelli gives you three easy steps to change your sky in any version of Photoshop without having to use complicated masking techniques.
“In this video I want to show you how you can take this photo shot from the top of The Rock in New York and change it from this boring sky to this incredible sunset,” he says. “It’s my technique in three easy steps to replace skylines.”
Watch the video below and then visit Ramelli’s YouTube page for details on how to get the full sky replacement course from him.
“I have spent the last four years curating my best sky photos,” he explains. “All photos were taken with 40MP resolution cameras and are the highest quality you will find anywhere. This offer includes 14 training videos, 10 Photoshop Sky Brushes to easily and quickly add your own skies to any photo, 112 Ultra High Definition sky replacements along with all the source files referenced in the training videos so you can follow along.”
If you want an even easier way to replace a sky using software, watch this video from Anthony Morganti where shows you how to do it in Luminar 4 in just five seconds.


![]()
Get the Latest Photo Tips, News & Reviews from Shutterbug!
| Camera Reviews Other Reviews | Mobile Reviews Photography Reviews Columns | News | Features | How-To | Resources |
 © 2026 Shutterbug
AVTech Media Americas Inc., USA
All rights reserved