- REVIEWS
Camera Reviews 
More Reviews Mobile Reviews Photography Reviews - GALLERIES
- VIDEOS
- BUYER'S GUIDES
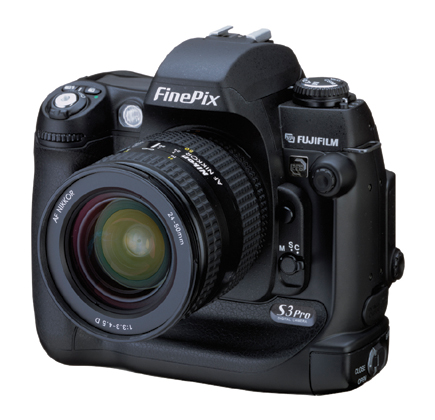
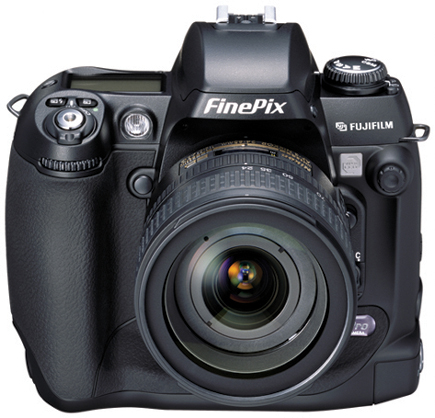
Fujifilm’s FinePix S3 Pro UVIR; An IR-Ready D-SLR
The fascination with infrared photography has been around for a long time. In olden days it required loading and unloading film in the dark and even keeping it safe in its canister prior to use, which these days can play havoc when taking it on planes as TSA officials have every right to open the canister for inspection. (Imagine explaining the need to keep the film in its canister in the dark with 100 harried travelers in line behind you.) More recently, photographers discovered the modification that can be made to digital SLRs that allows them to make infrared images to their heart's content, available from a number of companies who usually strip out the IR filter placed in front of normally IR-sensitive sensors. Now, with the recently released FinePix S3 Pro UVIR D-SLR ($1799 list) photographers have an out-of-the-box ready infrared camera that, with proper filtration, produces IR (and UV) images that match and exceed anything the High-Speed IR black and white film (still available from Kodak in 35mm format only) could deliver.
 |
 |
 |
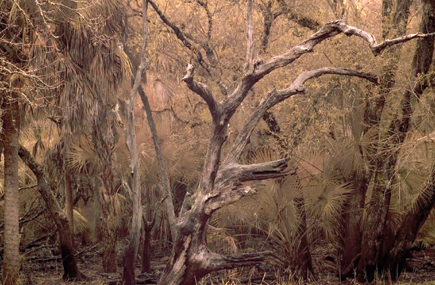
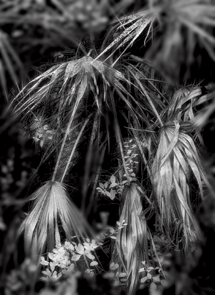
When I first heard about this camera we immediately thought it would be attractive
for fine art photographers who love the ethereal look of black and white IR
imaging. Color IR never attracted me; while it did produce weird effects, it
seemed more adept at scientific than artful images. But black and white IR has
its own character that's as unpredictable as it is seductive. Fujifilm
markets this camera chiefly to the scientific and particularly to the law enforcement
markets; indeed, it has proven more successful than they could have imagined
and production units are always in short supply. We considered ourselves lucky
to get one for a short test period.
The camera itself is the standard S3, reviewed in Shutterbug way back in May,
2005. (For the full text of that review by Steve Bedell go to the Shutterbug
website at www.shutterbug.com and type Fujifilm S3 Pro into the Search box.)
I won't belabor the specs as they are all available in that article. It
sports a Nikon lens mount and a 1.5x focal length factor. What Fujifilm did
was remove the IR and UV filter from in front of the sensor and replace it with
their specially formulated glass filter. They also added a Live Preview shooting
mode--available in Manual focusing mode that displays for 30 seconds. This
allows you to focus through the dark filters you might use to enhance the effect.
 |
|
|
Fujifilm claims that their "double photo diode" Super CCD SR II
sensor (6.17 megapixels for normal and 6.17 megapixels for higher sensitivity)
enhances the effects due to its high signal-to-noise ratio, which means less
"grain" and artifacts in lower-light shooting. Indeed, they found
that their Super CCD seemed quite adept when shooting within the UV and IR bands.
Filter Facts
When photographing with High-Speed IR film you have to use filters to get the
desired look. One choice is to shoot through a standard red filter (Wratten
#25) for working in most daylight situations. This blocks UV and blue light
and passes enough red light for visual focusing. If you just wanted deep IR
effects you have to use a near-opaque filter that blocks UV and visible radiation
and only lets IR light through, which means pre-focusing and then placing the
filter over the lens. In addition, there is no reliable ISO setting as meters
are not calibrated for IR, and the ratio of IR to visible light varies according
to the light source. The usual answer is to bracket or to run tests in typical
scenarios. You could start at about ISO 50 with a red filter or half that with
a denser filter. You also have to work with IR offset focusing, or stop down
as much as possible. Most photographers shoot at f/11 at 1/125 sec and bracket
(in daylight with a red filter).
Our tests were conducted with three IR filters, generously loaned to us by Hoya
(www.thkphoto.com) for
the duration of the shoot. We used the "standard" HMC red (about
$36 street); the R72 (about $85 street, for filtering out all light below 720
nanometers, the IR threshold); and their 90nm (a specialty filter more apt for
law enforcement purposes, which passes light above 900nm, about $360 street).
We also shot some "blanks" (no filter).
 |
|
|
Setup And Field Test
Before I started I went through a few setup procedures. Because I was only interested
in black and white IR I used the on-body Color control to switch to black and
white. I could have shot in color and then done the desaturation later, but
I wanted to see the effect in the field and not wait. I left the unique Dynamic
Range setting at Standard, as the image processor automatically suppresses the
ill effects of high-contrast scenes, endemic to IR. You might want to set it
to "Wide 2" as this sets the range to 400 percent on every shot.
I left the Sharpness at normal, subject to test, and used "ORG"
for Tone, which is lower than the standard contrast processing. I wanted to
try out the Film Simulation F1, suggested by Fujifilm for suppressing flaring
in flash highlights because I wanted to see how that would affect IR images;
this setting is usually used by portrait photographers working with this camera.
Note that once you do this, however, the Dynamic Range, Color, and Tone cannot
be changed, so that killed any chances of field review in black and white.
|
| |||||||||


![]()
Get the Latest Photo Tips, News & Reviews from Shutterbug!
| Camera Reviews Other Reviews | Mobile Reviews Photography Reviews Columns | News | Features | How-To | Resources |
 © 2026 Shutterbug
AVTech Media Americas Inc., USA
All rights reserved