- REVIEWS
Camera Reviews 
More Reviews Mobile Reviews Photography Reviews - GALLERIES
- VIDEOS
- BUYER'S GUIDES
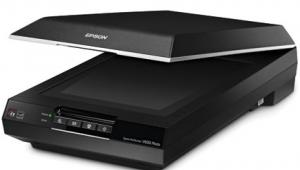
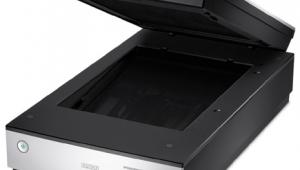
Epson Expression 12000XL Photo Scanner Review
Think of a scanner as an archivist and a digital recording device for both prints and film images. Next think of a scanner as a kind of large format copying device and even a camera. Now put those together and you’ll get an idea of what Epson’s new 12000XL scanner has to offer.
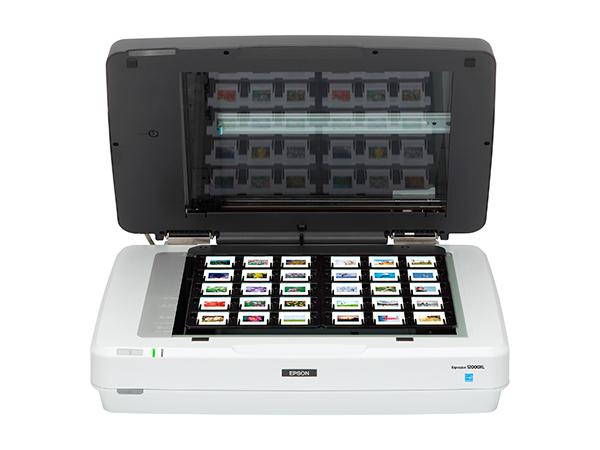
Capable of scanning images and objects up to 12.2x17.2 inches and batch scanning up to 30 (35mm) slides at a time, the Epson 12000XL is a pro-level tool that handles the “traditional” scanning tasks with ease and efficiency and opens the door to new forms of expression for artists and photographers alike.
Read what I think of it in this Epson 12000XL photo scanner review.
Footprint and Setup
Luckily I do my computer and image processing on a large farm table in my studio: this allowed me to make enough space for the Epson 12000XL’s 18x25-inch footprint. The scanner comes in two “parts,” a scanning module and a transparency unit, used for film and transparent images.
Those working solo should have a hand truck handy should the entire package be delivered to their door. Also included are two sets of film holders for slides and negatives (35mm, medium format, and 4x5), a positioning bar for proper placement of film holders, and LaserSoft’s SilverFast Ai software and IT8 targets (about $485 retail).
While physical setup instructions came in the package, full instructions and the Epson Scan 2 and SilverFast software must be downloaded from the Epson and LaserSoft websites, which is a good thing, as that way you’ll get the most recent software updates on both. Setup is easy: you place the scanning module down first, then lift and insert the transparency unit onto it via two long pins on the scanning base, download the software, follow the instructions and you’re set.
My test of the Epson 12000XL scanner included working with both Epson Scan 2 and LaserSoft SilverFast software. I scanned slides, negatives, and “common” prints, plus worked on “object” recording and, thanks to the large platen, making digital files from a print portfolio and drawings that would otherwise have to be handled with a copy stand setup.
Snapshots
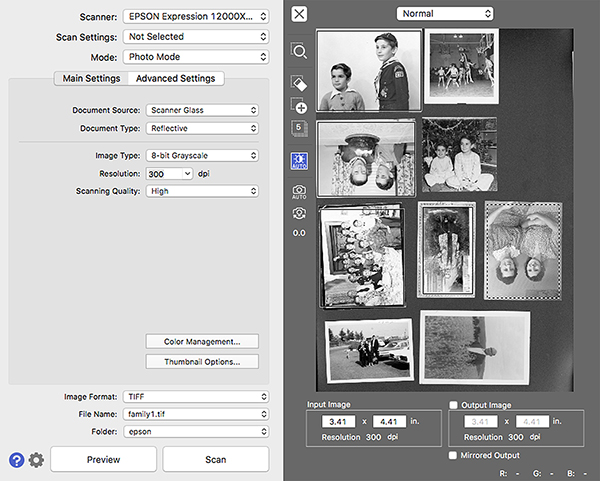
I started out laying a bunch of family snapshots in fairly haphazard fashion on the platen with the back reflective panel inserted into the transparency unit. I opened the Epson Scan 2 software and chose “Reflective,” “Scanner Glass,” and Photo mode, then made settings for dpi and quality. I worked in grayscale to help diminish the effects of discoloration due to the ravages of time: this helped reduce some “silvering” effects on very old or poorly washed prints, but it’s easy enough to retain sepia or cyanotype toning coloration as well by scanning in color.
Correction on individual snaps within the group is easy using sliders and a variety of tools. What is perhaps even better is the fact that you can work on each snap as an individual file. You do this by using a mouse to select the picture; this brings up a “marching ants” selection box around the image. You then hit the zoom tool in the workspace to bring it full size to make your corrections.
After that you hit the Scan button on the workspace (after naming and selecting the destination folder) and this saves that individual image to the folder. You can edit each image in this fashion and move onto the next prior to scanning as corrections on an individual image are saved.
Having a large platen means you can do a whole bunch of snaps, or postcards, or even collectible baseball cards at once quickly and easily. This is ideal for family archivists, historical societies, paper ephemera collectors and sellers, postage stamp dealers—you name it. The productivity potential of this unit is impressive. (See notes on batch scanning after each individual image edit later.)

Portfolio and Art Prints
I next exploited the Epson 12000XL’s large platen size to make digital files of artwork and prints in my portfolio and collection. This included pencil drawings, silkscreen prints, pastels and charcoals, paintings, and even inkjet prints of photographs. Previously, I had done this is in painstaking and laborious fashion using the old copy stand route.

Most of my inkjet prints are on 13x19-inch paper with a two-inch margin, so these fit the Epson 12000XL with no problem. I scanned some color and monochrome prints for the web and sample purposes at 150dpi and they were right on the money.
I then used the Epson 12000XL to scan some at 300dpi to see if they could be used as digital copies for printing, and am on the fence about that, but I suppose they would do if your original and/or processed files were lost. There’s no question that the quality is there for making web-ready images or a mailing piece for shows directly from prints in your portfolio; the same goes for making excellent copies of larger archive images held by historical societies and the like.
I have been doing some charcoals and pastels from photographs of late and wanted to scan those with the Epson 12000XL as well. However, it is not a good idea to place such material directly on the platen, so I placed an oversized piece of clear acetate over the platen prior to placement. This necessarily softens the resultant image a bit but this can be overcome by sharpening.
Film Scans
When it comes to film scans you have two software route options—the Epson Scan 2 or the dedicated LaserSoft SilverFast—and for me the choice came down to whether the film was color negative, black and white, or color slide. There’s no question that the SilverFast software is more comprehensive and thus a bit more complicated, but kudos to Epson for what I consider a marked improvement in their own software’s ease of use and resultant quality. I found in my tests that if the film image was problematic, especially when the inevitable ravages of time and poor storage had taken their toll, the SilverFast processes were a better option.

The Epson 12000XL scanner comes with double sets of strip and slide mount holders for 35mm, medium format, and 4x5 film; those with larger format film can simply lay it flat on the platen. The benefits of this large platen come into play here: you can load and scan 30 35mm slides or eight strips of 35mm negs, six strips of medium format, and eight sheets of 4x5 at a time.
While the workflow is necessarily different for the two software apps, with SilverFast offering many more nuanced edit options and controls, the approach is essentially the same. After loading the film emulsion up (the matte side of the film) you place the holders using the film guide on the platen, close the Epson 12000X’s lid, and hit Prescan. This brings up all the images as thumbnails on your screen (a larger monitor helps here).
You then select one image with the mouse and click on the zoom button in the workspace, which enlarges it so you can see what effect your edits produce. You then choose dpi, resolution, scan folder destination, and make your contrast, color, density choices, etc.

(Note: My scanning approach is to “do no harm” and to produce as “neutral” and true a copy as possible. Yes, faded slides and thin or thick (density) negatives need more editorializing than the hopefully more common “good” images, but in truth every image needs some tweaking. I avoid getting too expressive in my edits as this hard boils the changes into the scan and allows less leeway when I finalize processing later in Photoshop, Lightroom, or whatever.)
Now, about that batch scanning capability in SilverFast, which is where the true productivity gains of this large format scanner come into play. My approach is to make my prescan and then work on individual images, moving through the thumbnails one by one. (When working on filmstrips you will be more selective than handpicked mounted slides.) Once that’s done in SilverFast I select Batch Scan from the drop-down menu and the Epson 12000XL gets to work scanning one after the other of my selected images and their edits, a time I use to get my next set of image selections ready or tend to other matters.
Conclusion
At a retail price of $3,429, there’s no question the Epson 12000XL scanner is aimed at pro photographers, working artists, clubs, historical societies, archivists, and even well-heeled amateurs who have a lifetime of film and prints they want to protect and save in digital format. There’s a bit of a learning curve for anyone who has not scanned before, but it is not steep or formidable. The large platen and ease of workflow make it a multifunctional device for a large range of images of various formats and sizes on both paper and film. It is highly productive in terms of workflow and output, and produces scans of rich and usable quality, especially with problematic images that need some help in terms of color balance, density, and even surface defects.
Scanning is undoubtedly a task, and taking it up requires dedication, patience, and a certain degree of fortitude. But like any task, having the right tool makes it a much easier and more pleasant undertaking. In my time with the Epson Expression 12000XL I found it up to the challenge in handling a wide range of images with a flexible and productive workflow that delivered some of the best scans I have ever made.
- Log in or register to post comments


![]()
Get the Latest Photo Tips, News & Reviews from Shutterbug!
| Camera Reviews Other Reviews | Mobile Reviews Photography Reviews Columns | News | Features | How-To | Resources |
 © 2025 Shutterbug
AVTech Media Americas Inc., USA
All rights reserved