Epson’s Stylus Photo R380; Letter-Size Inkjet Prints On CD/DVDs, Too
There are lots of letter-size inkjet printers on the market, but you'd be hard-pressed to find one with this much functionality and at a price of $129.
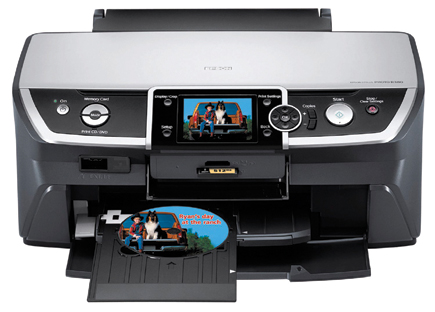 |
Epson's Stylus Photo R380: Key Features At A Glance
· Dye-based, letter-size inkjet printer
· Six ink colors in individual tanks
· CD/DVD printing on pre-labeled media
· Card reader/writer
· Hi-Speed USB 2.0 port to Mac or Windows PC
· Prints from memory card sans computer
· 3.5" color LCD
· Archival printing when using Claria Hi-Definition inks on Epson paper
· $129
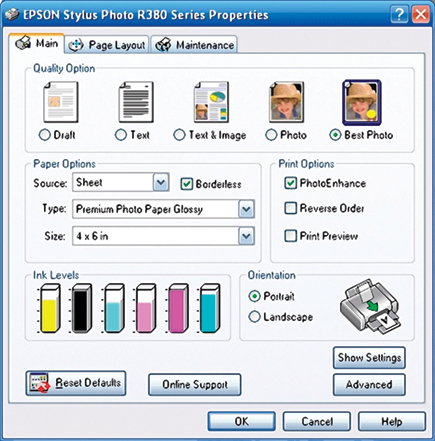
PhotoEnhance
Epson explains PhotoEnhance as follows: "This setting is best for printing images captured using a video camera, digital camera, or scanner. The Epson PhotoEnhance feature produces sharper images and more vivid colors by automatically adjusting the contrast, saturation, and brightness of the original image data. When you check this box, additional settings appear under the Color Management options."
Printing may also take longer with this feature selected. The one problem is that making your own contrast, saturation, and brightness adjustments on the printer, as well as from the driver software (when printing from computer), may work at cross purposes with PhotoEnhance. Before committing to 8x10 or multiple printing on photo papers, make a test print on 4x6 media of the same type (glossy, matte, etc.) to preview the results and avoid costly surprises.
Together with the new print heads and printing technology that were incorporated in Epson's latest printers, the new Claria Hi-Definition inks make a marked difference--specifically when compared to older Epson printing technologies. For starters, with this printer head alignment is no longer a first step, although it's always a good idea when first installing or replacing ink tanks to ensure trouble-free printing. The R380 has operated smoothly, and the only time I performed a head cleaning was not for the obvious reasons but with regard to a problem I uncovered.
The dye-based inkset consists of six colors in individually dedicated tanks (black, cyan, magenta, yellow, light cyan, and light magenta--the last two are the equivalent of photo cyan and photo magenta in other inksets). The inks are available in fairly economical standard and even more economical high-density tanks. Sure, we'd like to have more colors, but keep in mind that the more colors, the more ink tanks you need to buy and stock. Moreover, that really only makes a difference on wide-format printers, where you'd like to see all the time and expense pay off in large prints of unmatched quality.
The Epson Claria inks themselves were designed to be long-lasting. Beyond fade resistance, they offer smudge, water, and scratch resistance. Aside from that, the new DX5 technology incorporated in the new series of printers allows the MicroPiezo print head to deliver up to five droplet sizes, down to 1.5 picoliters. That is designed to produce a smooth look, with improved tonal gradation and better tonal quality overall--in other words, making it look even more like a true photographic print.
Memory Card Printing
Printing from memory cards is fairly easy, from JPEG or TIFF, via the built-in slots. The printer supports the following cards in their various incarnations: CompactFlash, Microdrive, Secure Digital, Memory Stick, and xD-Picture Card.
|
Printer Status Monitor
|
|
 |
|
|
The on-board settings give you lots of control for making global corrections to the image prior to printing (you can't make settings separately for each picture and then batch print). At the touch of a button an array of adjustments are offered for brightness, contrast, sharpness, and saturation. PhotoEnhance is also an option. Regrettably, the printer's LCD screen doesn't offer a corrected preview, so you're essentially working in the dark when making these changes. User cropping, however, is reflected on screen.
|
Basic Printer Settings
|
|
 |
|
|
Windows users get the free ArcSoft PhotoImpression software that lets you tackle redeye, but both Windows and Mac enthusiasts can always use Photoshop or other software for this purpose. But you don't even have to take that route: the printer gives you redeye reduction as an on-board option when printing from memory cards. Simply select it with the push of a button from the menu screen, along with the other settings mentioned.
|
Advanced Printer Settings
|
|
 |
|
|
The Output Tells All
As a dye-based inkjet printer, the R380 is optimized to print on glossy and matte photo papers, along with such specialty papers as iron-on transfers and transparency film. Only pigment-ink printers, such as Epson's own UltraChrome K3 machines, will do justice to fine art media.
I tried printing both from memory card and from my computer (Intel-based iMac as well as Windows PC, from which the sample prints were made) on glossy photo stock. In the past, I could easily see a difference between prints made from which source--card or computer, with computer output usually coming out on top. Not so now.
Printing a glossy photo from the computer seemed to be more involved and time-consuming than simply making selections from the printer's menu screen--and less fun. In the past, I'd shunned memory card printing. With the R380, it's something I now relish. From my PC the best-quality output on 4x6 took over 3 minutes, compared with printing from memory card using similar settings, which took just over 2 minutes. And were the overall results any better for all that effort? Engaging PhotoEnhance in both situations, output was practically indistinguishable, with one noteworthy exception.
|
Scenic View: Curacao--4x6 & 8x10 Prints
|
||
 |
 |
|
|
||
One of the key benefits when printing from the R380 itself is true borderless printing on borderless papers--without wasting paper on test prints. Yes, the printer did do some cropping on its own to fit the paper, but nothing egregious. Producing what I hoped would be a borderless 4x6 print from my computer resulted in borders top and bottom or left and right, depending on orientation. So the R380 wins when it comes to printing borderless.

